A blog for cooking and crafts

Showing posts with label Blogtober 2015. Show all posts

Saturday, 31 October 2015

Magnificent Seven layout

My last post for Blogtober :-)  At the moment I am at the ATDML retreat, so it seems appropriate to post a layout using a photo from a previous retreat, April 2014.  This is actually one of my many almost-done layouts which are languishing in my albums, in need of title and /or journaling.  This one actually only needed the title!


I cut the title with Memory Box 'Alphabet Soup', using Stick It as the letters are quite small and fiddly.  The papers are from Marian Smith.

So that's Blogtober over and done with ... for this year....  I have enjoyed it, though it has got a bit stressy toward the very end, but next time I can be more prepared for that.  I have tried several new ideas and made good use of my Pinterest board - also I have managed to use new stash as it comes in and have pulled quite a lot of things out of the drawer.  I even took part in some challenges and I must try and do more of that, going forward.  Roll on next year :-)

Friday, 30 October 2015

Three Happy Scrappers

A few years ago, Karen, Sy and I scrapped the same photo of the three of us and we thought it would be a nice idea to do the same thing for Blogtober and post it on the same day.  Karen's layout is here and Sy's is here.


The background paper is, I think, from Studio Light and I found two journalling cards and some toning patterned papers from an old class kit.  The large doily is Silhouette cut and the clock, gears, borders, butterfly and title are all die-cut.
This page is probably unique, since it deliberately includes a flower, something I never do ...... LOL.  That's because the gears are for me, the butterfly is for Karen and the flower is for Sy :-)

Thursday, 29 October 2015

Out of the Drawer - Cards from the UFO box

I have found it a little difficult over the last few days, to combine Blogtober with prepping for the retreat :-)  I have today off work, so for today's post I have taken two half-made cards from the UFO box and completed those LOL.
Both cards had a matted piece of patterned paper from a 6" paper pad and that was it. I stamped and embossed a large sentiment from Woodware in two different colours, matted those and attached to the prepped bases.  It took longer than it should have, I couldn't seem to get a decent embossed image, think I might be feeling a little stressed!


The OotD items are the card bases and the embossing powders - the orange is American Crafts 'Apricot', not previously used, and the purple is Stampendous 'Metallic Purple'  which I may have used once before but am not quite sure LOL.
I must dig further into that UFO card box - there were some in there I had forgotten about and now have ideas for..... :-)

Wednesday, 28 October 2015

Embossed, inked, panelled card - Pinterest challenge four of four

This is the final one of Sy's Pinterest challenge for this month.  She did ask at the start, what happens if she picks one of my Pins which I have done before and I said that's fine, I can always do it again, but differently.  So yes, I have done this one before, but it's worth doing again, I love the split panel layout.  The original Pin is here.
This is my take on it:

I took some cardstock which I had previously embossed with a folder and smoosh-inked, cut it into panels and arranged those on a mat.  I think the embossing folder is from Taylored Expressions. 
I wanted to keep it quite uncluttered as I love the elegant simplicity of the four panels and didn't want to cover them up too much.  So I die-cut a Dienamics twirly circle for a sentiment mat, stamped & heat embossed a sentiment (Stamping all Day) in a Wow embossing powder, a lovely colour called Paprika. Then I punched it out into a circle and attached to the mat, and put the whole thing onto the card with some 2mm foam pads.
Really like this one - will definitely use the design again!

Tuesday, 27 October 2015

Beat the Christmas Rush - October

Is this a first?  Completing Krafty Karen's BtCR challenge in the same month it goes live???  LOL.
I have gone for white and silver for these and used new stash to boot :-)


The stamps and embossing folder are new - stamps from Stampin' Up and folder from Crafter's Companion.  I embossed some Bazzill Bling in Diamond and stamped/heat embossed the snowflakes and sentiment in silver.  Then it was a case of cutting to size, cutting mirri mats and putting them all together - four times :-)


I like this simple central square layout, and I think I will try this particular design again, maybe in aqua ...... :-)

Monday, 26 October 2015

Retreat Preparation

Yesterday I started printing out photos for next weekend's ATDML retreat.  Most of them will be for pocket pages, but I covered the dining table and the top of my printer ......


...... I haven't finished yet :-)

Sunday, 25 October 2015

Autumn at Wakehurst Place

A very early start this morning - Wakehurst Place were opening at 6:30 am for season ticket holders, so we could enjoy seeing all the trees in the early Autumn morning mists.  So we set the alarm to 6:00 am - unfortunately the clocks went back last night and the mist was already burning off!  So we didn't get any 'misty ' photos ..... but early morning sun on Autumn foliage is just as good :-)


We had a full English breakfast at the end of our wander, which was lovely, then looked for Christmas presents in the shop.  Sadly it was an hour and a half before they were able to open (Sunday trading laws) so we made a note of what we wanted and will go back in a few weeks.
All in all, worth the early start .... and we have 250+ photos to prove it!

Saturday, 24 October 2015

Winged Clock on distress inked & embossed background

Today's card has been half done for a couple or three months!  I had embossed some cardstock, with various embossing folders, then experimented with blending distress inks over them.  I attached this panel to the card blank and then left it until I could think of how to finish it off :-)


For the second background panel, I smooshed distress inks in the same colours as far as I could remember them, luckily I hadn't strayed very far from my normal palette!  Then I over-stamped with a marble background, cut to size and inked the edges.
The clock face was part of a sheet of die-cuts in a 6" paper pad, either Bo Bunny or Kaisercraft and I had already put it with the wings, which were my experimental cut of a Cheery Lynn die.  I was looking through my die folder for the banner tags I used the other day for the white on white card, came across the large clock die (Robert Adams) and thought - that's it!  The small clock needed a mat as it was a little too small to fill the large clock centre, so I used a Dienamics twirly edge die for that ... I'm sure it has a proper name, but I can't think of it!
I really like this one and I must get that large clock die out again, it cuts beautifully and looks great :-)

Friday, 23 October 2015

Chocolate Wine

Last Christmas Sy bought me a mysterious bottle ...... chocolate wine!  It's a mix of fortified red wine and chocolate :-)


Now I have to admit that I was a bit dubious about this because I don't like thick liqueurs, like Baileys.  So it has taken me a while to pluck up the courage to try it.  But I have to tell you that it is gorgeous!!!  Not thick and claggy as I imagined, at all :-)  It tastes like cherry liqueur chocolates, but without that almond-y taste, in fact it reminds me of the Christmas cherry liqueur chocs stocked by Lidl .... must go and see if they have some this year.
It's all gone now ..... so Sy, if you see another one this year ........ :-)

Thursday, 22 October 2015

Festival of Trees

I finished this layout at the ATDML retreat in April, but I am fairly sure that I have never blogged it ...... do correct me if I am wrong!  It's a simple layout, but one of my favourites :-)
Every year, one of our local churches stages a Festival of Trees, inviting local businesses and organisations to decorate a Christmas tree and display it in the church.  There were over 150 trees last year, it was an amazing sight. 


All the trees were beautiful, but the one which stood out for me was the Remembrance Tree, covered with poppies to remember those fallen in war.

Wednesday, 21 October 2015

White on White, Pinterest challenge third of four

Sy picked four Pins for me at the beginning of the month ... challenges 1 and 2 are here and here.
This is the original Pin and here is my take on it:


I think that the original card must have been perhaps 7 x 5, but I don't have any that size, so I adapted it to fit an A6 card blank.  It also uses patterned paper strips, but I thought I would use white, with the strips embossed with different patterns.
I cut a white base and embossed some strips in five different designs.... six would have been better, but I persevered.  When I was happy with the arrangement, I stuck them all down, overlapping the base edge, then trimmed off the excess.  I cut a mirri mat and die-cut a banner (die from Dienamics) in mirri and a smaller one in white.  A peel off sentiment completes the card.
I am pleased with it, but the placement of white on white was quite difficult as it's hard to see!  I think I might try it again at some point, but would probably try the larger size and definitely use patterned paper :-)

Tuesday, 20 October 2015

Less is More challenge - Masculine

The theme for this week's Less is More challenge is 'Masculine' and I thought I would have a go.
The main idea for this card is the inlay technique which Sy and I brainstormed between us last craft day.  She will have a video tutorial up soon, I will add the link when that happens.  We picked out a border die and thought we could cut it out in plain cardstock, then cut another one in patterned paper and keep all the pieces which would normally be waste.  Then combine the two!


I didn't use patterned paper in the end, I inked up a sheet of cardstock by swiping inkpads across it, then die-cut from that.  Then I placed the border and the stamp, but thought it needed more..... so I applied the same technique to some die-cut gears .... very fiddly, but I think they look good!

Sunday, 18 October 2015

Freezer cooking weekend, part 2

A postscript to yesterday's session - you remember that I mentioned DH was making pizza?  Well he made four bases instead of two, so we topped and froze the two spare ones!
Pizza:

So today, I had three things to make.  I made a slow cooker chicken chorizo stew, a bolognese sauce for pasta and two suet rolls - these were both supposed to be frozen raw, to be cooked after thawing, but we had one for tea tonight as for some strange reason I didn't feel like cooking anymore!  In between, I made bread for the coming week.
Chicken Chorizo stew:

Bolognese:

Suet roll (cooked):

Bread:

It's been quite a productive weekend :-) Tiring, but I made sure to pace myself properly and not stand up too long on my bad feet!

Saturday, 17 October 2015

Freezer cooking weekend, part 1

I mentioned the other day that I had defrosted my big chest freezer.  This weekend I am filling it back up!
I got a head start on Friday evening, when I cooked an extra large chicken curry for tea and froze the extra portions, then I prepped a slow cooker beef curry and switched it on just before I went to bed.  This morning, I got up early (6:30!!), switched off the slow cooker, put the pot on the draining board to cool .... then went back to bed!
Slow cooker beef curry:


Chicken curry:


DH helped me clear the kitchen - I should mention that he has helped throughout, chopping onions etc! - then I went out to post a parcel and get a few remaining ingredients.  The next thing was to cook up a batch of mixed pulses, to freeze in small bags ready for adding to stews etc straight from frozen.  No photo of those, well they are just boring pulses LOL.  Whilst they were cooking I prepped the marinated chicken.  This is so simple, put freezer bags (I use Lakeland No.4 for three chicken breast fillets) in a plastic box so they stay reasonably upright when filled. Then put the chicken pieces in the bags and pour your chosen marinade all over them, smooshing the bag around so that all the meat is covered, leave bag unsealed to allow for expansion of the liquid whilst freezing.  I use bottled marinades for speed, one bottle will do 3 or 4 pieces - note I have popped labels into the boxes, to use when the chicken has frozen through and the bag is sealed.  When I want to cook one for an evening meal, I take out of the freezer in the morning as it needs the day to defrost.  Tip chicken and marinade into a Pyrex or similar dish and bake in the oven at Gas 6 / 200C until the chicken is cooked through, 30 - 40 minutes.
Chicken in marinades, various:


The final meal to cook today was chilli.  Easy one this, fry off onions, celery, chopped chillies and mince.  Add oregano, beef stock cube, chilli powder and paprika.  Then a good glug of red wine, tinned tomatoes, kidney and haricot beans and diced peppers.  Adjust quantities to suit the amount of mince, I had a large 750g pack so used two tins of tomatoes.

Chilli:

That's it for today.... well, apart from pizza - DH is just mixing up the dough as I type :-)  Part 2 tomorrow!


Friday, 16 October 2015

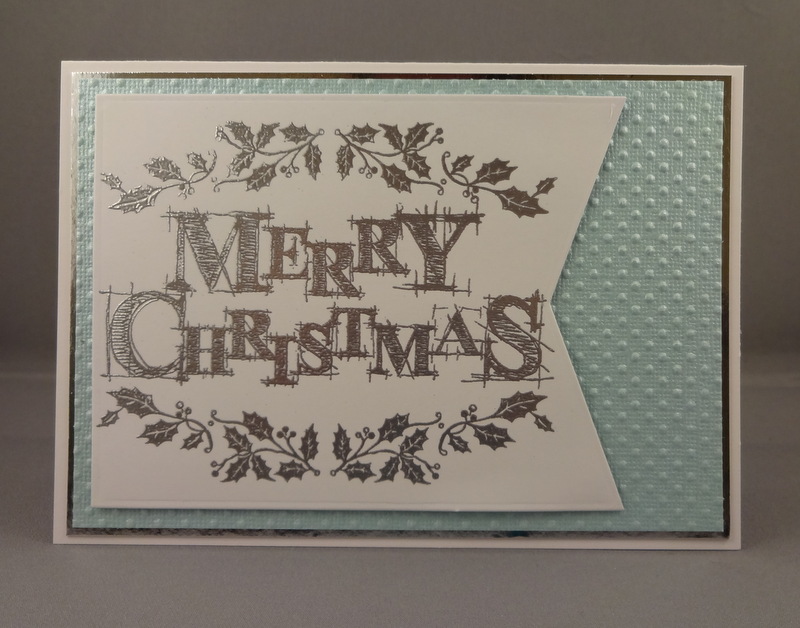
Out of the Drawer - aqua/silver/white Christmas cards

A bit late with my Blogtober post for today, but here it is!

The OotD item is this Indigo Blu 'Merry Christmas' stamp, which I bought last year and never used. 


I stamped and embossed with silver detail powder, then tried two different dies to cut out the image - a Nestie Grand Labels Four and a fishtail banner die from Dienamics.  The aqua background was embossed with a small dots embossing folder from Couture Creations.  I matted with some more of the freebie-from-work mirri card. I am getting to quite like it, what will I do when I run out of my freebie sample???  Buy some more... oh dear....
The silver is, as ever, difficult to photograph and is much more silver IRL.

Thursday, 15 October 2015

Throwback Thursday - White Easter

For Throwback Thursday, I thought I would share the only layout I have ever submitted to a magazine (it didn't get featured though!).


It's from 2008, I still rather like it - though I do remember that the silver mesh was a devil to stick down!

Wednesday, 14 October 2015

10 minute slow cooker lamb - easy!

Note for Karen: substitute beef every time you see the word lamb LOL.

I had a day off on Monday and spent part of it defrosting my big chest freezer.  It's taken us a while to eat right to the bottom of it, but after taking out The Last Turkey for DS1's visit over the weekend, there was finally little enough left so that I could cram it into the upright kitchen freezer and get going on the defrost.  This means a weekend or two will be spent freezer cooking, to fill it up with meals again :-)
I had taken two small leg joints of lamb out, they had been in there for a while because I love lamb and DH doesn't.  So the freezer cooking kicks off with the easiest slow-cooked lamb ever, slicing when cold and freezing them in the gravy for me to have when I like :-)
First, put into the slow cooker the following: garlic bulb, cut in half, onion cut in half, both of these unpeeled.  Add some celery sticks, snapped in half.  Then some carrot, unpeeled but cut in half if they are large - I didn't have any whole carrots, so put some sticks in which hadn't been used for the weekend roast.  Nothing needs to be prepped, because all the chunky stuff will be strained off later.
Add whatever herbs you wish, I have bay leaves, rosemary and lemon thyme from the garden.


Next the dry seasonings go in.  Paprika, dried thyme, two beef stock cubes, a scattering of black peppercorns.  Then a good glug, a glassful at least, of red wine and about 3 tablespoons of tomato puree - I don't measure, just put in a huge dollop LOL.  Stir together, lay the lamb joints on top.


Now for the water (cold), put in enough to almost cover the joints.  Swish the liquid around the joints a bit so the water mixes with the rest, but leave the joints on their vegetable bed as far as possible.


That's it.  I promise you it took me ten minutes to put together, including stepping outside the back door to snip the herbs.  It's now around 10pm and I will switch the slow cooker on at 10:30 before I go to bed.  Eight hours on low overnight will result in the most wonderfully cooked lamb.


This morning: lift the lamb out carefully, it will be almost falling apart, place in a dish to cool down.


  Place a sieve over a bowl and carefully pour the hot cooking liquid through it.  Discard all the chunky bits.  I then de-fat the liquid in one of those special jugs made for the purpose, but if you leave it to go cold the fat will rise to the top anyway and you can just lift it off when solidified.
I will slice the cooled lamb and either freeze it in some of the liquid, or serve today with the liquid thickened with cornflour for gravy.  Don't freeze the thickened gravy, as cornflour based sauces can misbehave when frozen and be strange when thawed.  It's easy enough to thicken the liquid you froze it in, at serving time.  There should also be enough leftover liquid to freeze as a base for a later soup.
This method makes the lamb much less greasy to eat and beautifully tender.  You can also do exactly the same with a beef joint, I usually sear those first but you don't have to.
Yummy :-)

Tuesday, 13 October 2015

Faux marquetry - Pinterest Challenge, second of four !

It's back to Sy's Pinterest challenge, she picked out four of my Pins to do over the month.  The first one is here.
The original Pin for today's card is here.
Here is my take on it:


First I used mini distress inkpads to colour a sheet of SU Very Vanilla, just swiping in rough stripes, and die cut the poppies (Memory box) out of it.  I wanted to do a stamped wood grain background and I think I may have finally found a way to use my unloved SU cardstock 'Crumbcake'  that I actually like!  First I smooshed over with Tea Dye distress ink and over stamped with the SU Hardwood stamp.  It needed a bit more warmth, so I smooshed Fossilised Amber DI over it and cut to size.
Then I die cut the poppies again from the hardwood background, being careful not to lose any of the pieces which would normally be 'waste'.  I cut a dark brown mat to size and then a piece of Stick It adhesive sheet to just smaller than the background, applied this carefully to the mat.
Very carefully ..... I stuck the background onto the Stick It, inlaid the inky poppy die cut and then put all the background 'waste' pieces back in. The sentiment stamp is from Lili of the Valley.
I am really pleased with this one, it's a lovely effect.

Monday, 12 October 2015

Autumn leaves birthday card

This is the first card I made for the Less is More challenge, before re-reading the rules :-)  A simple stamped image, centrally matted onto a large card blank to leave a wide border.  Simple and effective, my favourite kind LOL.


I have been meaning to do the Sheltering tree (SU) in autumn colours ever since I bought it and I really like the way it has turned out.  The sentiment is from Personal Expressions, I have been using the set a lot lately because I lost my folder which holds most of my sentiment stamps!!!  Luckily, I had a few other sentiment sets stashed in a different box, I had forgotten about this one and it has some really useful tiny sentiments, so I am pleased that I re-discovered it.  The main folder has now been found, hiding in plain sight on a shelf :-)
This is destined for a work colleague with an Autumn birthday!

Sunday, 11 October 2015

Steampunk angel times three

A third of the way through Blogtober already!
Some more smooshy backgrounds today, well three of them to be precise, each more or less the same or as near as I could get!  I wanted to experiment with different inks on the Steampunk Angel stamp from the same Viva Décor set as the Santa airship sleigh I featured the other day.  They are silicon stamps rather than polymer and can be difficult to ink up.
So having made the backgrounds with smooshed distress inks and a background stamp from Lili of the Valley, I stamped each one with the angel and the phrase, also a sentiment from Personal Impressions.


From left to right:
Distress ink, in Aged Mahogany
Versafine, in Crimson Red
Wendy Vecchi archival ink, in Plum

Of the three, the versafine has picked up the detail best, though it is a lot paler than I anticipated, I think perhaps it needs replacing!  The archival ink comes a close second and the distress ink is a little ...... well ...... distressed :-)  Which is to be expected and it's not a bad result for this kind of collage.  Incidentally the sentiment stamp comes out well in all three, because it is polymer, not silicon.
I am now wishing I had made them as Christmas cards rather than birthday, as I don't know how I can get rid of give away so many of such a specialised theme card!!