A blog for cooking and crafts

Showing posts with label double gatefold cards. Show all posts

Monday, 2 September 2019

Beat the Christmas Rush - August 2019

These cards have taken a while to come to fruition ..... I actually started them in January, by making the double gate-fold card blanks and adding the paper panels using old freebie magazine papers.  And there I was stuck!
I bought the sentiment stamp from Inkylicious a while later and realised it was perfectly sized for the inner panel.  So I stamped / heat embossed five images in colours to match the papers, then die-cut using a stitched square.  It turned out that the red didn't match one of the papers as well as I had thought it would, so that square was put aside.  When I went back to it, I used gold instead, but couldn't be bothered to dig out the die again, so used a circle punch.
There seemed to be something missing, the cards needed some detail on the front panels, so I put them aside (again!) waiting for inspiration.  Eventually I decided on some SU snowflake stamps, stamped /heat embossed those and used their matching punches to cut out.  It's a little difficult to see in the photo, but the snowflakes run under the image on the inside panel, as well as on the front.


They have turned out rather well (eventually!) and I actually prefer the circle inside the card to the squares, so that's something to remember for next time!

Monday, 17 April 2017

Out of the Drawer: Double gatefold birthday card

I forgot I hadn't blogged this, it's Sy's birthday card!


I made a double gatefold card blank and used papers from a 6" pad to make the panels.  The medallions are made with an SU set, Daydream Medallions, heat embossed in purple and teal, then die-cut with a pierced circle.  The sentiment banner is also a pierced die, SU sentiment heat embossed again with the purple.
The paper, stamps and the embossing powders are all OotD items - I really must use my embossing powders more often, I have so many (whisper it, around 90......) and I do like the effect.  I think that because I do most of my crafting at crops or retreats, I don't tend to take a heat gun etc with me, so that's probably why they have fallen by the wayside.  Must do better!!

Monday, 31 October 2016

Blogtober 14

The final post of Blogtober, a little later than normal, but I have the excuse of recovering from the ADTML retreat!  I managed 8 complete layouts and some cards, which I am very pleased with.
Today's post is a tutorial for the double gatefold cards (which I mistakenly called waterfall cards in a previous post).  The instructions were given to me by Nicky, a SU demonstrator who runs workshops in Chailey, East Sussex, contact her on nickyalevy@btinternet.com if you would like to come along.

Take a 12" x 12" sheet of cardstock and cut in half to make two strips 6" x 12".


Then score each one at 2", 4", 8" and 10".


Mark each short side of each scored strip at the central 3" point with a small pencil dot.  There are two variations from this point: cut to the 3" mark from either the top of the 2" and 10" score-lines, or from the top of the 4" and 8" score-lines.


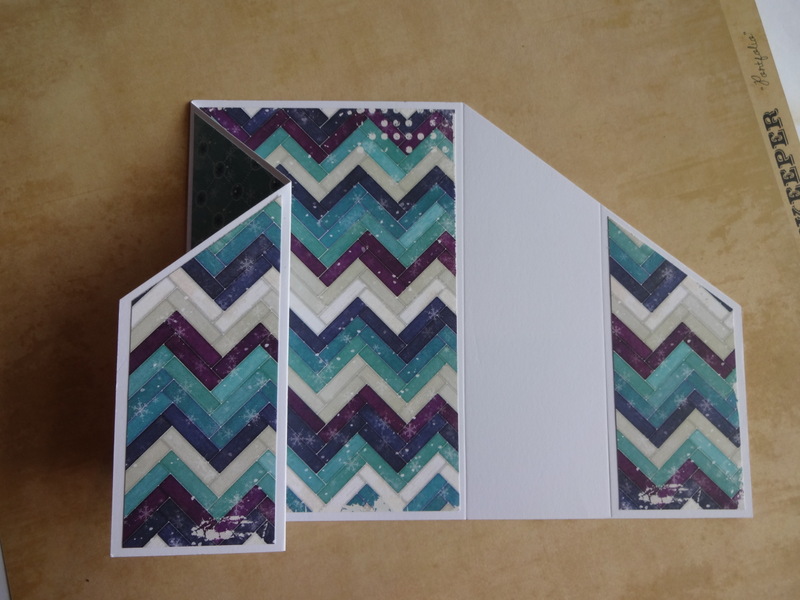
Decide which is the front of your card (the back is for writing on!) and cut panels to fit the front of the card as shown below - I have only done one variation, but the principle is the same for both.


Then cut panels for the back as below.


Now fold the side panel towards the centre, from the 4" score-line as shown.


Then fold from the 2" score-line back out towards the side of the card.


Repeat for the other side of the card.


Stamp an image for the inside panel and a sentiment tag for the front and attach them - the tag only needs to be stuck to the left hand panel!!


And there it is done!  It is actually easier to stick the inner image before folding it, but this is the way I did it at the retreat because I was concentrating on getting the photos of the folds!!  You can do all sort of things with these cards, you could have die-cuts on the front panels and the image/sentiment on the inside, for instance.  These are the others I made, the other variation is also shown.


This is definitely going to become a staple design in my card-making.  For someone like me who doesn't 'do' paper engineering, these are marvellously simple to make :-)

So, at the end of Blogtober, how have I done?  Well, I have achieved my goal of posting three times a a week, sometimes it has been a case of a late night spent making an item for the next day's post, but mostly I have been quite organised and made ahead LOL.  I need to keep it up now, perhaps two or three posts a week :-)  I have to admit though, I am just a little bit Christmas-carded out ......!!

Wednesday, 12 October 2016

Blogtober 6

Today I am sharing a new-to-me technique.   Stampin' Up demonstrator Nicky holds a workshop every month in Chailey village hall in East Sussex, where everyone can sit and craft to their hearts content and she always has a demo for us all.  If you would like to come along please contact her: nickyalevy@btinternet.com 
I actually missed the workshop where she demo'ed these cards, but she very kindly sent me the instructions :-)  I think the correct name for them is 'waterfall cards' and they are very easy to make, at the end of Blogtober I will do a step by step photo guide, but I am typing this in a bit of a rush!
EDIT: These are not waterfall cards at all, they are double gatefold cards.  My mistake, not Nicky's, she didn't give them a name.  Sorry!!


The papers are from Simple Stories, I used a 6 x 6 paper pad, it turns out that four sheets in two different designs will do two cards, so I will be going through my 6" papers with a view to making more of these.  The back is left blank to write on :-)
The circular snowflake stamp on the inner panel is an old one from, I think, Hero Arts and the sentiment is from Hobby Art.  I stamped/embossed in gold and die cut both with a stitched edge die, it gives them a finished edge without using a mat - which I would have preferred, but the circle was exactly the right size and a mat would have made it too large.  The snowflakes are done with a Martha Stewart punch.
I really like these, will definitely be making more, in fact I have made a few bases with different papers already, they just need finishing off and will appear later in Blogtober!
For full Blogtober details, hop over to Karmacraft.