A blog for cooking and crafts

Showing posts with label Christmas. Show all posts

Friday, 23 October 2015

Chocolate Wine

Last Christmas Sy bought me a mysterious bottle ...... chocolate wine!  It's a mix of fortified red wine and chocolate :-)


Now I have to admit that I was a bit dubious about this because I don't like thick liqueurs, like Baileys.  So it has taken me a while to pluck up the courage to try it.  But I have to tell you that it is gorgeous!!!  Not thick and claggy as I imagined, at all :-)  It tastes like cherry liqueur chocolates, but without that almond-y taste, in fact it reminds me of the Christmas cherry liqueur chocs stocked by Lidl .... must go and see if they have some this year.
It's all gone now ..... so Sy, if you see another one this year ........ :-)

Thursday, 22 October 2015

Festival of Trees

I finished this layout at the ATDML retreat in April, but I am fairly sure that I have never blogged it ...... do correct me if I am wrong!  It's a simple layout, but one of my favourites :-)
Every year, one of our local churches stages a Festival of Trees, inviting local businesses and organisations to decorate a Christmas tree and display it in the church.  There were over 150 trees last year, it was an amazing sight. 


All the trees were beautiful, but the one which stood out for me was the Remembrance Tree, covered with poppies to remember those fallen in war.

Friday, 16 January 2015

Cross stitch in Progress 4

As you can see, I didn't get it finished for Christmas!  I must admit, now I no longer have a deadline, my motivation has decreased a bit and I am now heartily fed up with it!


The seven trees are now done, complete with all their snow, so all I have left is the snowy ground beneath them and the snowflakes which surround them.  The ground is half cross stitch and will be quite quick to do, I have made a start on that, which you can just about see, the light is awful for photos at the moment!
It will definitely be done by next Christmas, honest.......

Wednesday, 26 November 2014

Cross stitch in progress 3

Another update on the Nine Trees :-)  It looks a little lumpy in the photo as I have the frame hanging off my steering wheel LOL.


I plan to finish the central seven trees and then see how to get around the fabric problem - it's not quite wide enough to have an ideal amount of excess on each side for framing, so it would have been tight anyway, plus I started half an inch to the left of where I should have.  There are two options, doing seven and two separate ones to form a triptych, as I mentioned in the last update.  Or..... I might be able to swap the two end trees with each other - the furthest left tree is 35 stitches wide and will not fit onto the fabric with enough left for framing, but the furthest right tree is only 23 stitches wide.  12 stitches difference is nearly an inch and I think it will work :-)
Watch this space!

Thursday, 30 October 2014

Christmas preparation: Mincemeat, part two

Oops!  I forgot that I had shown the first step, but not the finished jar!  When it's matured for a while, I will be using it to make Delia's Christmas Mincemeat cake.  The recipe from her original Christmas book does not appear to be online, the similarly-titled one on her website requires pre-soaking of fruit and has some different ingredients.  For this original version, you literally add mincemeat to the cake-y ingredients (flour etc), mix and bake.  If you can get hold of the book, I would recommend it highly just for this recipe - borrow it from a friend if you have to!


Just for good measure, I have started two more fruit vodkas - blueberry (left) and blackberry :-)


These should be ready to strain and drink just before Christmas.  That should give me enough time to find some nice bottles..... LOL

Wednesday, 29 October 2014

Cross stitch in progress 2

Here is the fortnightly update on my current cross stitch project.  I took the photo in the car, thinking that daylight would be helpful, but it was so dismal outside that those trees still look more black than green!


I do have a slight concern with this project - the instructions say the finished design is about 17" long, so I have used a 21" wide piece of fabric.  This should leave 2" at each end, right?  However the tree at the farthest left will fit, but with only half an inch to spare which could affect framing.  I haven't counted out the trees to the right hand side yet, and I do know that I started slightly left of the fabric centre ..... but not by that much!  The middle tree, incidentally, is the one which is currently showing as second from the right :-)

So I have started a few stitches for each of the tree trunks, to see what the spacing is.  I didn't quite get them all done this morning.  I don't think I can just take one tree out of the design, that would leave eight and odd numbers are more pleasing to the eye!  So I would have to take it down to seven, maybe doing the remaining two as separate pieces, thus making a tryptich to hang on the wall!  We shall see......

Sunday, 26 October 2014

Christmas preparation: Mincemeat, part one

I haven't made this mincemeat for a couple of years, because I have discovered that Waitrose's all-butter mince pies are much better than the ones I make :-)  I do also use it to make a Christmas cake, but last year I had enough left to be able to do that.  Now that I have finally run out, I need to make another batch!

This is Delia's mincemeat recipe, which you can find here.  I miss out the almonds because I don't like nuts and I also peel the apples - she says you don't have to, but I don't like the little bits of peel in my teeth LOL.  I also can't recommend her suggestion that veggie suet is just as good, because the result is just horrendous and I had to throw it away.  Other peoples' experience may differ, of course ...... :-)

Here are all the ingredients mixed up and ready for the oven:


It'll take some time to cool enough to pot up, so I'll share the finished result with you tomorrow.  In the meantime, my house smells wonderful :-)

Sunday, 19 October 2014

Christmas preparation: Cranberry Vodka

Last year, Tesco had punnets of cranberries at a reduced price, down from £2 to 25p, so I bought six and popped them in the freezer.  Three months ago, I started this cranberry vodka off, so it would be ready for Christmas.  Although I have used other fruits in vodka before, I have never tried cranberries so only used two punnets - didn't want to waste too much vodka on an experiment!  I usually wing the amounts but this time used an actual recipe (!) from the Waitrose magazine, it doesn't appear to available on their website anymore, so I will type it out here.

Cranberry vodka - original recipe with my adaptations in italics

200g cranberries
1 orange
200g caster sugar
500ml gin - I used vodka

I doubled all quantities
  • Prick the berries to allow the juice to run - I mashed them about a bit with a fork
  • Divide between two 500ml sterilised bottles - I used two x 1 litre preserving jars
  • Peel thin strips of zest from the orange and divide between bottles - I missed the orange out completely
  • Mix vodka and caster sugar, stir until sugar is dissolved, then divide between the bottles.  Make sure to leave a 2 - 3cm gap at the top of each bottle
  • Store bottles in a dark place for at least 2 weeks but not longer than 6 months, shaking them every couple days to infuse - I left mine for 3 months, so I have time to make more for Christmas if it turns out well
  • The recipe ends with: Label before giving as a gift - I don't think it's a great idea to give people vodka with the berries still in it, so that's why I use preserving jars and this is how I continued the process. 
  • Strain jars of vodka through a sieve into a large jug, in stages.  Discard cranberries.  Transfer vodka into a smaller jug for pouring into decorative bottles (washed and sterilised), don't fill the jug too full at a time so that pouring will be more controllable!  Place a muslin strainer or a tea strainer over the top of a small funnel and pour alcohol through this into the bottle.  You will need to rinse the muslin or strainer several times to get rid of sediment from the berries.
The jars:


The finished product:

We did taste a bit ..... well you have to ..... and it is a little tart but not too much so, it is absolutely gorgeous.  Tomorrow I will be buying more vodka :-)

Wednesday, 15 October 2014

Cross Stitch in Progress

I thought I would chart the progress of my current cross stitch project.  So far I have been stitching this for 10 - 15 minutes in the mornings before work, plus I was able to get a good couple of hours in at the crop.  There are nine different trees all together, with some 'snowy' ground beneath them and a lot of snowflakes swirling around them.  I have completed one tree so far and am working on the second :-)  The original chart has letters in the tree trunks spelling 'Welcome', but I didn't like that.  It is quite a long and thin design, about 18" x 6" so will fit nicely above a window.


The lighting is not very good, the trees are actually a deep green, not almost black as they appear here!  Hopefully it will be completed in time for Christmas :-)

Wednesday, 6 February 2013

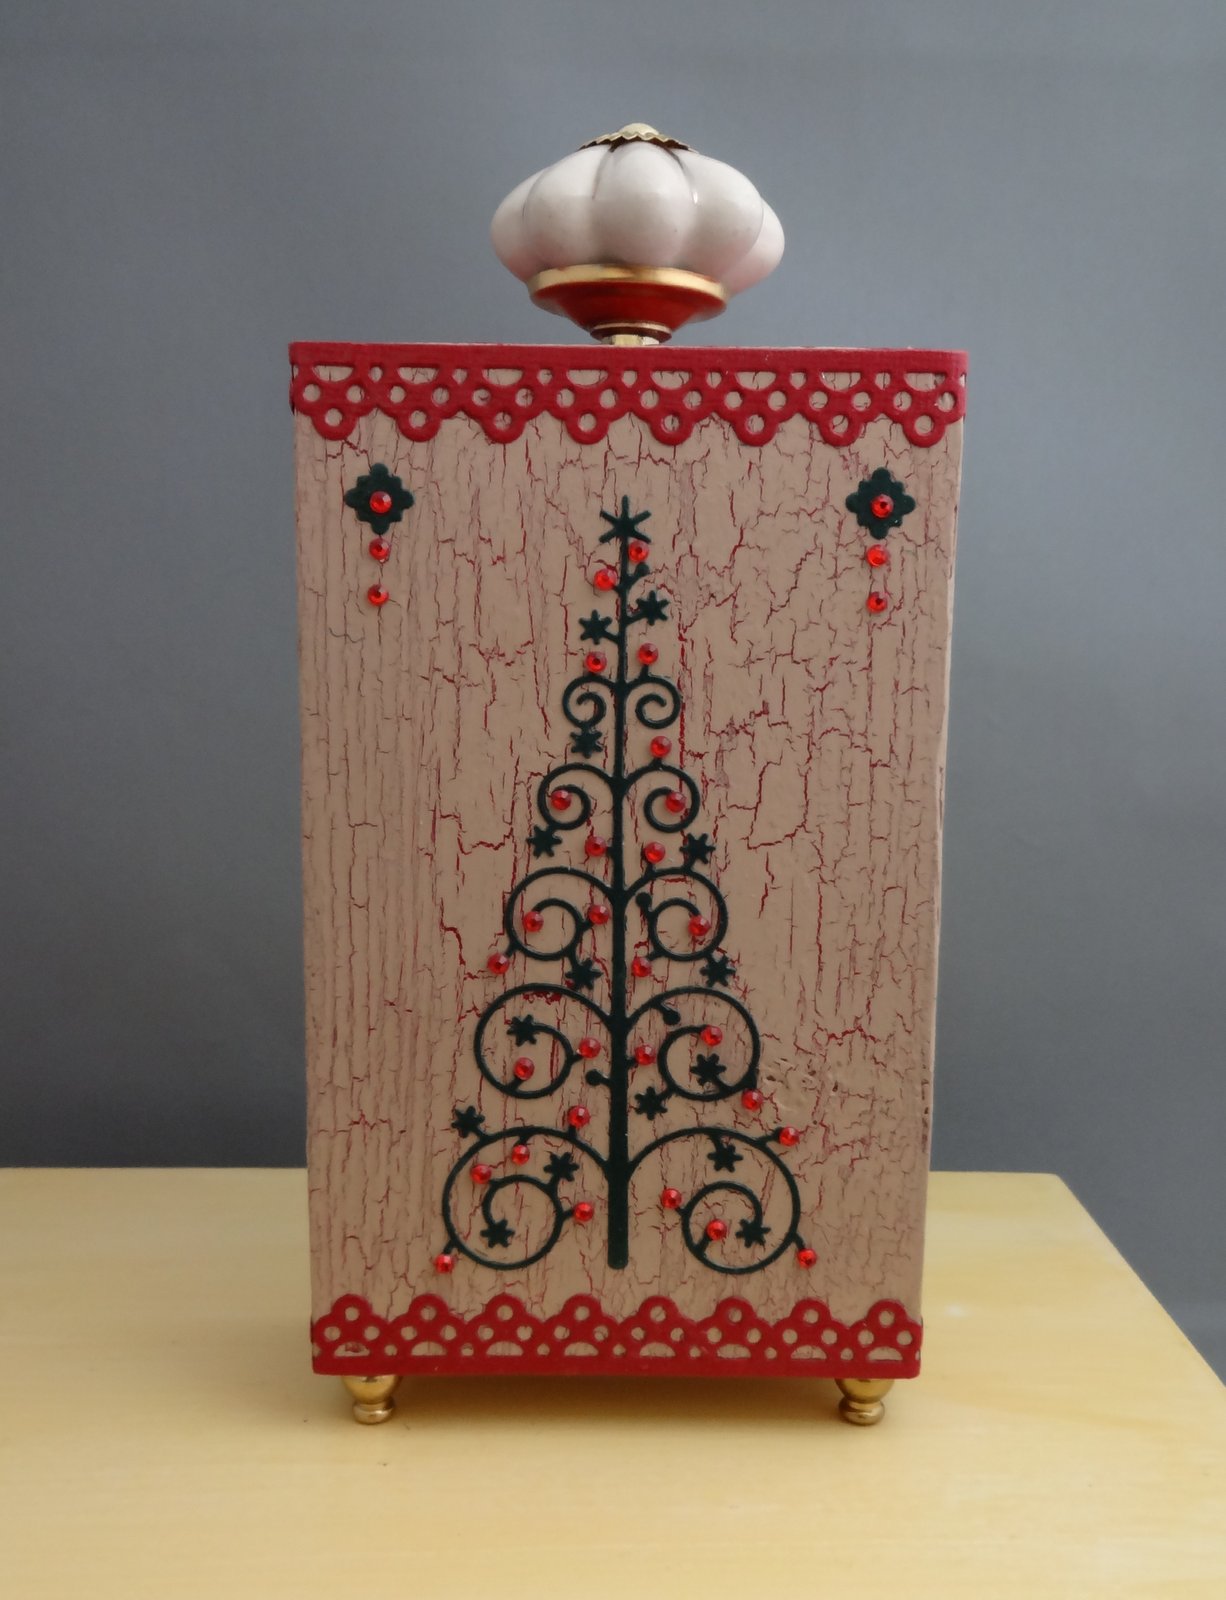
A bit late or very very early?


Yes, it's a Christmas decoration :-)  I did start it in late December, but then Christmas itself got in the way and I never got around to finishing it! 
It's inspired by an article in Craft Stamper a little while ago, the designer had decorated a block of wood about 6" x 4" x 2".  So I bought a 6ft length of 2" by 4" timber for around £10 and got DH to cut it into 6" lengths, 12 altogether.
The magazine project involved stamping on card and layering the images onto the block, but I decided to paint mine.  I wanted to try out a crackle effect and used Paperartsy crackle glaze, the base coat was a deep burgundy acrylic, after that had dried I applied the crackle glaze with a palette knife - I had never used the stuff before and the first side I did is not great, that's why it's at the back LOL.  When that had dried I applied some Paperasrty fresco paint in Irish cream over the top and it just about crackled as I watched, amazing stuff!
The borders and the tree are diecuts, Dienamics and Memory Box, I also die cut a trellis to go on each side and the back - forgot to photograph that - the small decorations over the tree are made with some of the 'waste' from that die-cut.  I put red crystals all over the tree.  The top has an embossed piece of card stock to hide the end grain of the wood.  All the cardstock pieces are attached and sealed with Mod Podge.
I got the lovely handle from Amazon, they have a staggering amount of drawer handles, would you believe :-)  The feet are proper box feet from a specialist seller, though the carriage charge was horrendous - next time I will buy several sets of four rather than just one!  DH drilled the holes for handle and feet, I didn't trust myself to get them straight :-)
I don't want to put it away now!
Hmmm ... now what shall I do with the other eleven blocks?!!!!
Posted by Picasa

Monday, 2 January 2012

Better late than never!


I had had the bits and pieces for this festive picture lying on my desk for the two weeks leading up to Christmas - but had no inspiration as to how I wanted to put them together. The lightbulb moment came on New Year's Eve and it only took a couple of hours to make once I knew what I was doing!

The Ikea box frame was already black, so I didn't need to paint it. I used two background papers from Craft Creations in grey/white, and stuck to two squares of mountboard (and what a pain to cut that was.....!). The snowflake was stamped and embossed in white onto black gloss card, then cut out. I stamped a sentiment and flourish in Versafine smokey grey, then added a bling flourish over the top. The central square has a border of black nailheads and the outer border is done with silver ones.

For the frame itself, I knew I wanted to use the silver/black mosaic tiles, but didn't want to put them all the way around - so I have just used them in the corners and connected them with more black nailheads. The tiles haven't photographed particularly well, though, they are truly gorgeous in real life! The good thing about the Ikea frame is that it stands completely flat, so I didn't have to hang it - instead I just have it standing on a shelf and it won't topple.

A close up of the flourish:


So, another Christmas picture..... I have put it up even though it is now after Christmas, so I can enjoy it until 12th Night LOL.

I photographed this using one of my Christmas presents - a photo studio booth thingie (can't remember the exact name now). Basically it has lights either side of nylon panels which diffuse the light shining on the object to be photographed. I think I need more practice at it, but the ones I have taken so far aren't too bad.
Posted by Picasa

Tuesday, 9 August 2011

Christmas Tag Picture


This is the finished picture using the tags from the previous post. The background had been done for a while, but I had been putting off assembling it ...... in case it all went horribly wrong ...... LOL. But last weekend was craft weekend and Sy was here - she always makes me be brave so I got down to putting it all together!

The background is a Craft Creations paper, like the one on the tags but with Christmas words printed all over it. The squares are painted chipboard with an embossed and alcohol-inked metal square on top. I stamped and embossed two different flourishes and laid crystal swirls over the top. The frame was glimmer misted in reds/browns/bronze. And that's how it all stayed for weeks until last Saturday ......

The original plan was to position the two tags and then stamp the verse at the right hand side. After much tweaking of position (a smidge to the left, a twitch upwards, you know how it is!) I mounted the large tag on 2mm foam tape and the smaller on 1mm. Then I stamped and ...... DISASTER! The verse was just lost in the whole picture, you couldn't see it at all :-(

Lightbulb moment - I remembered I have a large tag punch, so I punched a piece of white paper to check it would cover the stamping, then stamped on and punched out the swirly paper, distress inked it as I had the others and inked the edges. Then I realised that I wanted it to lay flat, which it wouldn't do if I added an eyelet like the other tags. Sy suggested I use a pen to colour the edge of the eyelet hole - worked a treat!

I am dead chuffed with this - it might just stay out until Christmas now, I don't want to put it away! Oh and I asked DH what he thought and he said oh yes, it's very nice and then in a puzzled sort of way he said "But what's it for?" ...........

Men. Grrr.


Posted by Picasa

Wednesday, 3 August 2011

Christmas tags


I have been mulling over this idea for a long time - these two tags will form part of a bigger Christmas picture eventually!

I covered both tags with some Craft Creations Christmas paper, a mottled creamy colour with a darker cream swirl. Then I blended distress inks around the edges in Antique Linen and Tea Dye. The large tag was stamped with a Hero Arts flourish in Aged Mahogany and some Paperartsy cogs and gears in Brilliance Pearlescent Chocolate. The smaller tag has a swirly background (think that is a Hero Arts one too!) and the cogs, using the same inks. I didn't want to cover the background when it was done!

The gears are die-cut with the Nestie sprocket set from gold mirri, which I smooshed over with a Versamark embossing pad and sprinkled embossing powder in copper, gold and black, then heated. Wasn't sure how it would turn out, but it seems to have worked pretty well. Although I am still finding areas of my desk which have a crunchy stray embossing powder layer!

The stamped images are matted onto Nestie label 18, run through an embossing folder after cutting. Father Christmas is from Stamps Away and the Partridge in a pear tree was bought in a sale last year - can't remember the brand now. It has unfortunately lost all 'cling' - I had to hold it in my fingers to ink it up and stamp it, it just wouldn't stick to the acrylic block! Took several attempts to get a good impression LOL. I then punched out the images with plain and scalloped oval punches. Ovals seem to work very well with this Nestie die, I will be using the combination again for cards, I think!

Then I added the crochet lace, the pearls and a Stampendous 'Merry Christmas' sentiment. I haven't really done tags before, but I love how these ones have turned out, so I might be doing some more!
Posted by Picasa

Saturday, 9 July 2011

Poinsettia


This is the cross stitch piece I finally finished last weekend, having started it in March 2010, and I have now put it into a frame. It's a kit from a magazine and came supplied with the green fabric - if I had had the sense to start stitching the green leaves first, rather than all the red poinsettia, I would have switched to ivory fabric as the green on green was quite tricky! But since I had done all the red, I decided to carry on regardless :-)

The original design had the frame and swirls stitched in gold metallic thread, which I found absolutely impossible to use, so I bought some ecru floss and mixed it with gold blending filament and it has come out rather well.

It has been going for so long now that I am quite fed up with it! But hopefully, by the time next Christmas comes, I will like it again :-)
Posted by Picasa

Friday, 3 September 2010

Christmas decoration


Just a simple decoration :-) I painted the triple frame with Viva Decor in Emerald Green, then it sat on my desk for about a week whilst I got around to digging out the large christmas brads I had intended to put in each frame. However - disaster! The brads were an entirely different and clashing shade of green, they looked awful.

So back to the drawing board - I rummaged in the "Christmas bit and bobs" drawer and found these poinsettias and also some old background paper I had forgotten about. I cut the paper to fit - you can't really see much of it, but the white card that came with the frame would have been glaringly obvious! After putting the poinsettias in each aperture I decided it needed something else, so I added the red pearls.

And by the way ...... poinsettias don't count as flowers ...... they are part of Christmas LOL.
Posted by Picasa

Monday, 23 November 2009

Extreme Baking Week - Sunday

I should have posted this last night, but was so tired at the end of a busy weekend! I will try to post every day from now on, hand on heart :-)

I decided to get a little headstart on the week by starting on Sunday. Mincemeat slices and small Christmas cakes, both from Delia's Christmas book. I also started off her mincemeat recipe, which will be finished off today.


Sunday, 12 July 2009

UFOs (UnFinished Objects)


I have several UFOs stashed away in various places, many of them stitching projects, but there are other things too :-) One of them, a decorated box, has been lying around for months, taking up space on my craft table and just generally getting in the way - it wasn't worth putting away because I "was going to finish it soon". Finally, after a good shove by Sy ("do it NOW!"), I put the final touch to it, which consisted of two coats of varnish. Yes, that's all it was awaiting, for all that time. Procrastination is my middle name.........

Anyway, the box itself is a wooden one, painted and decoupaged. I wanted to use some Christmas images which I had bought as a pack a couple or three years ago and not really made use of. First step was an acrylic primer, then two coats of cream emulsion. Then I chose my images and overlapped them on top of the box, sticking them down with PVA glue. When dry, and when I had made sure all the edges were firmly stuck down with no air bubbles under the image, I started to varnish. It would have taken fewer coats had I not overlapped them, but I did like the effect, so six or seven coats later....... the top was done. Because I had used a polyurethane varnish, the box had a yellowed tint to it, a really nice effect, but it did mean that the bottom half of the box looked noticeably different from the top even after 4 coats. That's when the project ground to a halt, as I kept putting off doing those final two coats! But now it is finally done, and I have plans to do some more decoupage, I had forgotten how much I like the effect.

Now all I have to is think what I am going to put in the box, come next Christmas......