Two BITI posts in a row! Well, I have bought an awful lot lately :-) Something to do with the festive season, perhaps...... This card also fits in very nicely with week 51 of the 52 cards challenge, a colour prompt.
The baubles are from Personal Impressions, I stamped and embossed in black, then coloured with Kuretake pens. Then I cut out the baubles, attached to a holly paper matted card blank, added faux nailheads to 'hang' the baubles, and stamped the sentiment.
I think I can use the stamp to better effect, but for a first go, it's not too shabby :-)
A blog for cooking and crafts
Showing posts with label 52 cards challenge. Show all posts
Monday, 15 December 2014
Monday, 3 November 2014
52 Cards Challenge: week 45
I had a wonderful time at the retreat as usual, the classes were fab and I spent quite a lot of some money in the shop ..... well it would be rude not to ..... LOL.
It was the first chance I have had to have a bit of a play with my new Stampin Up goodies. So I had a go with the Petite Petals set and its matching punch, also the Gorgeous Grunge set which I bought a while ago.
I really like the effect achieved with masking off stamped images and using a matching punch means no fiddly cutting out of the mask! The flowers were stamped first, masked off, then the lines and the splotches were stamped over the top. Very pleased with this one, I am going to do a few more, they are suited to birthday, get well, thank you cards ..... think I may do a mat next time, though. The sentiment is from Stamping All Day.
The 52 cards challenge for week 45 is 'botanical', so this fits nicely! I haven't taken part in this challenge for a couple of months at least, must jump back in.
It was the first chance I have had to have a bit of a play with my new Stampin Up goodies. So I had a go with the Petite Petals set and its matching punch, also the Gorgeous Grunge set which I bought a while ago.
I really like the effect achieved with masking off stamped images and using a matching punch means no fiddly cutting out of the mask! The flowers were stamped first, masked off, then the lines and the splotches were stamped over the top. Very pleased with this one, I am going to do a few more, they are suited to birthday, get well, thank you cards ..... think I may do a mat next time, though. The sentiment is from Stamping All Day.
The 52 cards challenge for week 45 is 'botanical', so this fits nicely! I haven't taken part in this challenge for a couple of months at least, must jump back in.
Sunday, 8 June 2014
52CC - week 23, aqua & yellow
The prompt for week 23 is a photo, predominately aqua and yellow. Now, yellow isn't really a colour I am fond of, and certainly I don't see it as a Christmas colour, so I did a birthday card and a get well card instead. I decided to go with using inks, after seeing an example on UKS from one of the other participants (thank you Silver Tiger!)
The get well card was inspired by something I found on Pinterest, here. Simple stamping and some scored lines to add interest to the white space :-)
For the birthday card, I revisited the embossing resist technique, stamping & embossing the flowers in white and smooshing distress ink over in Peacock Feathers, squeezed Lemonade and Salty Ocean.
I won't say they are my favourite cards ever, but they are acceptable :-)
The get well card was inspired by something I found on Pinterest, here. Simple stamping and some scored lines to add interest to the white space :-)
For the birthday card, I revisited the embossing resist technique, stamping & embossing the flowers in white and smooshing distress ink over in Peacock Feathers, squeezed Lemonade and Salty Ocean.
I won't say they are my favourite cards ever, but they are acceptable :-)
Monday, 26 May 2014
52CC - week 22, shades of green
This is a first - the prompt for week 22 went live today and I have completed both cards! The theme is 'Shades of green', I knew straightaway that I wanted to use distress inks, haven't done that for a while.
The birthday card features another new stamp from the Glitter Pot spree as described a couple of posts ago..... I put it back on the shelf initially, but it took so long to put all the other stuff through the till, that I had time to change my mind and go back for it! It's from Memory Box and gives a lovely detailed impression. I embossed it in white and then smooshed distress ink in three shades of green over the embossing. This is a resist technique, so a quick go over with a baby wipe brought the white back into view. Then I matted the image onto a dark green cardstock, made an interrupted frame for the sentiment and added a little cluster of pearls at two corners.
The Christmas card has a snowflake border (Waltzing Mouse) on the same principle. I used a mixture of the three greens to stamp the sentiment (Stampin' Up), but struggled with the white space..... it's not something I am good at, I always want to fill it! Then I remembered seeing a technique whilst surfing .... I don't know where I saw it, sorry, if I find it again I will add the credit. It involves using a scoreboard to score lines, very simple, but the two lines along the top of this card, plus one at each side of the border are very effective, I really like them.
Very pleased with these two, will definitely revisit the scoring idea and I must use distress inks more often, I had forgotten how nice they look :-)
The birthday card features another new stamp from the Glitter Pot spree as described a couple of posts ago..... I put it back on the shelf initially, but it took so long to put all the other stuff through the till, that I had time to change my mind and go back for it! It's from Memory Box and gives a lovely detailed impression. I embossed it in white and then smooshed distress ink in three shades of green over the embossing. This is a resist technique, so a quick go over with a baby wipe brought the white back into view. Then I matted the image onto a dark green cardstock, made an interrupted frame for the sentiment and added a little cluster of pearls at two corners.
The Christmas card has a snowflake border (Waltzing Mouse) on the same principle. I used a mixture of the three greens to stamp the sentiment (Stampin' Up), but struggled with the white space..... it's not something I am good at, I always want to fill it! Then I remembered seeing a technique whilst surfing .... I don't know where I saw it, sorry, if I find it again I will add the credit. It involves using a scoreboard to score lines, very simple, but the two lines along the top of this card, plus one at each side of the border are very effective, I really like them.
Very pleased with these two, will definitely revisit the scoring idea and I must use distress inks more often, I had forgotten how nice they look :-)
52CC - week 21, vertical strip sketch prompt
I didn't follow the suggestion of using patterned paper as the main panel - although I may revisit that idea later - because I knew immediately which tall and narrow Christmas stamp I wanted to use, this old Creative Expressions lamp post which I bought from the bargain bin at Ally Pally, many years ago :-) A hunt through my other, older wood-mounted stamps turned up this topiary tree - the copyright date on it is 1999, six years after I started stamping!
Both cards are as you can see, basically the same. I think the technical term is a 'shortfall' card? - but do correct me if I'm wrong! I stamped a vertical sentiment stamp down the right hand inside edge of the card blank, then cut off a strip from the front so that the sentiment is visible. Then I used a lace edge punch (Martha Stewart) along the front side edge. I stamped and embossed the two images in gold, coloured them, then die-cut them out (Nestie deckle edge rectangle). The edges of the lace border and the die-cuts were inked in gold. Then the images were mounted on 1mm foam tape to the card.
They proved extraordinarily difficult to photograph whilst stood upright, so in the end I resorted to laying them flat, holding them shut with Blu-Tak and taking the picture before they could spring open again!
Sunday, 25 May 2014
52CC - week 20, show and tell
The 52CC prompt for week 20 is 'Show and Tell' - use a new purchase!
There is a very sad tale attached to these cards, though it does have an ultimately happy ending ...... I was embossing the flower stamp when my trusty heat gun stopped working. It's been a faithful friend from when I first started stamping 21 years ago, so I have been wondering when it would finally go to Stamping Heaven. DH checked the fuse and pronounced the patient dead. Now, since I had been in mid-emboss ..... I had to get another gun in a hurry! The Glitter Pot is one of the closest places I could go, so I checked their website and they had a two speed heat gun, in stock and on sale! A quick phone call to ask them to put it to one side for me and off I went.
Ahem. Going all that way and not looking around would have been silly .... wouldn't it? A fair few items fell into the basket and by the time I left, that heat gun had cost me £90 !!!!! I got back home and the partially embossed image was completed without a hitch, somewhat to my surprise as I had thought it would dry up whilst I was gone for three hours.....
So, back to the cards! The birthday card is a tri-fold lined card blank, with a panel cut off and trimmed to fit the front with a gold mat. I used the Woodware south-west corner punch for a tiny bit of detail. The flower stamp is from Penny Black and is the required new purchase for the prompt, coloured with Kuretake pens, fussy cut and edged with gold ink. The sentiment is from Hobby Art.
The Christmas card features one of my new Glitter Pot purchases! The Memory Box landscape die, it's a favourite with the 52 card girlies and I have been thinking about buying it for some time..... it was obviously Fate that the GP had it in stock and who am I to argue with Fate? LOL. The snowflake paper is an old one from Craft Creations and the sentiment banner was bought at Ally Pally, years ago. I added some ribbons and pearls at the base. The frame is a silver peel-off line and I have no idea why it has appeared to be partially red in the photo ... the light must have caught it strangely :-)
There is a very sad tale attached to these cards, though it does have an ultimately happy ending ...... I was embossing the flower stamp when my trusty heat gun stopped working. It's been a faithful friend from when I first started stamping 21 years ago, so I have been wondering when it would finally go to Stamping Heaven. DH checked the fuse and pronounced the patient dead. Now, since I had been in mid-emboss ..... I had to get another gun in a hurry! The Glitter Pot is one of the closest places I could go, so I checked their website and they had a two speed heat gun, in stock and on sale! A quick phone call to ask them to put it to one side for me and off I went.
Ahem. Going all that way and not looking around would have been silly .... wouldn't it? A fair few items fell into the basket and by the time I left, that heat gun had cost me £90 !!!!! I got back home and the partially embossed image was completed without a hitch, somewhat to my surprise as I had thought it would dry up whilst I was gone for three hours.....
So, back to the cards! The birthday card is a tri-fold lined card blank, with a panel cut off and trimmed to fit the front with a gold mat. I used the Woodware south-west corner punch for a tiny bit of detail. The flower stamp is from Penny Black and is the required new purchase for the prompt, coloured with Kuretake pens, fussy cut and edged with gold ink. The sentiment is from Hobby Art.
The Christmas card features one of my new Glitter Pot purchases! The Memory Box landscape die, it's a favourite with the 52 card girlies and I have been thinking about buying it for some time..... it was obviously Fate that the GP had it in stock and who am I to argue with Fate? LOL. The snowflake paper is an old one from Craft Creations and the sentiment banner was bought at Ally Pally, years ago. I added some ribbons and pearls at the base. The frame is a silver peel-off line and I have no idea why it has appeared to be partially red in the photo ... the light must have caught it strangely :-)
Tuesday, 20 May 2014
52CC - week 17, pocket card
A sketch prompt for week 17, to make a card with a pocket on the front. I found this one really difficult and in the end was inspired by Trish's card with a doily in the pocket, here - thank you Trish!
I only did a birthday card, will have to re-visit the idea for a Christmas card at some future point :-) The papers are from a magazine freebie paper pad, all fairies, flowers and butterflies, so not to my taste at all but perfect for cards :-) The pocket back and the doily were attached to the card, then I made the pocket front, stamped the sentiment and die-cut the tag, then assembled them all before sticking the front to the back. I die-cut the butterfly flourish (Joanna Sheen), punched and die-cut leaves (Martha Stewart and Memory Box), then snipped a couple of pearl swirls apart. The tag is some more of the background paper, matted onto two cardstocks and over-stamped with that iconic quote :-) Having assembled everything, I realised that the bottom scored edge of the pocket, was looking a bit ragged where I had scored a bit .... er .... over enthusiastically, so I stuck a pearl trim along the edge. Incidentally, it was the first time I have used the Cosmic Shimmer glue for anything and I was very impressed :-)
The photo makes the pocket look a bit wonky, but in real life it is straight, I swear!
I only did a birthday card, will have to re-visit the idea for a Christmas card at some future point :-) The papers are from a magazine freebie paper pad, all fairies, flowers and butterflies, so not to my taste at all but perfect for cards :-) The pocket back and the doily were attached to the card, then I made the pocket front, stamped the sentiment and die-cut the tag, then assembled them all before sticking the front to the back. I die-cut the butterfly flourish (Joanna Sheen), punched and die-cut leaves (Martha Stewart and Memory Box), then snipped a couple of pearl swirls apart. The tag is some more of the background paper, matted onto two cardstocks and over-stamped with that iconic quote :-) Having assembled everything, I realised that the bottom scored edge of the pocket, was looking a bit ragged where I had scored a bit .... er .... over enthusiastically, so I stuck a pearl trim along the edge. Incidentally, it was the first time I have used the Cosmic Shimmer glue for anything and I was very impressed :-)
The photo makes the pocket look a bit wonky, but in real life it is straight, I swear!
Sunday, 18 May 2014
52CC - week 19
Nat dipped into the prompt jar for week 19 and this is what she came out with: navy, vellum and stitching. I didn't manage to use all three, but hey the prompt is just a starting point.... isn't it?? LOL.
The Christmas card has a landscape image, which I had previously stamped (not sure of brand) and then had put in the 'come-in-useful-one-day' drawer. I coloured it with Kuretake pens and matted it onto some background paper on a navy card blank. The sentiment is die-cut .... Britannia dies, I think. Then I added some pearls. I wasn't sure about colouring this image and will probably do it slightly differently next time, but it's not too bad :-)
The get well card is also on a navy blank and has faux stitching! The flower stamp is from Hero Arts, coloured with Kuretakes again, the sentiment is from Stampin' Up. I have to confess, one of the flowers is there to cover a stray splodge of ink and the other two are there to balance the first one!!
The Christmas card has a landscape image, which I had previously stamped (not sure of brand) and then had put in the 'come-in-useful-one-day' drawer. I coloured it with Kuretake pens and matted it onto some background paper on a navy card blank. The sentiment is die-cut .... Britannia dies, I think. Then I added some pearls. I wasn't sure about colouring this image and will probably do it slightly differently next time, but it's not too bad :-)
The get well card is also on a navy blank and has faux stitching! The flower stamp is from Hero Arts, coloured with Kuretakes again, the sentiment is from Stampin' Up. I have to confess, one of the flowers is there to cover a stray splodge of ink and the other two are there to balance the first one!!
Friday, 16 May 2014
52CC - week 18
A photo prompt for week 18 over at Kool Kitty Musings. I chose to use the colours to make these two cards.
I made two everyday cards rather than a Christmas one. My card box has mostly birthday cards in it, so I thought I should have some different cards in stock as well :-) I stamped and embossed the flower (Hero Arts) and sentiments (Stampin' Up), then coloured the flower with Kuretake alcohol pens. I cut a mat from the background paper, making it long enough to be able to punch a border at the base (Martha Stewart), then I tied a ribbon around the mat and assembled everything onto a deckle edge card blank.
A word on the Kuretake pens .....they are the first pens I have ever got on with, I have tried Promarkers and Flexmarkers, but never really did well with them. Now I am building up a my collection of the Kuretakes, a few every month - it does work out to be quite expensive as I buy a replacement brush tip for each pen as well, to go in the broad tip end, but I do like them! I get mine from Cult Pens, who have a wonderful selection of any pen you could ever need!!
I made two everyday cards rather than a Christmas one. My card box has mostly birthday cards in it, so I thought I should have some different cards in stock as well :-) I stamped and embossed the flower (Hero Arts) and sentiments (Stampin' Up), then coloured the flower with Kuretake alcohol pens. I cut a mat from the background paper, making it long enough to be able to punch a border at the base (Martha Stewart), then I tied a ribbon around the mat and assembled everything onto a deckle edge card blank.
A word on the Kuretake pens .....they are the first pens I have ever got on with, I have tried Promarkers and Flexmarkers, but never really did well with them. Now I am building up a my collection of the Kuretakes, a few every month - it does work out to be quite expensive as I buy a replacement brush tip for each pen as well, to go in the broad tip end, but I do like them! I get mine from Cult Pens, who have a wonderful selection of any pen you could ever need!!
Sunday, 27 April 2014
52CC week 16 - Gold
A colour prompt for week 16 of the 52 cards challenge. A card featuring the colour gold :-)
For the birthday card, I used an Impression Obsession stamp - bought at the Make It show a couple of years ago and I had even taken a photo of the finished card on the stand to remember the colours.... then he went into a drawer :-) A few weeks ago, I had stamped/embossed him in gold and coloured in various shades of blue/gold/aqua, but had never got around to making him up into a card. As soon as I saw the 'gold' prompt, I knew he would be perfect! I die-cut the image, but it needed the largest die in the Nestie set, so for the gold mat I had to draw around the outside edge of the die and hand cut. I made an interrupted frame for the sentiment with gold peel off lines. This card has already been shipped off to its recipient - I reminded DH of his mother's birthday, he looked in my card box and picked out this one. Let's hope she likes it!
The gold on the Christmas card doesn't show up very well in the photo, unfortunately, it all looks much richer IRL. The paper (Making Cards mag freebie) has a lot of gold swirlies between the poinsettias, there are gold mats for the paper and sentiment tag and the sentiment itself is stamped/embossed in gold. I really like the rounded opposite corners look, so used it again here on both the card blank and the tag.
For the birthday card, I used an Impression Obsession stamp - bought at the Make It show a couple of years ago and I had even taken a photo of the finished card on the stand to remember the colours.... then he went into a drawer :-) A few weeks ago, I had stamped/embossed him in gold and coloured in various shades of blue/gold/aqua, but had never got around to making him up into a card. As soon as I saw the 'gold' prompt, I knew he would be perfect! I die-cut the image, but it needed the largest die in the Nestie set, so for the gold mat I had to draw around the outside edge of the die and hand cut. I made an interrupted frame for the sentiment with gold peel off lines. This card has already been shipped off to its recipient - I reminded DH of his mother's birthday, he looked in my card box and picked out this one. Let's hope she likes it!
The gold on the Christmas card doesn't show up very well in the photo, unfortunately, it all looks much richer IRL. The paper (Making Cards mag freebie) has a lot of gold swirlies between the poinsettias, there are gold mats for the paper and sentiment tag and the sentiment itself is stamped/embossed in gold. I really like the rounded opposite corners look, so used it again here on both the card blank and the tag.
Wednesday, 23 April 2014
52CC week 15 - all creatures great and small
The prompt for week 15 is to feature animals on the card.
The birthday card uses Making Cards magazine freebie papers. The butterflies are punched (Martha Stewart) and I added a line of small gold nailheads to link them together. I have seen this style of card blank quite a lot lately and thought I would give it a go - I rounded two opposite corners to give the shape. Some green pearls and a peel off sentiment to finish.
The Christmas card has more freebie paper from MC and I simply over-stamped Father Christmas and reindeer (Lavinia stamps), then added the punched sentiment tag (Stampin Up).
We are now heading off to Heathrow for a trip to Vienna .... see you in a few days!
The birthday card uses Making Cards magazine freebie papers. The butterflies are punched (Martha Stewart) and I added a line of small gold nailheads to link them together. I have seen this style of card blank quite a lot lately and thought I would give it a go - I rounded two opposite corners to give the shape. Some green pearls and a peel off sentiment to finish.
The Christmas card has more freebie paper from MC and I simply over-stamped Father Christmas and reindeer (Lavinia stamps), then added the punched sentiment tag (Stampin Up).
We are now heading off to Heathrow for a trip to Vienna .... see you in a few days!
Sunday, 20 April 2014
52CC week 13 - sketch prompt
I am finally catching up with the challenge after a few very stressful weeks! The prompt for week 13 was this sketch.

There was an additional prompt to make the most of the frame.... which I didn't do in the end, as I just made a simple square topper. I did buy a frame die, though, so may revisit this sketch in the future :-)
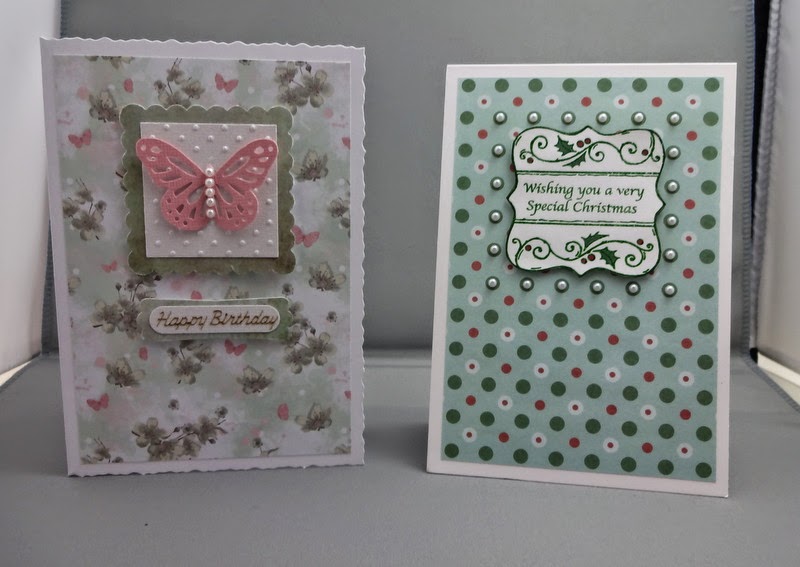
The birthday card is made with freebie magazine papers (Making Cards) in a soft green/pink/white combination. It took a while to find the right pink for the punched butterfly (Martha Stewart), I chose Bazzill Blossom. The butterfly looks a little off centre in the photo, it is not .... honest .... one wing is lifted higher than the other! The scalloped square (Woodware) and sentiment tag (Stampin Up) are the solid green from the same set of papers. I embossed the white square on which the butterfly is sitting with a Swiss Dots folder - maybe Cuttlebug?
MC freebie papers again for the Christmas card. I stamped/embossed the Woodware stamp in a dark green, then coloured in the red and green of the holly, after cutting out the image I inked the edges with dark green. I followed the dots on the paper to make a frame of white pearls.
There was an additional prompt to make the most of the frame.... which I didn't do in the end, as I just made a simple square topper. I did buy a frame die, though, so may revisit this sketch in the future :-)
The birthday card is made with freebie magazine papers (Making Cards) in a soft green/pink/white combination. It took a while to find the right pink for the punched butterfly (Martha Stewart), I chose Bazzill Blossom. The butterfly looks a little off centre in the photo, it is not .... honest .... one wing is lifted higher than the other! The scalloped square (Woodware) and sentiment tag (Stampin Up) are the solid green from the same set of papers. I embossed the white square on which the butterfly is sitting with a Swiss Dots folder - maybe Cuttlebug?
MC freebie papers again for the Christmas card. I stamped/embossed the Woodware stamp in a dark green, then coloured in the red and green of the holly, after cutting out the image I inked the edges with dark green. I followed the dots on the paper to make a frame of white pearls.
Thursday, 27 March 2014
52CC - weeks 10 and 12
I am lumping these together as I struggled with the week 10 and I am not sure it deserves a post to itself LOL.
The prompt for week 10 was wood-plastic-stickers. Doesn't sound very difficult, does it?? But I don't have any stickers, no wood paper, couldn't think of anything plastic! So .... this card uses some magazine freebie paper (Making Cards) - the owls are sitting on a tree and wood comes from trees. The pearls are plastic and the sentiment is a peel off sticker. There you go :-)
I am much happier with week 12 - the prompt was soft spring colours and I went with soft peach and aqua, again MC magazine papers.
I invert-rounded the corners of two cardstock mats and the background paper, and put pearls into the corners. The leaf flourish is a Cheery Lynn die, cut in half so that the ends tuck under the circle edge and enough of the leaves still show. I bought the fabric flowers at the Make It show a few weeks ago, but can't remember where from. The scalloped circle is a Stampin Up punch and the circular sentiment stamp is from Stamping all Day, the circle is fixed with 2mm foam tape for dimension.
I think this is one of my favourite cards so far this year, it just came together really easily!
The prompt for week 10 was wood-plastic-stickers. Doesn't sound very difficult, does it?? But I don't have any stickers, no wood paper, couldn't think of anything plastic! So .... this card uses some magazine freebie paper (Making Cards) - the owls are sitting on a tree and wood comes from trees. The pearls are plastic and the sentiment is a peel off sticker. There you go :-)
I am much happier with week 12 - the prompt was soft spring colours and I went with soft peach and aqua, again MC magazine papers.
I invert-rounded the corners of two cardstock mats and the background paper, and put pearls into the corners. The leaf flourish is a Cheery Lynn die, cut in half so that the ends tuck under the circle edge and enough of the leaves still show. I bought the fabric flowers at the Make It show a few weeks ago, but can't remember where from. The scalloped circle is a Stampin Up punch and the circular sentiment stamp is from Stamping all Day, the circle is fixed with 2mm foam tape for dimension.
I think this is one of my favourite cards so far this year, it just came together really easily!
Tuesday, 25 March 2014
52CC week 11 - something old, new, borrowed and blue
The prompt for week 11 is the saying "something old, something new, something borrowed, something blue".
The 'old' for both these cards was that they both have a previously prepared base - the inked and stamped background for the Christmas card and the embossed card blank, doily plus flower on the Mother's Day card. For 'new' I used some newly bought pearls for both. The 'blue' is self explanatory :-) 'Borrowed'... well I will have to resort to 'borrowing ' inspiration from the prompt!
I layered up various die-cut mats on the Christmas card - the base one is from Joy Crafts, the doily mats are Dienamics and the plain circle is a Woodware punch. The stamped and embossed sentiment is a Technique Tuesday stamp, I think. The snowflakes are done with a Martha Stewart punch, that's also 'new'!
For the Mother's Day card, I punched out a plain circle and ran it through the Big Shot in a spotty embossing folder. Then I die-cut the banners (Dienamics) then added the sentiment and pearls. I am not sure whether I am completely happy with this one, I think the big flower unbalances it a bit, but maybe it will grow on me!
The 'old' for both these cards was that they both have a previously prepared base - the inked and stamped background for the Christmas card and the embossed card blank, doily plus flower on the Mother's Day card. For 'new' I used some newly bought pearls for both. The 'blue' is self explanatory :-) 'Borrowed'... well I will have to resort to 'borrowing ' inspiration from the prompt!
I layered up various die-cut mats on the Christmas card - the base one is from Joy Crafts, the doily mats are Dienamics and the plain circle is a Woodware punch. The stamped and embossed sentiment is a Technique Tuesday stamp, I think. The snowflakes are done with a Martha Stewart punch, that's also 'new'!
For the Mother's Day card, I punched out a plain circle and ran it through the Big Shot in a spotty embossing folder. Then I die-cut the banners (Dienamics) then added the sentiment and pearls. I am not sure whether I am completely happy with this one, I think the big flower unbalances it a bit, but maybe it will grow on me!
Sunday, 23 March 2014
52CC week 9 - Mother's Day
The photo prompt for week 9 features soft mint, pink, white, gold, doilies, embossing, flowers .... a lot of elements to choose from!
I went with the colour scheme to make two Mother's Day cards, using a First Edition 6"paper pad. Some of the papers are double sided, so for the first one I used the white-on-pink as a base mat, then cut another mat about two thirds the size in the pink-on-white. The join is covered with a die-cut doily lace border (Dienamics). The butterfly flourish is a die from Joanna Sheen and is actually reversed on this card - I put the paper over the die the wrong way up! Pink pearls were added to the die cut. Then I punched out some butterflies (Martha Stewart) from the embossed card left over from making the panel on the other card and added gold pearls to them and the corners of the mat. A peel off sentiment completes the card.
The second card has a base mat of plain pink, to frame the white-on-pink damask background paper. I cut a plain green mat for the pink/green patterned panel and I embossed some plain pink with a Stampin Up embossing folder and cut a panel from that. The panels were assembled with some 1mm foam tape under the embossed one. The sentiment tag is a Nestie die, the flower is possibly Kaisercraft and the punched fronds are Martha Stewart. Pink pearls to finish :-)
I think the butterfly flourish is my favourite, it could be adapted to many cards .... must remember to put the paper the right way up next time LOL.
I went with the colour scheme to make two Mother's Day cards, using a First Edition 6"paper pad. Some of the papers are double sided, so for the first one I used the white-on-pink as a base mat, then cut another mat about two thirds the size in the pink-on-white. The join is covered with a die-cut doily lace border (Dienamics). The butterfly flourish is a die from Joanna Sheen and is actually reversed on this card - I put the paper over the die the wrong way up! Pink pearls were added to the die cut. Then I punched out some butterflies (Martha Stewart) from the embossed card left over from making the panel on the other card and added gold pearls to them and the corners of the mat. A peel off sentiment completes the card.
The second card has a base mat of plain pink, to frame the white-on-pink damask background paper. I cut a plain green mat for the pink/green patterned panel and I embossed some plain pink with a Stampin Up embossing folder and cut a panel from that. The panels were assembled with some 1mm foam tape under the embossed one. The sentiment tag is a Nestie die, the flower is possibly Kaisercraft and the punched fronds are Martha Stewart. Pink pearls to finish :-)
I think the butterfly flourish is my favourite, it could be adapted to many cards .... must remember to put the paper the right way up next time LOL.
Monday, 17 March 2014
52CC week 6 - paper collection
I have had a bit of a catch up over the weekend and I am now only two prompts behind, including today's new one! Now that I have upgraded my faithful craft robo to a silhouette (Valentine's pressie from DH!), there's no stopping me LOL.
Week 6 was "use a paper collection for the majority of elements on the card".
The birthday card is made with - what else - my beloved Timepiece collection from Bo Bunny. The background, the frame/mat and the wings are all silhouette cutting files. The gears are laser cut and the clock is a Tinchies stamp, coloured with Kuretake markers. I love the way the winged clock has turned out, will definitely do that again :-)
For the Christmas card I used Basic Grey 'Wassail', not one of my favourites, but for some reason I bought a 6" paper pad, have been trying to use it up ever since :-) The background, the doily and the sentiment are all silhouette cut. Just a ribbon needed to ground it a little :-)
Saturday, 15 March 2014
52CC week 8 - sketch challenge
The prompt for week 8 was this sketch. It did fox me a little at first, but then whilst blog hopping I saw a project which gave me an idea, you can see it here on Neet & Crafty. As you can see, I have 'card-lifted' the design more or less exactly for the birthday card and changed it a little for the Christmas one!
The birthday card is done with some free papers from Simply Homemade magazine, I think they may be Kaisercraft? The butterfly is a Martha Stewart punch, crystal trail is Kaisercraft, sentiment stamp may be Technique Tuesday or Twinchies, not sure which.
The Christmas card also has magazine papers, this time from Making Cards. I found some Bazzill in Cajun and Rusted to match the colours, used them to make the sentiment circle. The sentiment itself is from Stamping All Day. The holly leaves and berries are an MS punch and I finished off with some gold ribbon. I am still hesitating over whether to put some pearls in the bottom right corner, but I think I'll leave it alone for now!
Friday, 7 March 2014
52CC week 7 - blue, aqua green
The prompt for week 7 is to use the following colours - blue, green, aqua, white, cream. I made two birthday cards, but no Christmas card.
The butterflies are punched (Martha Stewart) in dark blue for the shadow and again in fresh green for the 3D effect, a row of nail heads in aqua completes the butterfly bodies. I made two mats in aqua and white and used a border punch (MS again) at the base for a little detail. The sentiment is done with two Stampin Up punches, I added a little row of nail heads at each side for a stronger horizontal line.
The next card uses some old Basic Grey 'Two Scoops' papers. I punched the flowers (EK Success) and fronds (MS), then added some two Scoops brads to the flower centres. The scalloped circles are done with Wood are punches and the lace stamp is from Stampin Up. The sentiment stamp is from Stamping All Day, they have a really nice range of small clear sentiment stamps.
I think the butterfly is my favourite, I especially like the way the bordered mats look :-)
Saturday, 15 February 2014
Valentine and anniversary - 52CC week 5
Three prompts from the prompt jar for week 5 of the 52 cards challenge :-) These were: pale, glitter, love.
Now you know I don't do glitter.... LOL. But I have used the 'pale' and 'love' and added a bit of pearly bling instead of glitter! I have to say, wasn't really inspired to make a Christmas card from this prompt, so did two everyday ones instead - Valentine and wedding anniversary, since it's our 29th coming up next month. Good job DH doesn't read my blog........
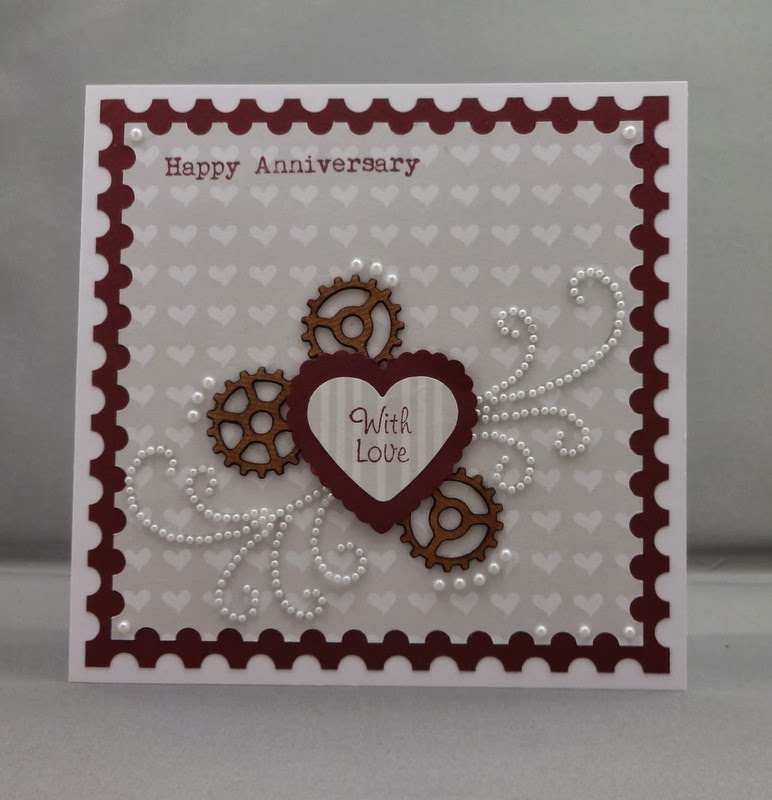
For the anniversary card, I robo-cut two postage stamp mats (cut file from the Silhouette site, big thank you to Trish for pointing the way!) The plum paper is a freebie from work and the pale background papers came with a magazine, which may have been Simply Homemade. I punched out the two hearts and attached them to the base using foam pads, so I could tuck the pearl swirls underneath. Then I stamped the sentiment (Stamping all day), it's little bit wonky, but I'm sure he won't notice LOL. Then the pearls in the corners. But it was missing something.... so I tucked some laser-cut gears under the heart too, and added pearls to the sides of those, supposedly to be like lines indicating motion ...... but actually to cover a smudge of ink near one of the gears, so I had to do the same 'fix' on all three! I like the way they look, so that's OK :-)
The Valentine card was much simpler. A while ago I bought some double-fold card blanks in a linen finish, by mistake - I hadn't read the description properly and thought they were ordinary single fold. However this has turned out to be a good thing, as I can cut off one of the thirds and then trim it down to a mat to fit on the now single fold blank. The same freebie plum paper is matted underneath this to give a very narrow border and I used a south-western corner punch for a bit of detail. Then I punched the two hearts in plum and pale paper as I had done on the anniversary card, but this time added a punched heart in a pink magazine paper (Making Cards). This was stuck with red tape just down the centre so it could be 2D and I added a line of pearls on each heart, plus one in each corner. No space to put a sentiment, but if you get a card on Valentine's day with hearts on it, I'm sure it's pretty clear what it is LOL.
I really like these two, and I must work out a way to put a sentiment on the second design, as I'm sure I could use it for several occasions.
Thursday, 6 February 2014
Photo prompt - white, colours, doily - 52 cards week 4
The prompt for week 4 is a Pinterest photo - a picture of beautifully decorated cookies on a lace doily. I didn't even realise they were cookies until reading the post LOL.
The Christmas card uses white with bits of red and green, and a doily. The doily is a die-cut (Cheery Lynn), the backing paper is from Craft Creations and the stamp is an old one from Elusive Images. I coloured it with Kuretake pens, I have quite a collection now, so need to practise using them LOL. I didn't add a separate sentiment as I don't think it needs one.
The birthday card... well, it does have a doily .... and white.... but it did kind of evolve from the starting point! The stamp is from Indigo Blu (more colouring!) and I cut round the image to mount it onto the doily (Hero Arts?). The background is embossed with a damask folder. I put ribbons behind the poppies and the sentiment tag is done with Stampin' Up oval punches.
Subscribe to:
Posts (Atom)