A blog for cooking and crafts

Saturday 28 December 2013

60th wedding anniversary - 52 cards week 52


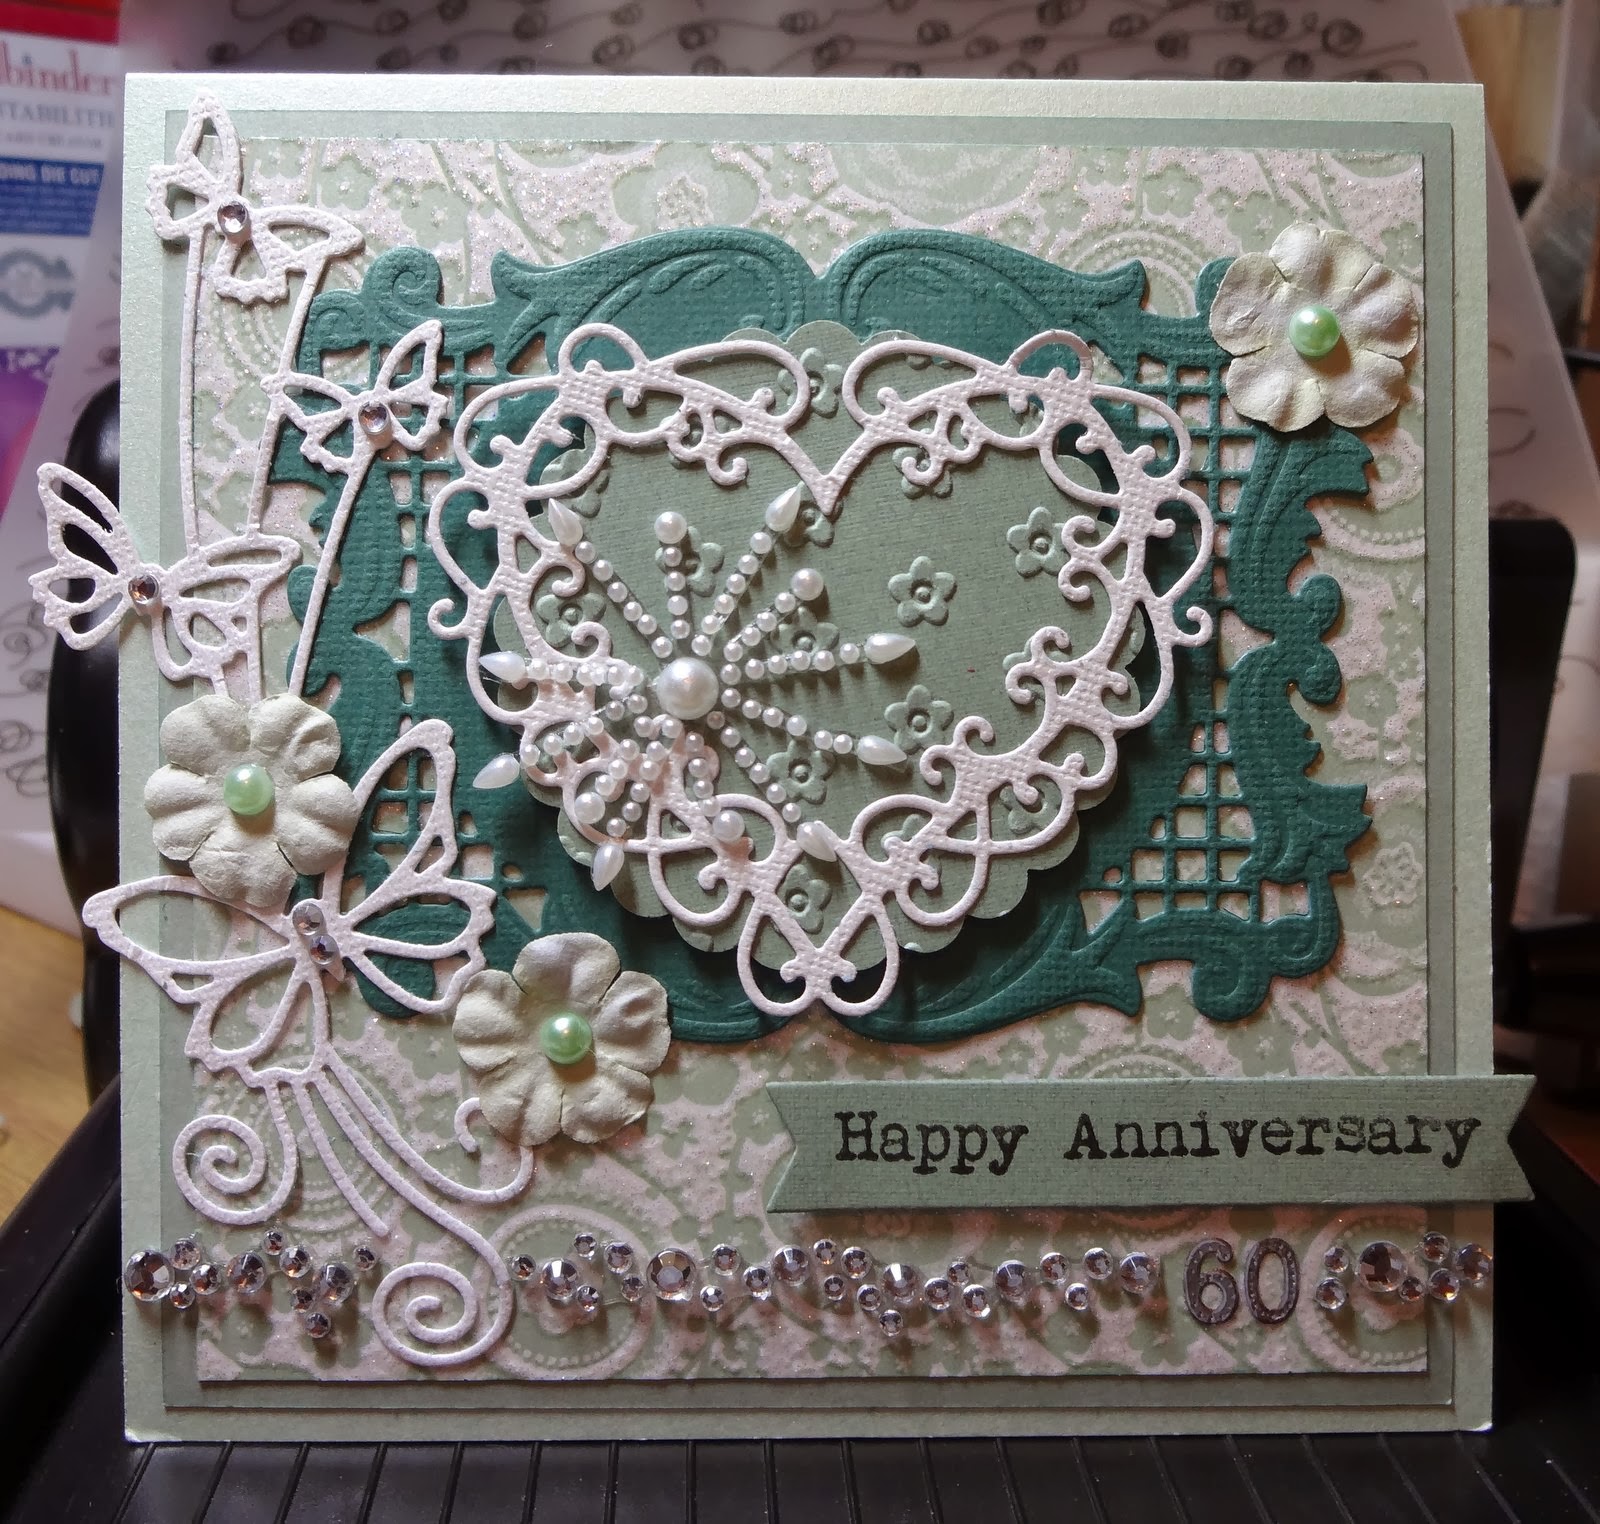
The final prompt for the 52 cards challenge is to use any prompt, or any card made this year, as inspiration for a new card.  Since it's my in-laws' 60th (Diamond) wedding anniversary, I decided on the 'numbers' prompt, though I can't remember which week that was originally from!

I had already prepped a base card, with matted and layered papers from a 6" paper pad.  Then I built up layers - the dark green base is a Joy Crafts die, the scalloped circle is done with a Woodware punch which was then run through the Bigshot in a flowery embossing folder.  The twirly heart is a Cheery Lynn die and the butterfly flourish is yet another die, this time from Joanna Sheen.
I added some flowers with pearl centres, a star which was part of a Hobby House pearl flourish and a row of diamonds interrupted by the number 60.  Also managed to sneak yet more diamonds in, on the butterflies :-)
The sentiment is from Stampingallday, stamped onto a die-cut banner from Dienamics.

I am very pleased with this card and they loved it.  However it was outshone by the other item we arranged for them to receive........ a telegram from the Queen.  Her Majesty now has pride of place on the mantelpiece!

See the entry on the Buckingham Palace website for details of how to apply - there are various anniversaries for which this can be done.
Posted by Picasa

Monday 2 December 2013

Horse themed Christmas card


As mentioned in the previous-to-last-post, my colleague loved the 'bee' card so much, she wanted a 'horse' one.
So here it is!  I used a Hero Arts snow scene background stamp, over-stamped the horses (Lavinia Stamps), then smooshed a little ink under their feet so that they weren't floating mid-snow.  I did have a little trouble with the black ink - my faithful Versafine let me down, so I tried heat embossing the image in both detail and ordinary black embossing powder, both looked awful.  Finally I remembered that I had bought a Memento black, ages ago, and tried that (removing the shrink wrap first.......!) and thankfully it worked!
I had an already-prepped card base, with an embossed mat in Bazzill bling 'Sparkle', so I mounted the topper onto that, stamped and punched out the sentiment, and added some pearls to finish.  I think the sentiment stamp might be from Lakeland, back when they were doing craft stuff.... I have had it for years, and only now have I discovered that one of my oval punches fits it perfectly LOL.
So - I charge £3 each for my cards, or 2 for £5.  To make these, I bought two Molly Blooms stamps (bees and hive) and the Lavinia horses ... not to mention the other Lavinia stamps that fell into the basket!  Somehow, I don't think I have made any money on this .... LOL .... but I will use all the other stuff I bought, so that's OK.  Isn't it?
Oh, and she loved it :-)
Posted by Picasa

Friday 29 November 2013

ATDML Photo Scavenger Hunt - November


I enjoyed last month's challenge so much, I thought I would do it again!

The seven photos required for November are:
  • Fire / firework
  • A reflection
  • Home Comforts
  • View from a Window
  • Sign of the Season
  • Favourite Drink
  • Something you are thankful for

Fire


I decided on a candle flame ..... wow, it was hard to photograph!  I wanted to take a picture of the whole candle holder, which is a dragon breathing life down into the candle ....... but all pictures with the whole object in, just had a blaze of light rather than a distinct flame.  So I had to settle for the flame and the base of the holder :-)

Reflection


Another difficult one to take!  My three decorated Ikea mirrors, with reflections of my cookbooks, me - or most of me, I seem to have cut off the top of my head - and some craft books on another bookshelf.

Home comforts


My knitted sampler square blanket .... it's quite well knitted, but not so well sewn together, that's the part I struggle with :-)  Lovely and snuggly though!

View from a Window


This is a view of a window, through another window ..... my car door window, to be precise.  I should add that I was stopped at traffic lights at the time :-)  Not as good a picture of the Christmas display as I would have liked, but not enough time to take another one.

Sign of the Season


Drifts of leaves under their trees ......

Favourite Drink


Red wine!  Well, really what else am I going to put....... LOL.  Doesn't have to be this specific brand, I'm happy with most things....... :-)


Something you are thankful for


My now usable craft room - I was drowning in stuff and could barely turn around.  So I took everything out .... and then put some of it back!  The result is a space where I can actually work :-)  Not to mention that I now have a much clearer idea of what I have got. 
During the course of this upheaval, I dropped a stepladder on my foot - ouch!  I nearly used a picture of my badly bruised toes, as I was very thankful that they weren't broken, but it was not a pretty sight, so you are spared that gruesome experience :-)
 
Looking forward to next month's prompts!


Thursday 28 November 2013

"Bee" Christmas card


One of my work colleagues asked if I could make a bee themed Christmas card for her daughter :-)  Well, I like a challenge.......!
I bought two Molly Blooms stamps, one of a bee on its own and the other of a hive hanging on a branch.  The main stamp had to have its leaves masked off so I could overstamp holly leaves in their place - that was fiddly......  The holly leaves are from a Woodware stamp set.
Usually, I avoid colouring in images, as I'm not that good at it!  But I have found some pens I really get on with, so gave it a go and I am quite pleased with the results.
I came up with "deck the hive with boughs of holly" as the sentiment, my colleague liked it so I went ahead and computer generated it, die-cut it with a Dienamics tag die.
The shaped card base is die-cut from an existing card blank, using Nesties Grand Labels Four, the smallest one of that set.  I tried something which I have been meaning to have a go at for ages - I inked inside the shape whilst still inside the die, it gives a really nice effect and reduces the rather wide spacing between the two Nestie shapes.
I forgot to photograph it before I handed it over, so had to beg it back and take a photo on my desk at work!  My colleague is very pleased with it ...... and has asked if I can now make a horse themed card for her other daughter!!! 
Well, I like a challenge ...... :-)
Posted by Picasa

Monday 4 November 2013

Flower Cluster birthday card


This card 'christens' a new sentiment stamp, used the same day as I bought it - unheard of!  I took a sheet of 6" paper from a pad (Authentique) for the background and stamped the sentiment (Hobby Art) in teal.  Then I stamped the script flowers in the same colour (Craft Stamper freebie stamp), cut out and inked the edges.  They were arranged in three layers, one flat to the card, one on 1mm foam squares and the third on 2mm foam.

I die-cut a swirly flourish (Memory Box), cut it in half, tucked the pieces behind the flowers.  Then I used a Martha Stewart punch for the fronds and tucked those behind too.  Pearls in the corners to finish :-)

This is one of my favourite stamps for cards (yes, even though it's a flower!), if I ever lose it I will be in trouble!
Posted by Picasa

Friday 1 November 2013

52 Cards Challenge - week 41


The prompt for week 41 is to use something with points - I have gone for these pointy sentiment banners!

The Christmas card is done with Basic Grey 'Wassail' from the 6" paper pad.  I think the stamp might be Penny Black, stamped and embossed in gold with the baubles coloured in red.  The sentiment banners are die-cut (Dienamics).

The steampunk birthday card is ny favourite :-)  Using a 6" pad again, Graphic 45 'Steampunk Spells', I took the plain side of one of the more Hallowe'en-y papers and stamped the swirly gear image in black versafine.  This stamp is either Stampendous or Hero Arts ...... :-)  Then I inked up two small parts of the stamp in versafine Toffee and cut them out to go over the blank.  The clock stamp is from Technique Tuesday, again stamped in Toffee and placed over a similar shape on the black image.  Some black ribbon and the sentiment banners finish it off.
Posted by Picasa

Wednesday 30 October 2013

ADTML Photo Scavenger Hunt Challenge

I had never done a photo scavenger hunt before, so when I saw this challenge on the ADTML blog, I thought I would have a go.  Seven photos ...... how hard could it be .....?

Here is the list:
  1. Time (to represent clocks changing at the end of the month)
  2. Pumpkins
  3. Autumn Leaves
  4. Weather (good or bad, blue skies or wet shoes!)
  5. Winter Warmer
  6. Something Scary
  7. A Treat :)
Time
 A watch catalogue
No, I don't attend Sotheby's auctions ...... I just work at the company which prints their catalogues ...... but I can dream ..... :-)
 
Pumpkins
Pumpkin display at the supermarket
 
Autumn Leaves
A tree on the way to work
Two days later the storm had blown away all the leaves!
 
Weather
The view out of the ADTML retreat hotel window
 
Winter Warmer
Slow cooker beef curry with griddled naan bread
 
Something Scary
Ooooh, scary cheeses .......
 
A Treat
Sweeties ready for the Trick-or-Treaters
This was the prompt I struggled with, until the obvious answer hit me :-)
 
This was such a fun challenge, and I plan to do a layout of all seven photos :-)


Tuesday 29 October 2013

Who ate all the Pies? - Craft Stamper Challenge 5


The Craft Stamper challenge requires 'splattering' to be used somewhere on the project.  I have chosen to stamp many splatters on the background cream paper.

I did this layout at the ADTML retreat, using one of their challenges as inspiration - a scrapping bingo where you had to use four things from a grid, making a 'bingo' line!  My four things were: stamping, four different papers, distressing and Thickers. 

The papers are Bo Bunny 'Weekend Market', except the woodgrain which was from stash.  A selection of splatter stamps were used, from Paperartsy and Visible Image, in various shades-of-brown inks.  I used some felt circles for embellishments, not sure of the brand.  The title uses the required Thickers LOL.

A close up of the splatters:


I had already scrapped these photos once, but just wasn't happy with the result ..... that first layout is now in the bin!  Never be afraid to start something again..... I am much happier with this page :-)
Posted by Picasa

Monday 28 October 2013

Steampunk frame shadow box

I have just spent the weekend at the fabulous retreat in Suffolk run by A Trip Down Memory Lane.  Got lots done and had a wonderful time :-)  I have some completed projects to share, but first I thought I had better show you the finally finished project from a class at the last retreat in April!

It was a technique class, taught by Jane Hewitt, the basic idea was to stick die-cut shapes to a frame, cover with foil tape, and paint over with black paint which was then rubbed back as desired to reveal the silver colour beneath.

This is how it looked at the end of the class:


It stayed that way for a while, in fact until I went to the Stamperama show in August, where I bought this shadow box.  It has an acrylic insert which slides into the groove to form the complete frame, I have taken the photo with it pulled slightly out so you can see how it works:


I painted the box black, while it was drying I had a little play with the frame.  I die-cut some gears in a coppery colour card, stuck them to the silver gears, then stamped/embossed in black over the frame with a script stamp.  Then I used Treasure Gold in Onyxite to highlight the gears and the frame, waited for it all to dry and sealed with Mod Podge.

Then came the interesting part .... I stuck the box to the backing board inside the frame and attached the little screw eyes to hold the charms.  This was a mistake, I should have sorted out the box before I fixed it to the board and it did cause me some problems!  Lesson learned for the next time!

The tiny travel charms are attached using jump rings and a lobster claw fastener, quite fiddly to insert.  They have an additional hidden element -  I have put a blob of Blu-tak behind each one, to stop them spinning and ensuring that they are all the right way round, all the time!

Here is the finished frame, photo'ed without the acetate front:


And a couple of close-ups:


Now all I need to do is collect some more charms :-)

Tuesday 15 October 2013

52 cards challenge - Week 40


The prompt for week 40 was a picture, of multi coloured umbrellas over a street.  I decided that they were autumn colours, so went with that for these birthday cards.
The papers are from Bo Bunny, their new 'Autumn Song' range ..... yes I bought a 6" paper pad - as if I didn't have enough of those!  The colours are gorgeous, though :-)  I matted onto some Bazzill (Julep) and stamped in black Versafine over the top (thanks to Sy for that suggestion) using some gorgeous new poppy seed head stamps from Lavinia Stamps and a quote, can't remember the brand.  The sentiment is from Stamping all Day.  I used a Memory Box trellis die on the second card.
They are a bit limited as birthday cards as probably only suited to Autumn birthdays, but I am really pleased with them - I had forgotten how effective silhouettes can look :-)  A couple of other Lavinia stamps slipped into the shopping basket, so they will be coming up soon........ LOL.
Posted by Picasa

Sunday 13 October 2013

52 cards challenge - week 37

The prompt for week 37 was a sketch.  I have deviated just a little from it, but hopefully not too much.  Also I am trying a new layout for this post, we'll see how it looks!

The birthday card is made made with yet more papers from my seemingly inexhaustible 6" paper pad stash.  This one is from My Minds Eye, can't remember the title, but something French, or maybe Parisian..... 
A basic background mat, with a horizontal band and an oval image.  The oval doily mat is from Dienamics and the cameo-in-frame stamp may be Stampendous, but I won't swear to it!   I have a terrible memory for brand names :-)  I punched out some flowers (EK Success) and added some pearls to the corners.  The sentiment is a HobbyArt stamp.  It still lacked something though, so I added some blingy trim along the band and a peel-off line border around the whole lot.

For the Christmas card, I ran the whole card blank through a 6" embossing folder (Embossalicious) and added the oval doily mat, the punched snowflakes (Martha Stewart & Woodware) and the ribbon, which had originally come from a box of chocolates ....... I could never tie a bow like that :-)  The tree was stamped and embossed in gold and the little red berries are actually the waste from the doily die-cut - quite fiddly to stick down, but they do look nice.

Out of the two, I prefer the birthday card :-)  And I don't like this layout - will be back to normal on the next post!
Posted by Picasa

Tuesday 1 October 2013

52 cards Challenge - week 38


The prompt for week 38 is ...... the G-word ...... glitter!  Aargh!!!!  I don't do glitter.......
I was going to give this prompt a miss, but I am on a mission to use up 6" paper pads at the moment and one of them (from First Edition) had some glittered papers in.  So I have made this very simple card, just a piece of the g-paper, matted up and sentiment added, with jewels in the corner.

However ...... this has led to a fab discovery, which is that this particular sentiment stamp (Hobby Art) fits perfectly into this Nestie tag- it could have been made for it!  So something good has come of this prompt after all, I will definitely be using this combination again :-)

I am not doing a Christmas card though ...... enough is enough :-)
Posted by Picasa

Thursday 26 September 2013

Let it Snow - for Craft Stamper Challenge Four


The current Craft Stamper Challenge is to use acetate in some way on a project.  Now this is well out of my comfort zone, in fact I think the only thing I have ever used acetate for is as a clear front for a shadow box :-)
I decided to stamp and emboss, so after getting some heat-embossable acetate, I used a snowflake circle stamp from Hero Arts.  The original intention was to use the circles on a card in some way, but once I had done a few, I wasn't happy with that idea, so pushed them to one side of the desk for a while, to wait for inspiration to strike!
Later ..... a couple of days later! ..... I looked at them and thought how they looked like a little snowdrift, and remembered that I had a snowy photograph to scrap!
The papers are a mix of old and new, the lower swirly one was bought on a trip to America, so either in 2004 or 2007!  Curiously, though, they are both from Hot off the Press.  I stuck the background snowflake paper to some white card (HOTP are quite thin papers) and stamped the Hero Arts snowflake border along the top.  Then I fussy-cut around the swirls on the other paper, shuffled the acetate circles and photo around until I was happy with the positioning, then stuck everything down.
The title is robo-cut (font: Boyz R Gross) and the snowflakes are done with a Martha Stewart punch.

A close up of the acetate:


I rather enjoyed this, definitely need to experiment some more :-)
Posted by Picasa

Wednesday 25 September 2013

52 cards Challenge - Week 36


I seem to have fallen a little behind again LOL.  The prompt for week 36 is to use kraft and one colour (neutrals don't count).

For the birthday card, the colour is a pitsachio-ish green - I tried out my new MS punch around the page set, I think it's called 'Arabesque', on a random piece of paper and liked the result enough to use it on a card!  I wraped a ribbon around a central corrugated card panel, then stamped the sentiment (Stamping All Day) and die-cut it out with a Go Kreate die.

The Christmas card in red and kraft is a variation on yesterday's BtCR set - I used the same printed topper downloaded from the Graphics Fairy and added some ribbon wrapped around the background mat.  Sentiment is again on a Dienamics tag.

I counted up the Christmas cards in The Box ..... I have 62!!!!   I don't think I actually need anymore, but I do like making them, so will carry on :-)
Posted by Picasa

Monday 23 September 2013

Beat the Christmas Rush - August


BtCR challenge for August - made it by the skin of my teeth once again ..... :-)  Only three days to go before the next one starts .... actually that's earlier than I have been, on some months LOL.

I used some red and white paper from stash - think it might be Magnolia? - and matted onto some red cardstock.  The corners were rounded to echo the scalloped card blank.
The image is a download from the Graphics Fairy, I don't have a link to the exact entry as I downloaded it some time ago, but a search under 'Christmas' or maybe 'Santa' will turn it up :-)  I printed it out and managed to get it to print at a size to fit a punch, which is a miracle in itself!
The doily mat and banner are die-cut (Dienamics).
I should really have a count up of Christmas cards, I am onto a second box, so I must have a fair few by now :-)
Posted by Picasa

Monday 9 September 2013

Calorie free chocolate tag


I made this tag to put on a birthday card, but decided to leave it just as a tag, so it could be used as a bookmark :-)

I distress-inked a manilla tag using Antique Linen, Tea Dye and Vintage Photo, then used Tea Dye to stamp the background in crackle and bubbles designs, both from Indigo Blu.  Then I stamped the Paperartsy chocolate quote.  At that point I didn't really have a plan, but I decided it was time to have another go with texture paste because I have recently bought several masks (part of my birthday spending!).
I used a Crafters Workshop gridded square mask and applied the paste, left it to dry.  I had thought of inking over the top, but I remembered the Treasure Gold metallic wax, also bought recently, the color is Onyxite.  It looks just like chocolate!
For the 'wrapper', I used a piece of embossed metal from my bits and pieces box and folded it around the base.  Then I backed the whole thing with a blank tag, to hide the metal edges and to make it more substantial, and finished with some ribbon.
I am definitely going to make some more of this calorie-free chocolate!
Posted by Picasa

Thursday 5 September 2013

Get Well card


Oo-err!  This is a bit bright for me!  I made the bubbly background tag a while ago and decided it should go onto a card.  So I searched through some 6" pads to find co-ordinating papers and this is the result.  Simple matting and layering, with peel-off line frames, then I stamped /embossed the flower and cut out.  The flourish is die-cut and the sentiment stamped.

Background stamp - Lost Coast designs
Papers - Jillibean Soup? or maybe My Minds Eye?
Flower - Craft Stamper freebie
Flourish - Dienamics
Sentiment - Tinchies
Posted by Picasa