I have just got the Stamparatus, the new stamping platform from Stampin Up. I have been thinking about getting a platform for a while and this one has two plates instead of the more usual one.
My first attempt was somewhat disastrous as I also tried some new inks, and they did not like polymer stamps! So I went back to trying one new thing at a time LOL.
A simple monotone card, the balloons and sentiment are both SU, and there is also a matching punch so I was able to punch out masks and stamp the centre balloon. I have had the balloons & punch for some time and not christened them so this is an OotD project too :-) The platform makes placement so easy and the greatest thing is - you know when you stamp a sentiment and it just misses one of the letters? With this tool you can re-ink the offending letter and re-stamp in exactly the same place. This is going to be so useful for me, the number of times I have tried to re-stamp by hand and it doesn't quite work, well I couldn't count them!
Further cards to follow during this week :-)
A blog for cooking and crafts
Showing posts with label out of the drawer. Show all posts
Monday, 5 March 2018
Friday, 23 February 2018
Peacock box
I have a huge stash of wooden items to use up and so I decided to decorate a box for Sy's Christmas present - I had forgotten I hadn't blogged it!
I took all the hinges and clasp off the box and put them safe to one side. Then I primed the box with gesso and painted with a teal paint from Cosmic Shimmer. The stencilling, which isn't - ahem - quite perfect ...... never mind, was done with silver acrylic paint, I can't remember the brand of stencil. It wasn't quite wide enough to go over the entire box, but I liked the borders at the side, just needed to find something to give them a 'finished' edge. A strip - or four - of nailheads did the trick, making certain they would stick permanently by using cosmic shimmer glue on the integral adhesive strip. A coat of varnish to protect it and left to dry overnight.
Tine to re-assemble the box. Now bear in mind that this was the Saturday morning before heading off to the crop where I was going to give the gift. I dropped the last tiny screw on the floor. Could I find it? I had to find another blank box with silver screws and discovered that all of them except one had brass fittings LOL. I have now bought a whole selection of tiny screws, in various finishes, to make sure that never happens again :-)
I took all the hinges and clasp off the box and put them safe to one side. Then I primed the box with gesso and painted with a teal paint from Cosmic Shimmer. The stencilling, which isn't - ahem - quite perfect ...... never mind, was done with silver acrylic paint, I can't remember the brand of stencil. It wasn't quite wide enough to go over the entire box, but I liked the borders at the side, just needed to find something to give them a 'finished' edge. A strip - or four - of nailheads did the trick, making certain they would stick permanently by using cosmic shimmer glue on the integral adhesive strip. A coat of varnish to protect it and left to dry overnight.
Tine to re-assemble the box. Now bear in mind that this was the Saturday morning before heading off to the crop where I was going to give the gift. I dropped the last tiny screw on the floor. Could I find it? I had to find another blank box with silver screws and discovered that all of them except one had brass fittings LOL. I have now bought a whole selection of tiny screws, in various finishes, to make sure that never happens again :-)
Tuesday, 9 January 2018
2018 card challenge - January
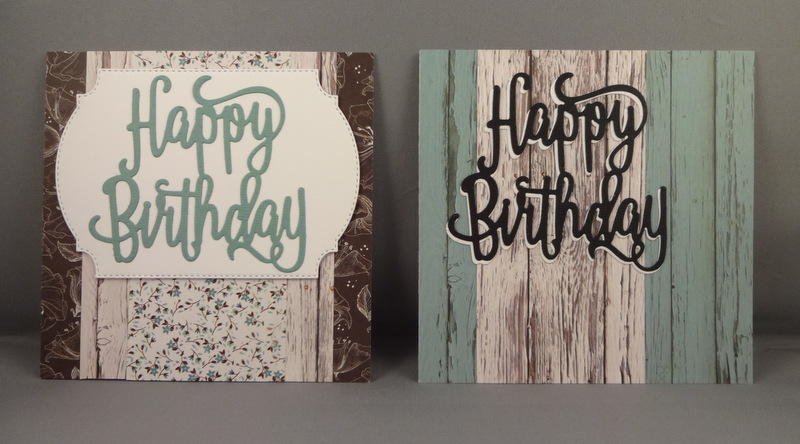
Kool Kitty Nat is running a card challenge this year, with a monthly theme and a goal to use old and new stash. Which goes very well with my own Buy it - Try it and Out of the Drawer :-) January is 'Fancy Words', where the sentiment or other text is the focus.
I used a 6.5 paper pad from Kaisercraft, Sea Breeze I think, as the 'old' element and the large HB die from SU is the 'new'. The other sentiments are also SU and are stamped/embossed in metallic Teal from American Crafts.
Wednesday, 25 October 2017
Out of the Drawer: Grungy pink butterfly birthday card
Another stamp christened .......
I stamped, coloured and masked the Stampendous butterfly/music stamp, then used various splatty stamps over the mask. The sentiment is from Stamping all Day.
A narrow black mat to finish it off ........ I am actually not too sure whether I like this one or not, maybe it'll grow on me :-)
I stamped, coloured and masked the Stampendous butterfly/music stamp, then used various splatty stamps over the mask. The sentiment is from Stamping all Day.
A narrow black mat to finish it off ........ I am actually not too sure whether I like this one or not, maybe it'll grow on me :-)
Tuesday, 17 October 2017
Out of the Drawer: Vintage Christmas card
I have had this poinsettia stamp from Hero Arts for over a year, having bought it in a sale well before last Christmas. It's actually been in my crop bag for most of that time, but I just haven't got around to inking it, until now!
I made a smooshy distress ink background, then over-stamped the image and a sentiment (SU) in brown. This was then matted onto a bronze-y cardstock. I cut a square from Bazzill Swiss Dot Kraft, adhered to a kraft card blank, then added the topper.
I love this vintage look. But next time I will try colouring the image, though I am not sure which bracts should be red and which green!!
I made a smooshy distress ink background, then over-stamped the image and a sentiment (SU) in brown. This was then matted onto a bronze-y cardstock. I cut a square from Bazzill Swiss Dot Kraft, adhered to a kraft card blank, then added the topper.
I love this vintage look. But next time I will try colouring the image, though I am not sure which bracts should be red and which green!!
Saturday, 9 September 2017
Out of the Drawer: Snowflake Christmas cards
This Stampendous stamp set and matching dies came out a couple of years ago, I saw it and thought well that's OK, but I won't bother with it. Fast forward a few months and I see a card on Pinterest and decide that actually I would rather like the sets after all! But you know how fast everything is released and then disappears nowadays...... I couldn't find it anywhere. In the end I got the stamps from a UK company and the dies from the US, via Amazon.
So what happened next ....? Yes you guessed it, they went into the drawer and have never been christened, even though I went to such lengths to get them!!
Tine to put that right:-)
There are two small and one large snowflakes in the set and I used the smaller ones, in two colourways. However I found that one of them was more difficult to die-cut as the die obscured most of the stamping and it was very difficult to position accurately. The gold snowflake on the right was my third attempt, I then switched to the other one which is much easier to cut!
For the blue cards, I stamped/embossed the snowflakes in silver and blue, plus a sentiment (Stampin' Up). The paper is from Craft Creations, matted onto silver mirri.
The gold snowflakes and sentiment are also heat embossed and the paper is from Teresa Collins, matted onto a nice dull gold.
I made five gold and six blue - it would have been six gold but I messed up the stamping of the sixth snowflake and I was a bit fed up with them all by that point LOL. I also discovered that my 4" card blanks were actually not square, so I had to trim all my carefully cut mats to fit! I have since cut down the entire pack so that they are all square, otherwise I can't use any square dies without them looking wrong! Thank you, Card Crafts UK ......
I ma very pleased with how they have turned out, that's eleven more for the box :-)
So what happened next ....? Yes you guessed it, they went into the drawer and have never been christened, even though I went to such lengths to get them!!
Tine to put that right:-)
There are two small and one large snowflakes in the set and I used the smaller ones, in two colourways. However I found that one of them was more difficult to die-cut as the die obscured most of the stamping and it was very difficult to position accurately. The gold snowflake on the right was my third attempt, I then switched to the other one which is much easier to cut!
For the blue cards, I stamped/embossed the snowflakes in silver and blue, plus a sentiment (Stampin' Up). The paper is from Craft Creations, matted onto silver mirri.
The gold snowflakes and sentiment are also heat embossed and the paper is from Teresa Collins, matted onto a nice dull gold.
I made five gold and six blue - it would have been six gold but I messed up the stamping of the sixth snowflake and I was a bit fed up with them all by that point LOL. I also discovered that my 4" card blanks were actually not square, so I had to trim all my carefully cut mats to fit! I have since cut down the entire pack so that they are all square, otherwise I can't use any square dies without them looking wrong! Thank you, Card Crafts UK ......
I ma very pleased with how they have turned out, that's eleven more for the box :-)
Friday, 21 April 2017
Out of the Drawer: lattice stencil flower birthday card
Still haven't managed to photograph any retreat stuff.... we had visitors over Easter so no crafting! Good time had by all :-)
I did manage to finish another Distress oxide stencilled image into a card though.
The OotD item is the lattice die, from Tonic. It's not a complete lattice, the centre is a blank circle, which actually, I didn't like when I originally tried it and so haven't used it since. Then it occurred to me that I could cover it up ...... duh. So I die cut the stencilled flower (Clarity stencil) into the outer square shape, then trimmed it into a diagonal sash to cover the centre. I'm not quite happy with the finish on the stencilling, I used a proper stencil brush, but blending foam pads would have worked better - for the next background I made (not completed into a card yet), I tried those and the colours are much more dense and chalky.
Some aqua/silver paper for the background, also cut with the outer square, then everything was layered up. All it needed then was the sentiment, I used an SU punch and a peel-off.
I do like the die used in this way and will definitely try it again :-)
I did manage to finish another Distress oxide stencilled image into a card though.
The OotD item is the lattice die, from Tonic. It's not a complete lattice, the centre is a blank circle, which actually, I didn't like when I originally tried it and so haven't used it since. Then it occurred to me that I could cover it up ...... duh. So I die cut the stencilled flower (Clarity stencil) into the outer square shape, then trimmed it into a diagonal sash to cover the centre. I'm not quite happy with the finish on the stencilling, I used a proper stencil brush, but blending foam pads would have worked better - for the next background I made (not completed into a card yet), I tried those and the colours are much more dense and chalky.
Some aqua/silver paper for the background, also cut with the outer square, then everything was layered up. All it needed then was the sentiment, I used an SU punch and a peel-off.
I do like the die used in this way and will definitely try it again :-)
Saturday, 1 October 2016
Blogtober is here!
Welcome to my first Blogtober post :-) I have decided to go for blogging three times a week, every Monday, Wednesday and Friday - plus this first post! For full Blogtober details, hop over to Karmacraft to see how you can take part in this challenge.
I'm going for a theme for the whole month, it's Christmas, Christmas, Christmas all the way! This first post is my Beat the Christmas Rush for September.
I have gone for a Scandi theme, with kraft red and white. White stamping and embossing on kraft, with a red mat and kraft card blank. The stamp is from Indigo Blu, bought ages ago but never really used, and the sentiment is brand new, from Visible Image.
I really like the way this has come out, there will definitely be some more Scandi-themed cards during the month!
I'm going for a theme for the whole month, it's Christmas, Christmas, Christmas all the way! This first post is my Beat the Christmas Rush for September.
I really like the way this has come out, there will definitely be some more Scandi-themed cards during the month!
Thursday, 11 August 2016
Out of the Drawer: Monochrome letter rack
In 2014, I went to the Merly Impressions retreat and had a wonderful time :-) This letter rack was one of the included kits - I didn't start it at the retreat, but brought it home 'to do later'.
Two years later...... a lady who had been to the 2016 retreat, posted her beautiful completed letter rack on Facebook and I thought - I really must do mine! I made a good start, then family bereavement and the resulting issues put a stop to any other thoughts for a while.
Last weekend was my craft weekend, so I decided to make finishing this my priority. The papers are all Kaisercraft, though I am not sure from which ranges now (having lost the original kit instructions!). The back surfaces of the dividers, the inside sides and the back of the rack are painted with black acrylic and then sealed with a matte varnish. The handles are from Tonic Studios, they are brads, so were easy to attach to the greyboard drawers and I really love the effect.
Now all I have to do, is finish the other BTP products I bought in 2014...... plus the one I have just bought ...... before the retreat next year :-)
Two years later...... a lady who had been to the 2016 retreat, posted her beautiful completed letter rack on Facebook and I thought - I really must do mine! I made a good start, then family bereavement and the resulting issues put a stop to any other thoughts for a while.
Last weekend was my craft weekend, so I decided to make finishing this my priority. The papers are all Kaisercraft, though I am not sure from which ranges now (having lost the original kit instructions!). The back surfaces of the dividers, the inside sides and the back of the rack are painted with black acrylic and then sealed with a matte varnish. The handles are from Tonic Studios, they are brads, so were easy to attach to the greyboard drawers and I really love the effect.
Now all I have to do, is finish the other BTP products I bought in 2014...... plus the one I have just bought ...... before the retreat next year :-)
Monday, 5 October 2015
Out of the Drawer - feather cards
Once upon a time, a long long time ago ....... I went to Ally Pally scrapbooking and stamping show, back when they still had enough scrapbooking supplies to warrant the name LOL. I bought some quotation stamps from the Clarity stamps stand, brought them home .... only used one of them, the rest never saw the light of day again and I forgot about them.
Fast forward to sometime last year, when I bought a magazine with a feather die as the free gift. I bought it, then discovered it was meant to go with the stamp set they had given away in the previous issue. I couldn't find this issue, so got a bit fixated on the whole thing and ordered the Hot off the Press stamps from Amazon, from a USA supplier LOL.
Forward a bit more, just a few months ago now, when I happened to come across the feather quote stamp and had the good sense to put it in the drawer with the die and stamps. There the whole combination stayed.
Here and now! - I decided they would be perfect for an OotD post for Blogtober :-) I had made a layout, to be shared later in the month, and the papers were also OotD, as they were an unused kit from a class at A Trip Down Memory Lane retreat. So I made cards with the scraps!
I did find that the die didn't seem to fit the stamp exactly - the curve on the 'spine' of the feather seems to be different on the stamp and the die, even allowing for my placement errors :-) The papers are from Echo Park. As an extra OotD, I used two previously un-christened embossing powders, both from American Crafts, in Metallic Teal and Powder. Embossing powders are high on the list of "I really must use those more often!", I have so many colours and I do love the effect.
The stamp set gives a very nice impression and I will definitely use both stamps and die again. I also got some more cards out of the papers, will share those tomorrow :-)
Fast forward to sometime last year, when I bought a magazine with a feather die as the free gift. I bought it, then discovered it was meant to go with the stamp set they had given away in the previous issue. I couldn't find this issue, so got a bit fixated on the whole thing and ordered the Hot off the Press stamps from Amazon, from a USA supplier LOL.
Forward a bit more, just a few months ago now, when I happened to come across the feather quote stamp and had the good sense to put it in the drawer with the die and stamps. There the whole combination stayed.
Here and now! - I decided they would be perfect for an OotD post for Blogtober :-) I had made a layout, to be shared later in the month, and the papers were also OotD, as they were an unused kit from a class at A Trip Down Memory Lane retreat. So I made cards with the scraps!
I did find that the die didn't seem to fit the stamp exactly - the curve on the 'spine' of the feather seems to be different on the stamp and the die, even allowing for my placement errors :-) The papers are from Echo Park. As an extra OotD, I used two previously un-christened embossing powders, both from American Crafts, in Metallic Teal and Powder. Embossing powders are high on the list of "I really must use those more often!", I have so many colours and I do love the effect.
The stamp set gives a very nice impression and I will definitely use both stamps and die again. I also got some more cards out of the papers, will share those tomorrow :-)
Tuesday, 10 March 2015
BiTi and OotD - Mother's Day cards
A combined Buy it - Try it and Out of the Drawer post :-)
BiTi - I used three new dies, the Boudoir Square and rococo heart from Tonic Studios and a tag from the Spellbinders Victorian tags set. Oh, and some linen textured cardstock which I bought at the Make It show.
OotD - I used a Memory Box diamond background die and some old freebie magazine papers.
Quite simple cards, but I am pleased with them and I think the recipients will be too :-).
BiTi - I used three new dies, the Boudoir Square and rococo heart from Tonic Studios and a tag from the Spellbinders Victorian tags set. Oh, and some linen textured cardstock which I bought at the Make It show.
OotD - I used a Memory Box diamond background die and some old freebie magazine papers.
Quite simple cards, but I am pleased with them and I think the recipients will be too :-).
Thursday, 18 December 2014
Out of the Drawer: Last minute Anniversary card
As we were going to bed on Monday evening, DH whispered those words every wife loves to hear ......
"It's my folks' wedding anniversary this week and I need to post the card tomorrow"
He then promptly went to sleep, whilst I lay wide awake!!! I knew I didn't have an anniversary card in my box, so was still turning over ideas in my head until I finally (much, much later!) fell asleep.
So I got up early the next morning and in the shower, I remembered a heart die and thought it would fit on one of my previously half-prepped card bases.
This is what I came up with in the end and even managed to take a photo before DH left for work with it.
It's a double OotD really - the card base, comprising the scalloped blank, the patterned paper mat and the turquoise die-cut mat was made ages ago at a crop and stashed in the drawer. I think the paper is from a 6" paper pad and the mat was a Marianne die. The heart die (Robert Adams) was bought at the Make it show last year on a vague "it'll come in useful" whim, but has not been christened until now! I have to say, it cuts beautifully.
So, early on Tuesday morning, I embossed some cardstock with a dotty embossing folder and punched a circle to frame the heart, stuck it to the die-cut mat. Then I die-cut the heart - after a frantic search for a suitably-coloured cardstock - and attached to the circle. The sentiment banner is done with a Dienamics die and a peel-off, no way was I going to risk messing up stamping a sentiment! The banner was attached to the heart and then I stuck down the flowers using Cosmic Shimmer glue, leaving about five minutes for it to set before DH was due to leave! I only had time to take one photo, luckily it's a reasonable one :-)
I do hope they like it ...... LOL.
"It's my folks' wedding anniversary this week and I need to post the card tomorrow"
He then promptly went to sleep, whilst I lay wide awake!!! I knew I didn't have an anniversary card in my box, so was still turning over ideas in my head until I finally (much, much later!) fell asleep.
So I got up early the next morning and in the shower, I remembered a heart die and thought it would fit on one of my previously half-prepped card bases.
This is what I came up with in the end and even managed to take a photo before DH left for work with it.
It's a double OotD really - the card base, comprising the scalloped blank, the patterned paper mat and the turquoise die-cut mat was made ages ago at a crop and stashed in the drawer. I think the paper is from a 6" paper pad and the mat was a Marianne die. The heart die (Robert Adams) was bought at the Make it show last year on a vague "it'll come in useful" whim, but has not been christened until now! I have to say, it cuts beautifully.
So, early on Tuesday morning, I embossed some cardstock with a dotty embossing folder and punched a circle to frame the heart, stuck it to the die-cut mat. Then I die-cut the heart - after a frantic search for a suitably-coloured cardstock - and attached to the circle. The sentiment banner is done with a Dienamics die and a peel-off, no way was I going to risk messing up stamping a sentiment! The banner was attached to the heart and then I stuck down the flowers using Cosmic Shimmer glue, leaving about five minutes for it to set before DH was due to leave! I only had time to take one photo, luckily it's a reasonable one :-)
I do hope they like it ...... LOL.
Monday, 24 November 2014
Out of the Drawer - doily die
I had partially made up this card and decided it needed a doily die-cut .... as you do :-) I found this die (Hero Arts? - it's difficult to remember when one doesn't keep packaging) and thought it would be suitable.
Well. I very quickly remembered just why this die was in the drawer! It is a pig to cut .... many passes through the machine and multiple shims later .... I finally had my doily.
The paper is from a 6" pad, I cut to fit the card blank and added the ribbon, pearls, paper doily and clock face (Robert Adams die). The dots are done using texture paste through a stencil and then inking them with a gold ink pad. It was at this point I decided on the doily...... having finally managed to cut it, I coloured it with the same gold ink pad. Then I stamped a sentiment (magazine freebie stamp) and circle-punched it, with a punched scalloped circle mat.
I am actually rather pleased with the finished card - but I must find an easier way to cut that doily!
Well. I very quickly remembered just why this die was in the drawer! It is a pig to cut .... many passes through the machine and multiple shims later .... I finally had my doily.
The paper is from a 6" pad, I cut to fit the card blank and added the ribbon, pearls, paper doily and clock face (Robert Adams die). The dots are done using texture paste through a stencil and then inking them with a gold ink pad. It was at this point I decided on the doily...... having finally managed to cut it, I coloured it with the same gold ink pad. Then I stamped a sentiment (magazine freebie stamp) and circle-punched it, with a punched scalloped circle mat.
I am actually rather pleased with the finished card - but I must find an easier way to cut that doily!
Monday, 27 October 2014
Beat the Christmas Rush - October
Oh my goodness ..... I haven't done this challenge since May!!
It also counts as a Buy it & Use it and an Out of the Drawer, so value for money today!
First, the cards - Two more cards with the Memory Box text die, but they also use something new .....
And two more which use an Impression Obsession die, bought sometime ago - these also use something new .....
The 'new' item is a sheet of adhesive developed especially for die-cutting, to enable the most intricate cuts to be self adhesive. You may recall a while ago I had trouble with a delicate die here, well I think this will be the answer! It's called Stick It, I bought mine from Craft Obsessions - who have made an instructional video here - but other retailers are stocking it too. So far, it is living up to the promise :-)
Now, this was not actually my planned blog post for today. What I had hoped to share with you was my bumper parcel of Stampin Up goodies, which I was expecting on Friday or Saturday, so that I could spend a happy weekend playing .... unfortunately they haven't arrived yet! Fingers crossed LOL.
It also counts as a Buy it & Use it and an Out of the Drawer, so value for money today!
First, the cards - Two more cards with the Memory Box text die, but they also use something new .....
And two more which use an Impression Obsession die, bought sometime ago - these also use something new .....
The 'new' item is a sheet of adhesive developed especially for die-cutting, to enable the most intricate cuts to be self adhesive. You may recall a while ago I had trouble with a delicate die here, well I think this will be the answer! It's called Stick It, I bought mine from Craft Obsessions - who have made an instructional video here - but other retailers are stocking it too. So far, it is living up to the promise :-)
Now, this was not actually my planned blog post for today. What I had hoped to share with you was my bumper parcel of Stampin Up goodies, which I was expecting on Friday or Saturday, so that I could spend a happy weekend playing .... unfortunately they haven't arrived yet! Fingers crossed LOL.
Wednesday, 22 October 2014
Out of the Drawer - simple Christmas card
I have so many Christmas stamps, it's about time I used more of them. Out of the Drawer today is this sentiment from a Woodware holly-themed clear stamp set, I think it's about two or maybe even three years old.
This is a quick and simple card, I used some paper from a magazine freebie 6x6 paper pad (maybe Bo Bunny?) for the background mat. The sentiment is stamped and embossed in silver with the leaves and berries coloured in, then the whole shape was hand-cut. I attached the sentiment using 1mm foam near the top right corner and added a ribbon down the left side. Shame I can't tie better knots, but there you go :-)
Sunday, 12 October 2014
Out of the Drawer - gilding flakes
Out of the Drawer is where I will be attempting to use some previously bought item, never used and languishing unloved in a drawer!
Today's item is an Indigo Blu gilding flakes starter kit. I had waited for a decent subscription gift for a magazine and this was suddenly advertised, so I thought "Ooooooh! Must have!" But in spite of all that excitement, it has sat in the drawer for a couple of months.
The flakes are very easy to use - though they fly everywhere - the comprehensive instructions did recommend using tumble dryer sheets to combat the static, I can certainly endorse that! The colour blend included in the kit was Autumn Dawn, mainly silver with a few other colour inclusions. I had seen a demo table at The Glitter Pot (didn't have time to stay and watch the actual demo!) and this stamp was on the table there so I thought I would try it .... though I was a bit doubtful as it is very detailed.
It gives an amazing effect, all the detail is picked up. DH did mutter something about couldn't I get that effect with embossing powder ..... to which Sy and I answered No! LOL.
It's also very difficult to photograph as it changes with the light. The two pics above are the same card, but it looks more gold than its real silver colour, the mat is actually blue-green :-) I have now bought another six Indigo Blu colour mixes, plus a Cosmic Shimmer one called Mulled Wine, well how could I resist that??
Looking forward to trying all my new mixes :-)
Today's item is an Indigo Blu gilding flakes starter kit. I had waited for a decent subscription gift for a magazine and this was suddenly advertised, so I thought "Ooooooh! Must have!" But in spite of all that excitement, it has sat in the drawer for a couple of months.
The flakes are very easy to use - though they fly everywhere - the comprehensive instructions did recommend using tumble dryer sheets to combat the static, I can certainly endorse that! The colour blend included in the kit was Autumn Dawn, mainly silver with a few other colour inclusions. I had seen a demo table at The Glitter Pot (didn't have time to stay and watch the actual demo!) and this stamp was on the table there so I thought I would try it .... though I was a bit doubtful as it is very detailed.
It gives an amazing effect, all the detail is picked up. DH did mutter something about couldn't I get that effect with embossing powder ..... to which Sy and I answered No! LOL.
It's also very difficult to photograph as it changes with the light. The two pics above are the same card, but it looks more gold than its real silver colour, the mat is actually blue-green :-) I have now bought another six Indigo Blu colour mixes, plus a Cosmic Shimmer one called Mulled Wine, well how could I resist that??
Looking forward to trying all my new mixes :-)
Subscribe to:
Posts (Atom)