A blog for cooking and crafts

Showing posts with label glimmer mist. Show all posts

Sunday, 15 June 2014

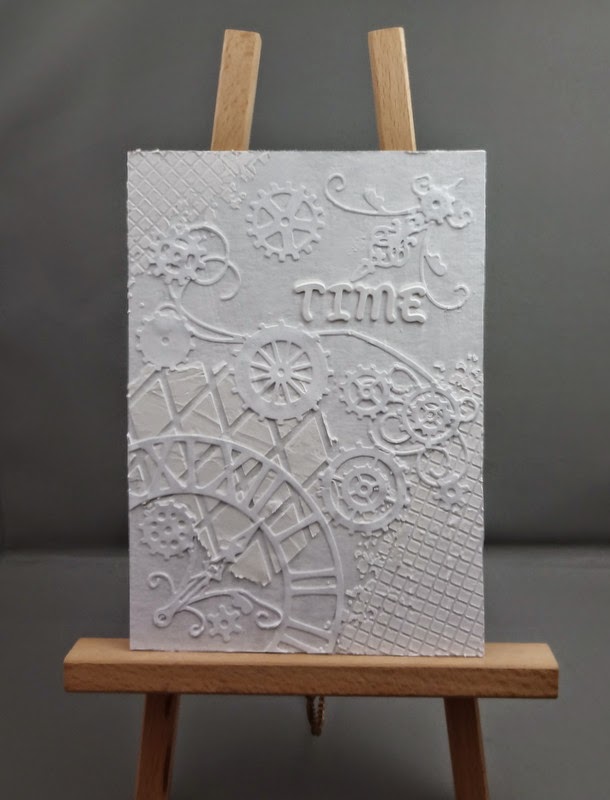
Mixed Media - Clock & Butterfly

This is a present for my friend's daughter, based on the mixed media piece of wall art I did a little while ago, here.


I didn't take step by step photos, as I was quite anxious to get it finished in time, but the basic procedure is as follows.....
  • Cut some greyboard to fit the chosen frame - I knew that I would be using a mount to allow room for the crystals, so I cut the board to 10 x 8", and marked out the visible area of 8 x 6".  Cover both sides with gesso - the back won't be seen, of course, but it does seem to stop the piece warping if both sides are primed.
  • Die-cut your chosen shapes in white card.
  • Gather the 'background' items together - masks and stamps.
  • Work out placement of die-cuts, then stamp/emboss where required.  I used brown embossing powder as I wasn't sure how it would take everything that was going over it - if it acted as a resist, brown would look OK (though I did end up putting Treasure Gold over it anyway!).
  • Adhere die cuts.
  • Use texture paste through the masks in required areas.  Leave to dry.
  • Cover everything with gesso, leave to dry.  I did speed this up with a heat gun!
  • Apply colours  .... I have used mists and alcohol inks, using water from a mister to help everything flow around the piece nicely.  Dry thoroughly with a heat gun between each colour so the colours don't muddy together.
  • When happy with the result, make sure everything is completely dry and apply Treasure Gold to various raised areas.  I have used Classic Gold on the clock dial, the embossed script and a little over the texture squares  in the corners, Onyxite on the die-cut corners, the clock hands and the butterfly.  The gears and clock centres have the misleadingly-named Sapphire, it is not really blue, much more of a teal!
  • Place crystals here and there :-)
  • Leave for at least a couple of hours to let the solvents from the TG evaporate off before placing behind the glass in the frame.
I took the photo without the glass, to avoid reflections.  My friend is very happy with it and will let me know if her daughter likes it ...... fingers crossed :-)

Monday, 21 April 2014

Mixed media wall art

I have at times messed around with texture paste, sprays and alcohol inks, but I don't think I have ever intentionally started a full on mixed media piece before.  I had to go and buy some gesso especially :-)  This was inspired by two projects found whilst blog surfing. 
This one from Misteejay:
http://misteejay.blogspot.co.uk/2014/03/sunshine-good-company.html

And this one from Gabrielle Pollacco, which I found via a video link on you tube:
http://gabriellepollacco.blogspot.ca/2014/01/video-tutorial-steampunk-journal-cover.html
the video is well worth watching, not too bad at a shade over 24 minutes, though I did mute the music after a while :-)

So I started with a piece of greyboard cut to fit a 5 x 7 frame, applied gesso all over it, left to dry.  Then I added texture paste through stencils and adhered various die-cuts and some letter stickers, and gesso'ed all over again.  At which point it looked like this:


Now for colour..... I used spray mists and alcohol inks and water from a mister to make the colours run nicely.  The piece was dried with a heat gun between each colour.  Then I applied Treasure Gold in Classic Gold over the raised die-cuts and some TG in Aquamarine in a few areas.


The frame was a plain wooden one, I painted it with Paperartsy fresco paint in chocolate pudding, then added some copper spray mist over the top, but this made it compete with the artwork too much, so I knocked it down a bit with some Paperartsy matte glaze.  The final touch was to add some metal corners, from 7 Gypsies I think, coloured with alcohol ink.  I also added a few crystals to the gears in the piece.


And there it was done!  I am rather pleased with it and will definitely do some others.  After all, I have a whole tub of gesso to use up ...... :-)
 

Sunday, 14 July 2013

"Destination & Journey" box framed picture


Inspiration is a funny thing ....... a few weeks ago I had decided that I really should use the texture paste I had bought after Sy had shown me how to use it, so I applied some through a mask to a piece of linen-effect card.  I didn't know what to do next, so left it lying around on my desk. 

Then last Friday evening, it happened that I was doing some blog hopping, with a glass of cider to hand LOL, and was reading the Tando and Craft Barn blogs - both of them had projects involving mists.  So I (or was it the cider?) decided that what that texture-pasted card really needed was some misting!  Off I ran into my craft room and applied some Cosmic Shimmer mist in Patina, blotted with kitchen roll then swiped over the top with a chalk ink pad.  I found the tag, which I made, oh, at least a year ago, but had never found a use for, in my "useful bits" box, together with the embossed piece of cardstock and the die-cut squiggle borders.  Then I spent some time arranging and re-arranging the elements before having the sense to let the misted piece dry overnight :-)

Saturday was spent shopping, siesta-ing, pizza making .... so I didn't get back to it, though ideas were beginning to wander around in my head - I even fell asleep thinking about it!  So today, I set about trying to bring all those random thoughts together.  It was going quite smoothly until I decided that I needed to put a key on, luckily I had only stuck the textured piece to its backing board and not attached the whole thing to the picture!  So I cropadile'd a hole for a brad, then had to find some black chain and jumprings to assemble the dangly bit for the key to hang from ...... After that it was just a matter of die-cutting the piece of embossed card for the side panels, attaching the crystal swirls and the die-cut squiggles, then mounting the tag on foam tape over the top.  I did have to swear a bit as I attached the silver mandala (originally a piece of Primark jewellery!), as it refused to stick and I had to Glossy Accent it to within an inch of its life!

I have photographed it without the glass in front, here are some close ups:


The frame is from Ikea, I think it is called Ribba and it comes in various sizes - I like it because it stands on its flat base so it doesn't need hanging on a wall.  I am very pleased with this, it will be going to a shelf on the landing, but for now it is stood on the dining room table so I can look at it! 

I should also say ....... not all my crafting is cider-assisted....... :-)
Posted by Picasa

Wednesday, 15 May 2013

Five green bottles


The Scrapology May challenge is H for Hand stitched and this is my entry.
Last year, I was so taken with these Jubilee editions of Stones ginger wine that I bought five bottles (over the course of a few weeks!) for the express purpose of making a page with this title LOL.  They did take me a while to empty, mind......
I decided to try a 'spattery' page, I randomly sprayed some glimmer mist on a blue paper (Craft Creations) - and then couldn't think how to proceed, so left it for a few months!  At the crop last weekend, I was inspired by the scrapology sketch and so carried on where I had left off.....
I usd some border strip punches to make the zig-zag and chains, then adhered the doilies and stamped some splatters and 'wine glass' rings.  The journalling is done on half of a Stamps Away journalling block.  I stamped and punched out my title and then the fun began..... pricking all the holes for the stitching and then the stitching itself - with thanks to Scrappy Sarah for the white thread!  It took ages........
It's a bit different for me, but I like it :-)
Posted by Picasa

Tuesday, 9 August 2011

Christmas Tag Picture


This is the finished picture using the tags from the previous post. The background had been done for a while, but I had been putting off assembling it ...... in case it all went horribly wrong ...... LOL. But last weekend was craft weekend and Sy was here - she always makes me be brave so I got down to putting it all together!

The background is a Craft Creations paper, like the one on the tags but with Christmas words printed all over it. The squares are painted chipboard with an embossed and alcohol-inked metal square on top. I stamped and embossed two different flourishes and laid crystal swirls over the top. The frame was glimmer misted in reds/browns/bronze. And that's how it all stayed for weeks until last Saturday ......

The original plan was to position the two tags and then stamp the verse at the right hand side. After much tweaking of position (a smidge to the left, a twitch upwards, you know how it is!) I mounted the large tag on 2mm foam tape and the smaller on 1mm. Then I stamped and ...... DISASTER! The verse was just lost in the whole picture, you couldn't see it at all :-(

Lightbulb moment - I remembered I have a large tag punch, so I punched a piece of white paper to check it would cover the stamping, then stamped on and punched out the swirly paper, distress inked it as I had the others and inked the edges. Then I realised that I wanted it to lay flat, which it wouldn't do if I added an eyelet like the other tags. Sy suggested I use a pen to colour the edge of the eyelet hole - worked a treat!

I am dead chuffed with this - it might just stay out until Christmas now, I don't want to put it away! Oh and I asked DH what he thought and he said oh yes, it's very nice and then in a puzzled sort of way he said "But what's it for?" ...........

Men. Grrr.


Posted by Picasa

Wednesday, 20 July 2011

Decorated Tray and Shelf


Something different today! DS1 is always losing his wallet in the mornings, inevitably resulting in a frantic search of the whole house to see where he left it last (it's usually underneath something..... LOL) so I dug out this shelf and tray from my huge stash of wooden decoratable items as a solution.

The shelf has only had a very simple makeover - it started life as a plain pine semi-circle, I painted it silver and added copper nailheads around the edge. I also put hooks underneath it to hold the items which are too long for the keyrack where DH insists on hanging them..... :-) I used Viva Decor precious metals paint in silver - worth noting that I had to varnish it, after 24 hours drying time, the silver pigment was still coming off on my fingers, I haven't had this problem with any other colour I have used from this range! But a coat of acrylic varnish did the trick!


The tray was glimmer misted in a couple of shades of brown plus bronze. Then I stamped various gears and swirls in Stazon, timber brown and cherry red. I added a piece of self adhesive green baize to the base to stop it rubbing on the shelf.


Ds1 has even remembered to put the wallet in it, ooh, a couple of times at least........

Posted by Picasa

Wednesday, 29 June 2011

Serendipity Squares

I decided to see what I could do with an old sheet of paper that I was never going to use otherwise - not sure why I bought it, apart from the fact that it was 10p in a sale........ forgot the 'before' picture unfortunately! It started out as a dingy beige with an all over pattern in darker beige...... I sprayed it with a green mica mist and then used the waste from a swirl die-cut as a stencil, spraying copper mist through it. It stayed like that for a while before I thought of using a swirly background stamp all over it in a pearlescent brown ink. I started to punch out squares, then remembered to take a photo!


Here are the punched squares, 28 of them plus 7 inchies. Not quite sure what I will do with them yet, though I do have a vague idea for a layout, the rest will probably go on cards!


I am really pleased with the way these have turned out, I shall be rummaging through my stash for some more unloved papers I think!
Posted by Picasa

Monday, 21 February 2011

Cherry Caddy


This is my father-in-law's Christmas present - we weren't able to get up to Hull at Christmas as planned due to the snow, so DH is spending this forthcoming week up there and is taking all the pressies with him :-)

We had decided to make a little selection pack of our homemade cherry stuff for FIL, with a miniature bottle of cherry vodka, small jar of cherry chutney, cherry chocolate and some boozy cherries (not in pic). But how to package them? I had this wooden caddy, we had to take the carrying handle off to be able to fit the jar in it, but otherwise it is perfect!

I sprayed with glimmer mist in Kiwi, then stamped the swirls with stazon. Three little pearls on each side in a cherry red finished it off. I also put some self adhesive green baize underneath to stop it scratching surfaces and the carrying handle was replaced with some cord.

I do really like this glimmer mist / stazon combination, will have to use it on some more of the many boxes I have stashed away ready to decorate!
Posted by Picasa

Monday, 29 November 2010

MIrror 3 of 3


If I have taken one photo of this mirror, I have taken fifty!!! Finally I have managed to get a halfway decent picture to share with you :-)

I glimmer misted the mirror and stamped some flourishes in red and some cogs & gears in brown. Then I embossed some metal in the bigshot, but the colour wasn't quite right - ten second studio "bronzed god", it's a very cold brown so I alcohol inked it with ginger ink. Then I punched a square out of each pattern and stuck them on, along with some mosaic tiles and pearls. A charm made from beads bought in Venice completes the mirror, I attached it with a tiny screw eye I found in our local DIY store - I bought several, so I will be hanging all sorts of things from items I decorate in the future :-)

The second photo shows all three mirrors in their (miraculously level!) permanent position on the wall. I now need to go to Ikea to get some more, I have so many ideas........ :-)
Posted by Picasa

Thursday, 11 November 2010

Mirror, mirror, on the wall......


I haven't blogged for a while, mainly because I have been trying to make progress on a piece of cross stitch :-)

Last weekend was November craft weekend, so I thought I would decorate the second of my Ikea mirrors. I had bought some decoupage papers at Ally Pally and decided this would be an ideal use for them. My original plan was to alternate the darker colour with two paler ones, but when they were all overlapped, the darker one showed through the lighter on the overlap and it looked quite odd. So I covered the whole mirror in the darker paper and used one of the pale ones on top to look like broken shards of mirror glass :-)

The swirly corners were painted in acrylic and then sprayed with glimmer mist. The mosaic tiles were left over from another project and I only had ten - spent a while trying to work out how to use them all to best advantage! A frame of flat back pearls completed the front. I hadn't wrapped the paper over the edges very well, so I stuck a strip of metal all the way around!

It was quite difficult to photograph - one pic with flash and the other without, hope it gives you some idea of how it looks!

Two down, one more to go......
Posted by Picasa

Thursday, 2 September 2010

Glimmer Misted Box


I started this box several months ago - yes, months! - by glimmer misting a plain wooden treasure chest in Midnight Blue and a bit of Candlelight. Then I stamped a couple of corner swirls with Timber Brown Stazon. It looked OK, but needed something more, and I couldn't think what, so I left it ....... it has been sat on the shelf behind my desk, staring at me accusingly, ever since.

Over the Bank Holiday weekend, I decided to stop procrastinating! I knew I wanted the three mosaic tiles on the front but couldn't decide on the rest of the stamping. Then I remembered some of the stamps I had bought at Ally Pally, a compass and two sizes of pocket watch. Perfect. I stamped them on in Teal Stazon, stuck the mosaics on with Matte Accents and it was done! It took me all of 20 minutes to actually finish this thing that had sat around for months :-)
Posted by Picasa