A blog for cooking and crafts

Showing posts with label Venice. Show all posts

Wednesday, 7 November 2018

Steampunk candle stand

I was browsing in a charity shop, when something caught my eye - a rather naff candle stand with some plastic 'crystals' suspended from the top plate.


I thought ... I could steampunk that to within an inch of its life!  It was in the half price bric-a-brac sale at £2.50, a bargain LOL.  It did come with a wax pillar candle, held by a spike in the centre of the top plate.  But I knew I wanted to put an LED candle on the top, so that spike had to go.
First I found some MDF cogs and gears, two assorted sizes packs I had bought at a show a while back.  There were two large ones for a base and top plate and some smaller ones for decoration and also to sit over the spike.
I sprayed with a metal primer and then with a matt black.  The base and top plates, plus two smaller cogs were painted with a black acrylic and matt varnished.  The wings were made by die-cutting the openwork wing, then drawing around the solid shape left in the die-cut waste and hand cutting the solid backgrounds - four of each as I wanted them to be dimensional two-sided wings.  The front and back were then joined by a strip of the same heavy black card, with cuts made to each side of the strip so it would bend to the shape of the wing (thanks Sy!).
The decorative trim around the base and the clock face on the top plate were die-cut in the same bronze card as the openwork wings.
I found some metal cogs in gunmetal and copper, fixed two small copper cogs to the 'twirly' bits to frame the mask.  For the small MDF cogs, I used large gunmetal and small copper cogs on top. Then it was time for assembly!  It all came together quite well, though I had a bit of trouble hanging the ornaments from the edge, until I worked out I could turn it upside down rather than trying to fiddle with it from underneath ... duh.  The ornaments are souvenir key-rings from our travels.
The last thing to go on were the masks, front and back - they are tiny fridge magnets from Venice, so cling to the stand without the need to stick them down.
The finished candle stand:


Here it is in its final position :-)


The only thing I had to buy was the spray primer, which will get used for other projects, everything else was dug out from stash.  I absolutely love it :-)

Tuesday, 15 November 2016

ATDML class layouts - part one

After some computer problems, finally I can share these....
The two layouts are from a class at the ATDML retreat, taught by Mel, using American Crafts DIY 4 range. 


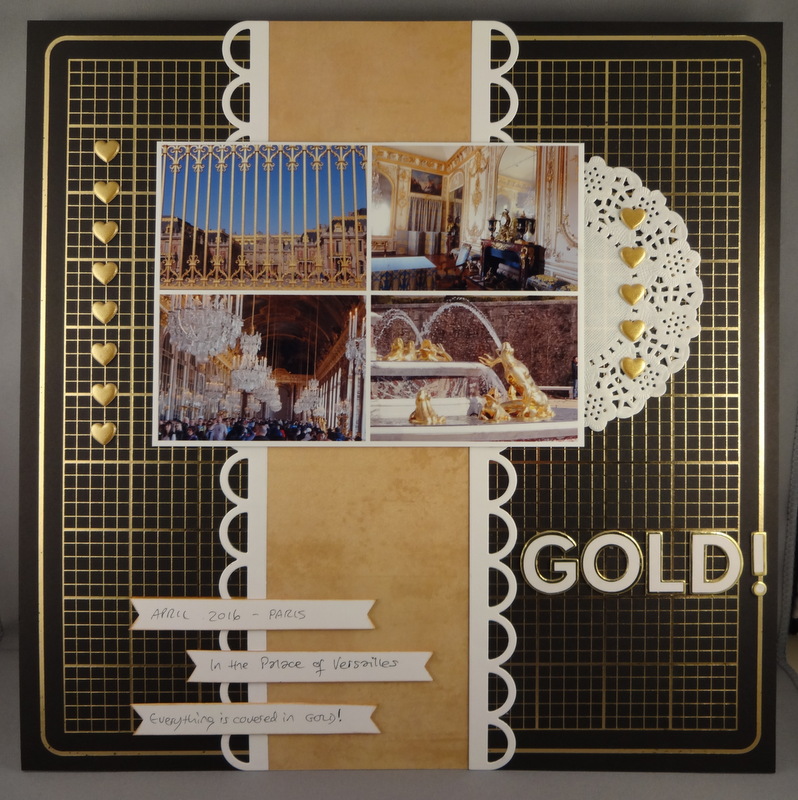
I made a cutting mistake on the first layout, then decided to change the colour of the vertical panel - it was originally white.  The scalloped border is done using a Die-namics die.  The photo is a collage of details from the Palace of Versailles, which is dripping with gold everywhere you turn!
The second page is a photo of my favourite place :-)  The main focus of the class was to add distress inks for pops of colour, I used ink brushes, stencils and stamps for my muted vintage take on the class.

Monday, 19 October 2015

Venice - pocket page layouts

For some time now, I have been using Project Life style pocket page protectors as part of my scrapbooking, even though I don't do Project Life in its original form.  I have found that it's a great way to include a lot of photos, whilst still doing a traditional layout with my favourite pictures.  The problem is - how to photograph the resulting filled page protector without the reflective glare.  Of course the answer is obvious, once you see how other people have done it .... LOL.  Take the photos out, arrange them on a flat surface, then take the picture!  Duh.....
These pages are the front and back of a protector with one 4 x 12 pocket along the top and four 6 x 4 landscape pockets underneath.
These are some photos from our 30th wedding anniversary trip to Venice in March this year.  The other advantage of the pockets is that you can put ephemera inside, like the card of the restaurant where we ate on our actual anniversary :-)


The first page has two banners with details of the photos on each side.  The paper is Basic Grey 'Little Black Dress' and I cut the title on the Silhouette.
We take an awful lot of photos when we go anywhere - the advantage of digital! - and this is a good way to use them.  I like to do a 'proper' 12 x 12 layout, then have another page protector with six 6 x 4 pockets and fill both sides with photos and a little journalling.

Tuesday, 7 October 2014

Tuesday Travel

I thought I would share some travel photos with you.  My favourite place to visit is Venice, we have been three times now, twice during carnival when the costumes are so fabulous.  These pictures are from February this year.

Gondola on the Grand Canal


Steampunk couple


If I won the lottery, Venice would be the place I would go to first :-)