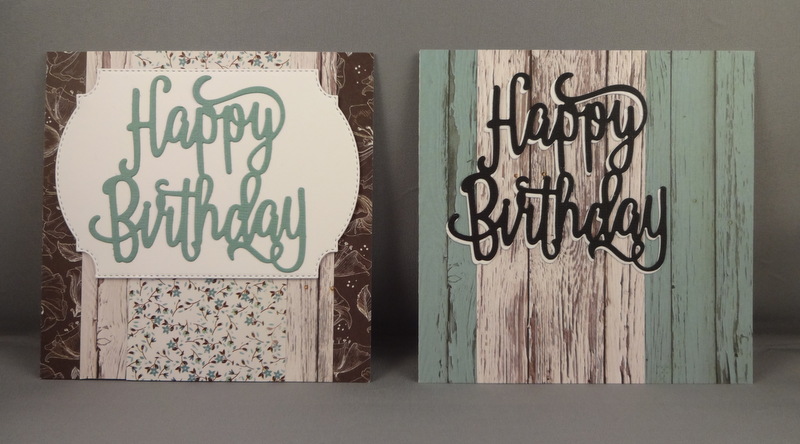
Kool Kitty Nat is running a card challenge this year, with a monthly theme and a goal to use old and new stash. Which goes very well with my own Buy it - Try it and Out of the Drawer :-) January is 'Fancy Words', where the sentiment or other text is the focus.
I used a 6.5 paper pad from Kaisercraft, Sea Breeze I think, as the 'old' element and the large HB die from SU is the 'new'. The other sentiments are also SU and are stamped/embossed in metallic Teal from American Crafts.
A blog for cooking and crafts
Showing posts with label Buy it -Try it. Show all posts
Tuesday, 9 January 2018
Monday, 25 September 2017
Buy it - Try it: Daisy & border birthday card
I used my new SU daisy stamp and punch set to start off this card, together with a Kaisercraft texture stamp and a sentiment banner. But it was just a bit too CAS for me, I felt it needed something else.
Fast forward a couple of weeks and I had bought some new Kaisercraft dies at the Merly Impressions retreat. My trial cut of this border die happened to be a nice green from my scraps tray ......
...... and I realised it was the perfect addition to this card!
The daisy was stamped and punched three times, coloured with three SU pink pens, and layered up, with the centre coloured yellow. I used the same pens to 'ink' up the texture stamp and sentiment, then cut out the stamped image, and die-cut a banner.
I like the layout of this card, think I will try it with an embossed panel in place of the texture stamp next time.
Fast forward a couple of weeks and I had bought some new Kaisercraft dies at the Merly Impressions retreat. My trial cut of this border die happened to be a nice green from my scraps tray ......
...... and I realised it was the perfect addition to this card!
The daisy was stamped and punched three times, coloured with three SU pink pens, and layered up, with the centre coloured yellow. I used the same pens to 'ink' up the texture stamp and sentiment, then cut out the stamped image, and die-cut a banner.
I like the layout of this card, think I will try it with an embossed panel in place of the texture stamp next time.
Monday, 13 March 2017
Buy it - Try it: Tie dye thank you card
I recently bought the new Tie dyed stamp set from SU.
After a little play with the three different spiral motifs, I stamped them in three colours, six times, then matted the images in two each of the same three different colours and put them onto 3" card blanks. Only three shown in the photo! A nice little set of six thank you cards :-)
Monday, 6 March 2017
Buy it - Try it: Vertical Greetings stamp set
Another couple of cards made by using water colour markers to colour the stamp instead of ink. The stamps set is from SU - Vertical Greetings.
I was very pleased with the three identical panels on this one, until I realised that I had left no room for a sentiment!!! So I improvised with a tiny stamp, punched out into a small scalloped circle.
Second attempt - I used the vertical sentiment from the set on the centre panel and I like the overall effect much better :-)
I was very pleased with the three identical panels on this one, until I realised that I had left no room for a sentiment!!! So I improvised with a tiny stamp, punched out into a small scalloped circle.
Second attempt - I used the vertical sentiment from the set on the centre panel and I like the overall effect much better :-)
Monday, 16 January 2017
Buy it - Try it: Colour Challenge 2017
Nat over at Kool Kitty Musings is hosting a 2017 colour challenge, based on Pantone seasonal colours. January's colours are two shades of blue, Island Paradise which is an aqua-ish light blue and Niagara which is a dusty darker blue.
I plan to do one in each colourway! I found some Bazzill in a colour called 'Seawater' which was a good approximation of the lighter shade. To make the shaped card, I used a card creator die from Diesire ('Louise') and cut this blank from an existing rectangular blank, then used it to cut the mats. It has a non-cutting edge for the fold of the card, so if using for mats you need to do that edge with a trimmer :-)
I embossed the Bazzill with a Swiss dot embossing folder. The paper is a magazine freebie, a bit thin to go straight onto such a textured background, so I made a mat of white card in the same size to stiffen it up a bit :-) Then I punched a butterfly (Martha Stewart) and added pearls for the body. The sentiment and punched strip are both from Stampin' Up.
Very unusually for me, I used this new die on the day it arrived in the post!! I like the effect it gives, though it makes the A6 card blank a little short for the envelope - I 'm sure no one will notice though :-)
I plan to do one in each colourway! I found some Bazzill in a colour called 'Seawater' which was a good approximation of the lighter shade. To make the shaped card, I used a card creator die from Diesire ('Louise') and cut this blank from an existing rectangular blank, then used it to cut the mats. It has a non-cutting edge for the fold of the card, so if using for mats you need to do that edge with a trimmer :-)
I embossed the Bazzill with a Swiss dot embossing folder. The paper is a magazine freebie, a bit thin to go straight onto such a textured background, so I made a mat of white card in the same size to stiffen it up a bit :-) Then I punched a butterfly (Martha Stewart) and added pearls for the body. The sentiment and punched strip are both from Stampin' Up.
Very unusually for me, I used this new die on the day it arrived in the post!! I like the effect it gives, though it makes the A6 card blank a little short for the envelope - I 'm sure no one will notice though :-)
Tuesday, 10 January 2017
Buy it - Try it: 12 Years
It seems right to start my first blog post of the year with something I got for Christmas..... actually a little after the festivities, because I was waiting for the SU Sale-a-Bration to start on the 4th of January. DH got me the Large Letters and Large Numbers stamps, along with the matching dies. These are something of a considered purchase, the price tag for the lot is quite hefty. But by waiting, I got four free SAB sets, plus making up the order to £200 meant 10% plus £20 in reward points, so I ended up being able to buy another stamp /die bundle. Also, the SAB card tin, some A4 cardstock and a couple of pens, not shown below.
I decided to christen the letter dies, as I had a layout just needing a short title - needed to be short because the letters are large!
The two photos are - surprise! - twelve years apart. DS1 on the right, DS2 on the left in both photos - the height differential has changed quite a bit!
The main papers are from Maja Design and Studio Light, the strip is from Kaisercraft and the manufacturer strip is from Studio Light.
The smaller letters are die-cut using Memory Box Alphabet Soup. I cut the large letters out of embossed cardstock, which flattened it a bit ..... if I had just thought it through, I could have cut the letters and then run them through the embossing folder :-) Next time ... LOL.
I decided to christen the letter dies, as I had a layout just needing a short title - needed to be short because the letters are large!
The main papers are from Maja Design and Studio Light, the strip is from Kaisercraft and the manufacturer strip is from Studio Light.
The smaller letters are die-cut using Memory Box Alphabet Soup. I cut the large letters out of embossed cardstock, which flattened it a bit ..... if I had just thought it through, I could have cut the letters and then run them through the embossing folder :-) Next time ... LOL.
Saturday, 1 October 2016
Blogtober is here!
Welcome to my first Blogtober post :-) I have decided to go for blogging three times a week, every Monday, Wednesday and Friday - plus this first post! For full Blogtober details, hop over to Karmacraft to see how you can take part in this challenge.
I'm going for a theme for the whole month, it's Christmas, Christmas, Christmas all the way! This first post is my Beat the Christmas Rush for September.
I have gone for a Scandi theme, with kraft red and white. White stamping and embossing on kraft, with a red mat and kraft card blank. The stamp is from Indigo Blu, bought ages ago but never really used, and the sentiment is brand new, from Visible Image.
I really like the way this has come out, there will definitely be some more Scandi-themed cards during the month!
I'm going for a theme for the whole month, it's Christmas, Christmas, Christmas all the way! This first post is my Beat the Christmas Rush for September.
I really like the way this has come out, there will definitely be some more Scandi-themed cards during the month!
Monday, 16 May 2016
Buy it - Try it: Get well card
I forgot I hadn't blogged this BiTi .... I bought a magazine a while ago with a free stamp and embossing folder, thought I would try out the folder. I can't remember which magazine it was, I only buy them for the gifts now and they all blur into one!!!
I ran some pink cardstock through the folder and lightly brushed over the raised areas with Picket Fence distress ink ... so lightly it doesn't really show in the photo .... LOL. I had some freebie magazine papers and die cut a circle to go in the middle of the embossed card. Then I die-cut some pennants (Nesties) and some leaves (Sue Wilson) and put the whole lot together.
I decided to make it a Get well card, because I don't have that many in the box, I need more variety :-)
So, the embossing folder, the paper, the pennants and the leaves are all new, a four-in-one BiTi :-)
I ran some pink cardstock through the folder and lightly brushed over the raised areas with Picket Fence distress ink ... so lightly it doesn't really show in the photo .... LOL. I had some freebie magazine papers and die cut a circle to go in the middle of the embossed card. Then I die-cut some pennants (Nesties) and some leaves (Sue Wilson) and put the whole lot together.
I decided to make it a Get well card, because I don't have that many in the box, I need more variety :-)
So, the embossing folder, the paper, the pennants and the leaves are all new, a four-in-one BiTi :-)
Monday, 18 January 2016
Buy it - Try it: Shaped cards
One resolution gone to the wall already .... blogging at least twice every week! I blame the post Christmas back-to-work lethargy, not to mention the horrible stinking cold which stopped me going to the crop :-(
So, for my first post of the year, I have been playing with some new stamps from Justrite (flowers)and stamps by Chloe (wreath). I stamped/embossed in silver, then coloured with a mixture of Kuretake and Copic pens.
I made shaped card blanks for the images. The first two cards are done with Nestie labels 21 and 22, for the round card I used a scalloped circle from Go-Kreate. The round mat is a Tonic die, the topper is a Woodware punch, the sentiment mat is a SU punch as is the sentiment itself. The stamp is from Lili of the Valley.
These were fun to do, now I need to experiment with some of my other dies!
So, for my first post of the year, I have been playing with some new stamps from Justrite (flowers)and stamps by Chloe (wreath). I stamped/embossed in silver, then coloured with a mixture of Kuretake and Copic pens.
I made shaped card blanks for the images. The first two cards are done with Nestie labels 21 and 22, for the round card I used a scalloped circle from Go-Kreate. The round mat is a Tonic die, the topper is a Woodware punch, the sentiment mat is a SU punch as is the sentiment itself. The stamp is from Lili of the Valley.
These were fun to do, now I need to experiment with some of my other dies!
Monday, 21 December 2015
Buy it - Try it: Almost the last cards.....
I have just a couple of cards to make after these and then I am done. This is actually the first year for a long time, where I haven't had several Christmas cards left over to give me a headstart on the following year!
I have just bought this lovely snowflake wreath stamp from Stamps by Chloe. It stamps beautifully, I chose to stamp/emboss these in silver and pink.
I punched out the image with a Woodware 4" scalloped punch, then die cut the mats in mirri, using a Go Kreate die - amazingly they have the same sort of scallops, so go very well with each other. The circular sentiment is from Stamping all Day and I punched that with a plain circle, then used the SU scallop circle punch for the mat, and raised the sentiment topper with some 1mm foam tape. The pink embossing powder is from Wendy Vecchi, in Pink Peony.
The pink card is for a friend, for whom it wouldn't be Christmas if it wasn't pink.... LOL.
I really like this stamp, I'm sure it will feature in a Beat the Christmas Rush (or two!) next year :-)
I have just bought this lovely snowflake wreath stamp from Stamps by Chloe. It stamps beautifully, I chose to stamp/emboss these in silver and pink.
I punched out the image with a Woodware 4" scalloped punch, then die cut the mats in mirri, using a Go Kreate die - amazingly they have the same sort of scallops, so go very well with each other. The circular sentiment is from Stamping all Day and I punched that with a plain circle, then used the SU scallop circle punch for the mat, and raised the sentiment topper with some 1mm foam tape. The pink embossing powder is from Wendy Vecchi, in Pink Peony.
The pink card is for a friend, for whom it wouldn't be Christmas if it wasn't pink.... LOL.
I really like this stamp, I'm sure it will feature in a Beat the Christmas Rush (or two!) next year :-)
Saturday, 10 October 2015
Buy it, Try it: Less is More challenge - Autumn
Two blog challenges in two days - I don't know what's come over me :-)
The Less is More week 245 challenge theme is 'Autumn', so I decided to go for Autumn colours. I actually ended up making two cards, because I re-read the rules after making the first one and realised that it is a one layer challenge this week .... I had done a matted and layered card! That'll teach me to read things properly LOL, you'll be seeing that card in the next few days instead.
I christened some new stamps: SU Watercolour Wash and Flowering Flourish, also a script stamp from Darkroom Door. There are two new inks making an appearance too, Wendy Vecchi Pale Ochre and Memento Potter's Clay.
I partially inked up the Watercolour Wash (it is huge) and stamped it as a background in Pale Ochre. Then I used Memento Peanut Brittle to stamp the script over the wash, four times as it is only small. I do miss my Prima script stamp, it was a useful size and I have lost it, don't think you can get it any more :-( The Flowering Flourish and the sentiment (from SU Butterfly Basics) were stamped in Potter's Clay.
I don't usually go for orange, but I really like the way this has turned out :-)
The Less is More week 245 challenge theme is 'Autumn', so I decided to go for Autumn colours. I actually ended up making two cards, because I re-read the rules after making the first one and realised that it is a one layer challenge this week .... I had done a matted and layered card! That'll teach me to read things properly LOL, you'll be seeing that card in the next few days instead.
I christened some new stamps: SU Watercolour Wash and Flowering Flourish, also a script stamp from Darkroom Door. There are two new inks making an appearance too, Wendy Vecchi Pale Ochre and Memento Potter's Clay.
I partially inked up the Watercolour Wash (it is huge) and stamped it as a background in Pale Ochre. Then I used Memento Peanut Brittle to stamp the script over the wash, four times as it is only small. I do miss my Prima script stamp, it was a useful size and I have lost it, don't think you can get it any more :-( The Flowering Flourish and the sentiment (from SU Butterfly Basics) were stamped in Potter's Clay.
I don't usually go for orange, but I really like the way this has turned out :-)
Friday, 9 October 2015
Buy it, Try it: Steampunk Christmas card
I don't do many blog challenges, but the Fantasy Stampers steampunk challenge did catch my eye :-) Just the thing to use my new steampunk stamp set LOL.
The airship Santa sleigh stamp is from Viva Décor, the sentiment is from Stamping All Day. I smooshed distress inks to make a background, over-stamped with a crackle background, then stamped the main image.
I had forgotten how much I like doing the smooshy backgrounds .... you may be seeing a few more during Blogtober :-)
The airship Santa sleigh stamp is from Viva Décor, the sentiment is from Stamping All Day. I smooshed distress inks to make a background, over-stamped with a crackle background, then stamped the main image.
I had forgotten how much I like doing the smooshy backgrounds .... you may be seeing a few more during Blogtober :-)
Monday, 23 March 2015
BiTi Monday
This weekend Sy came down, to bring the new tote she had picked up for me - We R Memory Keepers rolling tote, she ordered three, for herself, Karen and me!
So we had a lovely craft day, I got eight cards made, would have been nine if my Herma dispenser hadn't broken mid-use :-(
For the thank you cards below, I used a new stamp, a new die and some new card blanks, so they definitely qualify for my Buy it - Try it this week :-)
The stamp is from Stampin Up, a three stage stamping process to get the different layers and colours on the lotus blossom, the sentiment is from the same set. I had been a bit hesitant about using it, as I didn't quite 'get' how it worked, but Sy has a great example here, so she talked me through it, it's not actually difficult once you try it LOL. I used a Tonic Studios scalloped circle die, this is a great set, 14 dies I think, and they don't have too much of a border if you use the next size up for a mat. Not that I could have fitted a mat on these tiny cards - they are 3" square, just right for little thank you cards.
Update on The Wedding Card - she loved it :-)
So we had a lovely craft day, I got eight cards made, would have been nine if my Herma dispenser hadn't broken mid-use :-(
For the thank you cards below, I used a new stamp, a new die and some new card blanks, so they definitely qualify for my Buy it - Try it this week :-)
The stamp is from Stampin Up, a three stage stamping process to get the different layers and colours on the lotus blossom, the sentiment is from the same set. I had been a bit hesitant about using it, as I didn't quite 'get' how it worked, but Sy has a great example here, so she talked me through it, it's not actually difficult once you try it LOL. I used a Tonic Studios scalloped circle die, this is a great set, 14 dies I think, and they don't have too much of a border if you use the next size up for a mat. Not that I could have fitted a mat on these tiny cards - they are 3" square, just right for little thank you cards.
Update on The Wedding Card - she loved it :-)
Tuesday, 10 March 2015
BiTi and OotD - Mother's Day cards
A combined Buy it - Try it and Out of the Drawer post :-)
BiTi - I used three new dies, the Boudoir Square and rococo heart from Tonic Studios and a tag from the Spellbinders Victorian tags set. Oh, and some linen textured cardstock which I bought at the Make It show.
OotD - I used a Memory Box diamond background die and some old freebie magazine papers.
Quite simple cards, but I am pleased with them and I think the recipients will be too :-).
BiTi - I used three new dies, the Boudoir Square and rococo heart from Tonic Studios and a tag from the Spellbinders Victorian tags set. Oh, and some linen textured cardstock which I bought at the Make It show.
OotD - I used a Memory Box diamond background die and some old freebie magazine papers.
Quite simple cards, but I am pleased with them and I think the recipients will be too :-).
Monday, 9 March 2015
BiTi Monday - tall narrow steampunk-ish drawers
Hmmm .... so much for a week of Buy it - Try it .... just didn't happen last week! A combination of real life and a new DVD, season 6 of The Mentalist :-)
I have at least finished the UFO mentioned in the last post - the 'new' part of it being the crackle glaze! It's a narrow chest of drawers, made of wood and bought originally from the Craft Barn, I think, it was several years ago.
I had primed it a while ago and got DH to laser cut some cogs to go around the drawer knobs. The main body was painted with a pale cream, the drawers and cogs were painted bronze. I applied the crackle glaze to the drawers and when it was dry, applied some Paperartsy paint in Hyde Park over the top. The bronze crackles come through like magic! At that point, it became obvious that the cream was too light and bright against the drawers, so I re-painted the body with Paperartsy Irish Cream.
I then cut some Venetian paper for the top and sides - bought a few years ago on our first trip to Venice, I have been hoarding it! But it's time to start using it as we are going back next week for our 30th wedding anniversary and DH will raise an eyebrow if I buy any more without using at least some :-)
Here are the side and top views, I did hesitate about putting an extra decoration on top, but I am happy with it as it is. Another UFO conquered!
I have at least finished the UFO mentioned in the last post - the 'new' part of it being the crackle glaze! It's a narrow chest of drawers, made of wood and bought originally from the Craft Barn, I think, it was several years ago.
I had primed it a while ago and got DH to laser cut some cogs to go around the drawer knobs. The main body was painted with a pale cream, the drawers and cogs were painted bronze. I applied the crackle glaze to the drawers and when it was dry, applied some Paperartsy paint in Hyde Park over the top. The bronze crackles come through like magic! At that point, it became obvious that the cream was too light and bright against the drawers, so I re-painted the body with Paperartsy Irish Cream.
I then cut some Venetian paper for the top and sides - bought a few years ago on our first trip to Venice, I have been hoarding it! But it's time to start using it as we are going back next week for our 30th wedding anniversary and DH will raise an eyebrow if I buy any more without using at least some :-)
Here are the side and top views, I did hesitate about putting an extra decoration on top, but I am happy with it as it is. Another UFO conquered!
Monday, 2 March 2015
Buy it - Try it week: Monday!
Our trip to Farnborough deserves (needs!) a full week of BiTi. The intention was to start on Saturday when we got back and continue on Sunday.
However .... I got waylaid by a UFO and spent most of my Sunday working on that, not using anything I had bought at all, though the crackle glaze was a recent re-stock! .... I'll post that during the week.
I did try test-cutting my new dies, a Tonic Studios frame, a TS heart and some Sue Wilson corners.
So here is the die-cut, the die and the new TS ring binder die storage wallet which I bought at the show - I am very pleased with it. I think the frame is called Boudoir square, it cuts beautifully, first pass through.
Sy painted her new ribbon rack from MDF Man in a lovely dark greenish blue, you can see it here. I must admit, I was after some items from them as well, but sadly they had no stock - although I was tempted by the spice rack they had, it was cash only and I had run out by that time! Maybe next year :-)
However .... I got waylaid by a UFO and spent most of my Sunday working on that, not using anything I had bought at all, though the crackle glaze was a recent re-stock! .... I'll post that during the week.
I did try test-cutting my new dies, a Tonic Studios frame, a TS heart and some Sue Wilson corners.
So here is the die-cut, the die and the new TS ring binder die storage wallet which I bought at the show - I am very pleased with it. I think the frame is called Boudoir square, it cuts beautifully, first pass through.
Sy painted her new ribbon rack from MDF Man in a lovely dark greenish blue, you can see it here. I must admit, I was after some items from them as well, but sadly they had no stock - although I was tempted by the spice rack they had, it was cash only and I had run out by that time! Maybe next year :-)
Monday, 26 January 2015
Buy it - Try it Monday: butterfly birthday
Today's BiTi is a birthday card using a new butterfly die from Memory Box.
Some of the purple cardstock from last week was still on my desk, so I used that to cut the butterfly, it's quite delicate so I applied Stick It sheet adhesive before running through the machine. The background is done with a large Justrite stamp, inked up in green/pink/lilac, then I laid the card over the stamp and pressed all over to give a complete impression - this is a much easier way to use such a large stamp! Then I matted using the same purple cardstock, added the sentiment and some crystals to finish.
This is a nicely sized die for a card, you don't really need much else, so I am quite pleased with this purchase!
Some of the purple cardstock from last week was still on my desk, so I used that to cut the butterfly, it's quite delicate so I applied Stick It sheet adhesive before running through the machine. The background is done with a large Justrite stamp, inked up in green/pink/lilac, then I laid the card over the stamp and pressed all over to give a complete impression - this is a much easier way to use such a large stamp! Then I matted using the same purple cardstock, added the sentiment and some crystals to finish.
This is a nicely sized die for a card, you don't really need much else, so I am quite pleased with this purchase!
Monday, 19 January 2015
Buy it - Try it Monday: sympathy card
I find it hard to make sympathy cards, in fact they are the only card I will go into a shop and buy. But I was asked a couple of times last year if I did bereavement cards, so I thought I ought to try it.

This card was inspired by the use of negative die cutting at this Pin. I used two new items, the Prim Poppy die (Memory Box) and the sympathy sentiment (Crafters Companion).
I cut the poppy out of white cardstock and placed it over some purple, remembering not to throw away the inner part of the cut which was then stuck back into place! Then I matted it onto black. The paler shade of purple was embossed with a spotty embossing folder and cut to size. I used the same shade to stamp the sentiment onto, then cut into a banner shape. After assembling everything, I wrapped a black velvet ribbon down the side of the card .... I usually use satin ribbon, but could only find velvet which does have a tendency to shed fibres..... After removing all the stray bits of fibre, it was done.
It does feel a bit odd to be making such a card when there is no actual requirement.... it will go into the box with the hope that neither I nor anyone else will need it.
This card was inspired by the use of negative die cutting at this Pin. I used two new items, the Prim Poppy die (Memory Box) and the sympathy sentiment (Crafters Companion).
I cut the poppy out of white cardstock and placed it over some purple, remembering not to throw away the inner part of the cut which was then stuck back into place! Then I matted it onto black. The paler shade of purple was embossed with a spotty embossing folder and cut to size. I used the same shade to stamp the sentiment onto, then cut into a banner shape. After assembling everything, I wrapped a black velvet ribbon down the side of the card .... I usually use satin ribbon, but could only find velvet which does have a tendency to shed fibres..... After removing all the stray bits of fibre, it was done.
It does feel a bit odd to be making such a card when there is no actual requirement.... it will go into the box with the hope that neither I nor anyone else will need it.
Monday, 12 January 2015
New challenge for 2015 - Buy it Try it Mondays
BiTi is going weekly! I haven't yet learned how to add a linky tool, but that will come soon :-) The idea is that you take something 'new' and use it to make ...... well, anything: a card, a layout, a decorated object and so forth. For the purposes of this challenge, 'new' means anything bought (or gifted) during the previous four weeks.
Here is mine for this week:
It is a simple card, but having chosen the Nestie die to work with, I was a bit stuck for ideas. The die is actually wider than I had realised, almost the full width of the card blank, so my original plan of putting it onto a panel wasn't as easy as I had thought. So I have made an interrupted frame to connect both the butterfly and sentiment dies, then added a few flowers from the same Nestie set. The sentiment is also new, it's a Poppystamps die.
Since this is my first post for this year - Happy New Year! - I had better mention resolutions ..... my word for 2015 is MORE.
MORE using stash
MORE blogging
MORE entering challenges
MORE new techniques
not forgetting of course ....
MORE weight to be lost
MORE using money wisely LOL
I think the first four might be easier than the last two.......:-)
Here is mine for this week:
It is a simple card, but having chosen the Nestie die to work with, I was a bit stuck for ideas. The die is actually wider than I had realised, almost the full width of the card blank, so my original plan of putting it onto a panel wasn't as easy as I had thought. So I have made an interrupted frame to connect both the butterfly and sentiment dies, then added a few flowers from the same Nestie set. The sentiment is also new, it's a Poppystamps die.
Since this is my first post for this year - Happy New Year! - I had better mention resolutions ..... my word for 2015 is MORE.
MORE using stash
MORE blogging
MORE entering challenges
MORE new techniques
not forgetting of course ....
MORE weight to be lost
MORE using money wisely LOL
I think the first four might be easier than the last two.......:-)
Friday, 19 December 2014
Buy it - Try it: The Horse and the Bee
Sounds like it could be a children's story doesn't it? LOL. But no, these are actually the Christmas cards requested by my colleague for her daughters - if you'll recall, last year her DD2 married a man named Bee, so she wanted to give her a themed card and of course she couldn't leave out her DD1, who is into horses. I did think it was a one-off, but she asked me if I could do another two this year:-)
This is what I came up with, first the Bee:
The hive is a Memory Box die, the holly is done with a Martha Stewart punch and the background stamp is by Phil Martin. The sentiment is computer generated, font is MacHumaine, I die-cut it with a Dienamics banner.
Second, the Horse:
The horse is a Die-versions die, the branch and baubles are from Memory Box and I used Stik It adhesive sheet for the bauble overlays, made it so much easier! I used a Stampin Up punch for the sentiment tag.
The baubles, branch, horse and hive are all new, so it's a BITI extravaganza today LOL. My colleague was very pleased with them :-)
I will definitely be using the branch to hang things from again, it looks really effective. When I first saw this die, I didn't really think it looked like anything much, but Helen over at Fiddlefart used it to such great effect, I just had to buy it!
This is what I came up with, first the Bee:
The hive is a Memory Box die, the holly is done with a Martha Stewart punch and the background stamp is by Phil Martin. The sentiment is computer generated, font is MacHumaine, I die-cut it with a Dienamics banner.
Second, the Horse:
The horse is a Die-versions die, the branch and baubles are from Memory Box and I used Stik It adhesive sheet for the bauble overlays, made it so much easier! I used a Stampin Up punch for the sentiment tag.
The baubles, branch, horse and hive are all new, so it's a BITI extravaganza today LOL. My colleague was very pleased with them :-)
I will definitely be using the branch to hang things from again, it looks really effective. When I first saw this die, I didn't really think it looked like anything much, but Helen over at Fiddlefart used it to such great effect, I just had to buy it!
Subscribe to:
Posts (Atom)