Two more layouts done at the retreat.
Here be Dragons? - G had made some giant eggs, using plaster and balloons, they looked like dragon eggs and one had cracked, giving it the appearance of something having hatched :-) I used a Kaisercraft background paper, added splatty stamping and some texture paste "eggshell" through stencils. The title is die-cut, twice, to give a shadow effect.
Look Up is a photo from a few years back, we had taken our visitor to London for the day and went to the London Aquarium. Next door was a Star Wars exhibition and the stormtroopers were posed above us as we queued, clearly ready to take over the world :-)
A blog for cooking and crafts
Showing posts with label ATDML. Show all posts
Wednesday, 14 November 2018
Friday, 9 November 2018
Retreat Layouts 1
I got seven layouts completed and a few more partially done at the ADTML retreat. I hadn't actually scrapped since the previous retreat last April, but it was like meeting up with an old friend, I just took up where we left off!
Here are two:
The photos have come out a little dark! Silver Birch has a beautiful background paper which didn't really need much adding to it. I used this sketch from Pinterest, the banners and long strip are punched, the doily is die-cut, as is the title. It is also straight in real life, not as wonky as it looks, I swear!
The Mad Hatters also lets the background paper do most of the work. I punched out two different Martha Stewart snowflakes, several times, to make a flurry. The journalling and date tags at the side of the photo were supposed to be done with a label punch, halved - until I discovered I hadn't packed it! But in my die folder I had the nestabilities labels four set and it was perfect. The title is die-cut.
Here are two:
The photos have come out a little dark! Silver Birch has a beautiful background paper which didn't really need much adding to it. I used this sketch from Pinterest, the banners and long strip are punched, the doily is die-cut, as is the title. It is also straight in real life, not as wonky as it looks, I swear!
The Mad Hatters also lets the background paper do most of the work. I punched out two different Martha Stewart snowflakes, several times, to make a flurry. The journalling and date tags at the side of the photo were supposed to be done with a label punch, halved - until I discovered I hadn't packed it! But in my die folder I had the nestabilities labels four set and it was perfect. The title is die-cut.
Wednesday, 28 February 2018
Layout - Find your Happy Place
This is the page I made about the ADML retreat last April. I haven't done a double layout for a long time! It was quite difficult to photograph the whole thing in one LOL.
The papers are from stash, but I am fairly sure that the two main background papers are from Marion Smith. I used a Kaisercraft die along the edges of the chequered connecting panel. The journalling panels are either Kaisercraft or Bo Bunny and the Art quote stamp is from Deep Red. I die-cut the title with a stitched alpha form Dienamics.
The photos are of the amount Karen and I pack into the car, the crop room and a group photo :-) Looking forward to doing it again this year!!!
The papers are from stash, but I am fairly sure that the two main background papers are from Marion Smith. I used a Kaisercraft die along the edges of the chequered connecting panel. The journalling panels are either Kaisercraft or Bo Bunny and the Art quote stamp is from Deep Red. I die-cut the title with a stitched alpha form Dienamics.
The photos are of the amount Karen and I pack into the car, the crop room and a group photo :-) Looking forward to doing it again this year!!!
Thursday, 1 December 2016
Layouts - Paris and Claude the Octopus
Two more layouts completed at ATDML :-)
The first is a photo of the entrance to the Paris Metro. The papers are from Kaisercraft, apart from the main background which is Marion Smith. I die-cut the letters twice for the title, using the darker colour under the lighter for a shadow effect.
The second layout is based on a class taught at the previous retreat, last April! I finally found some square photos to use it with :-) Sy crocheted Claude the Octopus and he joined at our last crop at Cardinal Colours. The papers are Basic Grey.
The first is a photo of the entrance to the Paris Metro. The papers are from Kaisercraft, apart from the main background which is Marion Smith. I die-cut the letters twice for the title, using the darker colour under the lighter for a shadow effect.
The second layout is based on a class taught at the previous retreat, last April! I finally found some square photos to use it with :-) Sy crocheted Claude the Octopus and he joined at our last crop at Cardinal Colours. The papers are Basic Grey.
Sunday, 20 November 2016
Penguins!
Another page done at the retreat - this layout had been on the back burner for quite a while, as I had picked the background paper months ago but got stuck on how to use it without overpowering the photo. Finally I found a sketch, picked some other more neutral papers, and was ready to go!
The photo is of the penguins at Berlin Zoo. They stand so still it's difficult to tell if they are real, until they move!!
I cut down the Authentique background paper, inked the edges and framed with a sheet of Bazzill. Then I cut the various panels, I think the papers (from top down) are HoTP, Graphic 45 and possibly Simple Stories. The title is done with some tiny letter stickers (American crafts?). Although, I couldn't remember how many p-p-p's were needed and after some discussion round the table, we had to Google the original advert to find out (thank you Lyn)!!
This layout came together really well, once I had a plan, I am really pleased with it :-)
The photo is of the penguins at Berlin Zoo. They stand so still it's difficult to tell if they are real, until they move!!
I cut down the Authentique background paper, inked the edges and framed with a sheet of Bazzill. Then I cut the various panels, I think the papers (from top down) are HoTP, Graphic 45 and possibly Simple Stories. The title is done with some tiny letter stickers (American crafts?). Although, I couldn't remember how many p-p-p's were needed and after some discussion round the table, we had to Google the original advert to find out (thank you Lyn)!!
This layout came together really well, once I had a plan, I am really pleased with it :-)
Tuesday, 15 November 2016
ATDML class layouts - part one
After some computer problems, finally I can share these....
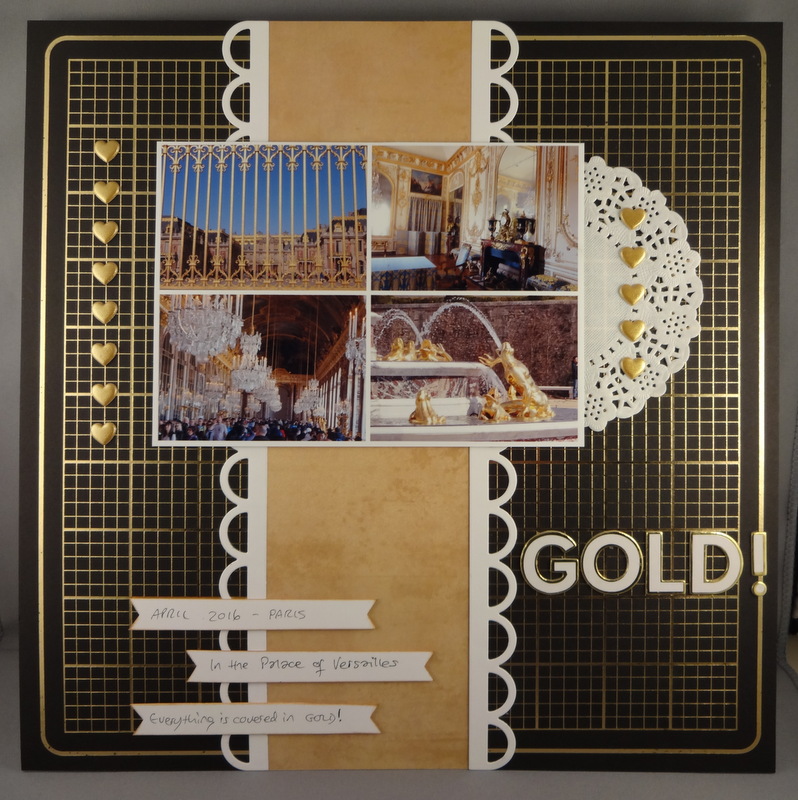
The two layouts are from a class at the ATDML retreat, taught by Mel, using American Crafts DIY 4 range.
I made a cutting mistake on the first layout, then decided to change the colour of the vertical panel - it was originally white. The scalloped border is done using a Die-namics die. The photo is a collage of details from the Palace of Versailles, which is dripping with gold everywhere you turn!
The second page is a photo of my favourite place :-) The main focus of the class was to add distress inks for pops of colour, I used ink brushes, stencils and stamps for my muted vintage take on the class.
The two layouts are from a class at the ATDML retreat, taught by Mel, using American Crafts DIY 4 range.
I made a cutting mistake on the first layout, then decided to change the colour of the vertical panel - it was originally white. The scalloped border is done using a Die-namics die. The photo is a collage of details from the Palace of Versailles, which is dripping with gold everywhere you turn!
The second page is a photo of my favourite place :-) The main focus of the class was to add distress inks for pops of colour, I used ink brushes, stencils and stamps for my muted vintage take on the class.
Labels:
ATDML,
die cutting,
distress ink,
layout,
stamping,
Venice
Sunday, 6 November 2016
Homeward Bound layout
I went with Karen to the retreat run by A Trip Down Memory Lane last weekend, a previous post shows the car packed to the gunwales! I managed to complete 8 layouts and some cards, so here is the first of those pages. It's a re-do of photos from 2015 which I scrapped a while ago but was never really happy with. Whilst I was prepping for the retreat, I found a sketch which I knew would fit the photos.
The papers are from an old Bo Bunny Christmas range. The background already had all the detail on it so I just needed to cut strips to back the photos. I used a typewriter alpha die for the title and the journaling is done with the SU Draw the Line set, the journaling lines are very useful and I have finally used the line of arrows!! I stamped them in Versafine Smoky Grey and used a black pen to journal, it's a nice combination.
I am happy with it this time :-)
The papers are from an old Bo Bunny Christmas range. The background already had all the detail on it so I just needed to cut strips to back the photos. I used a typewriter alpha die for the title and the journaling is done with the SU Draw the Line set, the journaling lines are very useful and I have finally used the line of arrows!! I stamped them in Versafine Smoky Grey and used a black pen to journal, it's a nice combination.
I am happy with it this time :-)
Monday, 31 October 2016
Blogtober 14
The final post of Blogtober, a little later than normal, but I have the excuse of recovering from the ADTML retreat! I managed 8 complete layouts and some cards, which I am very pleased with.
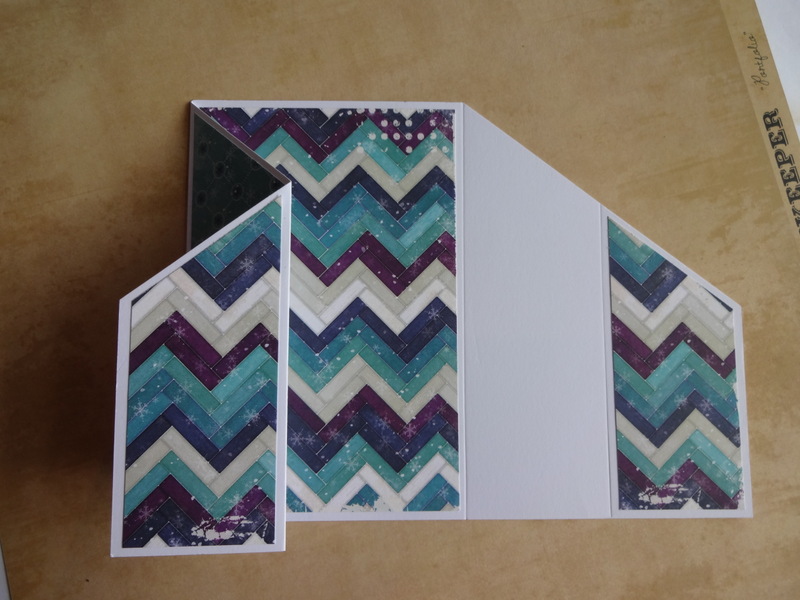
Today's post is a tutorial for the double gatefold cards (which I mistakenly called waterfall cards in a previous post). The instructions were given to me by Nicky, a SU demonstrator who runs workshops in Chailey, East Sussex, contact her on nickyalevy@btinternet.com if you would like to come along.
Take a 12" x 12" sheet of cardstock and cut in half to make two strips 6" x 12".
Then score each one at 2", 4", 8" and 10".
Mark each short side of each scored strip at the central 3" point with a small pencil dot. There are two variations from this point: cut to the 3" mark from either the top of the 2" and 10" score-lines, or from the top of the 4" and 8" score-lines.
Decide which is the front of your card (the back is for writing on!) and cut panels to fit the front of the card as shown below - I have only done one variation, but the principle is the same for both.
Then cut panels for the back as below.
Now fold the side panel towards the centre, from the 4" score-line as shown.
Then fold from the 2" score-line back out towards the side of the card.
Repeat for the other side of the card.
Stamp an image for the inside panel and a sentiment tag for the front and attach them - the tag only needs to be stuck to the left hand panel!!
And there it is done! It is actually easier to stick the inner image before folding it, but this is the way I did it at the retreat because I was concentrating on getting the photos of the folds!! You can do all sort of things with these cards, you could have die-cuts on the front panels and the image/sentiment on the inside, for instance. These are the others I made, the other variation is also shown.
This is definitely going to become a staple design in my card-making. For someone like me who doesn't 'do' paper engineering, these are marvellously simple to make :-)
So, at the end of Blogtober, how have I done? Well, I have achieved my goal of posting three times a a week, sometimes it has been a case of a late night spent making an item for the next day's post, but mostly I have been quite organised and made ahead LOL. I need to keep it up now, perhaps two or three posts a week :-) I have to admit though, I am just a little bit Christmas-carded out ......!!
Today's post is a tutorial for the double gatefold cards (which I mistakenly called waterfall cards in a previous post). The instructions were given to me by Nicky, a SU demonstrator who runs workshops in Chailey, East Sussex, contact her on nickyalevy@btinternet.com if you would like to come along.
Take a 12" x 12" sheet of cardstock and cut in half to make two strips 6" x 12".
Then score each one at 2", 4", 8" and 10".
Mark each short side of each scored strip at the central 3" point with a small pencil dot. There are two variations from this point: cut to the 3" mark from either the top of the 2" and 10" score-lines, or from the top of the 4" and 8" score-lines.
Decide which is the front of your card (the back is for writing on!) and cut panels to fit the front of the card as shown below - I have only done one variation, but the principle is the same for both.
Then cut panels for the back as below.
Now fold the side panel towards the centre, from the 4" score-line as shown.
Then fold from the 2" score-line back out towards the side of the card.
Repeat for the other side of the card.
Stamp an image for the inside panel and a sentiment tag for the front and attach them - the tag only needs to be stuck to the left hand panel!!
And there it is done! It is actually easier to stick the inner image before folding it, but this is the way I did it at the retreat because I was concentrating on getting the photos of the folds!! You can do all sort of things with these cards, you could have die-cuts on the front panels and the image/sentiment on the inside, for instance. These are the others I made, the other variation is also shown.
This is definitely going to become a staple design in my card-making. For someone like me who doesn't 'do' paper engineering, these are marvellously simple to make :-)
So, at the end of Blogtober, how have I done? Well, I have achieved my goal of posting three times a a week, sometimes it has been a case of a late night spent making an item for the next day's post, but mostly I have been quite organised and made ahead LOL. I need to keep it up now, perhaps two or three posts a week :-) I have to admit though, I am just a little bit Christmas-carded out ......!!
Friday, 28 October 2016
Blogtober 13
No Christmas cards today! I am off to the A Trip Down Memory Lane retreat with Krafty Karen. This is our packing ......
Back seat and boot both full!!
Sunday, 8 May 2016
DS2
Another layout to share! This is the last one from the retreat, or at least the last one that I am happy with, there is one more which I need to re-scrap as it didn't really work LOL.
This one is a photo of DS2, smartly dressed for a day out in London. Not an 'occasion' as such, so no obvious title .... I decided to just use his name instead.
The background paper is from Kaisercraft and I have used sheets from a 6" paper pad for the panels, which may also be Kaisercraft or possibly Bo Bunny?? The strips of paper are manufacturer strips from the base of some Studio Light papers and the ornate rivets are definitely Bo Bunny, though I can't remember from which collection.
I cut the title on the Silhouette (font: Monster Paparazzi).
This one is a photo of DS2, smartly dressed for a day out in London. Not an 'occasion' as such, so no obvious title .... I decided to just use his name instead.
The background paper is from Kaisercraft and I have used sheets from a 6" paper pad for the panels, which may also be Kaisercraft or possibly Bo Bunny?? The strips of paper are manufacturer strips from the base of some Studio Light papers and the ornate rivets are definitely Bo Bunny, though I can't remember from which collection.
I cut the title on the Silhouette (font: Monster Paparazzi).
Monday, 2 May 2016
Suited and Booted
Another layout, finally finished at the retreat .... in fact it was started at last November's retreat, but (big surprise!) lacked a title.
I now can't find the original sketch I used for this, the horizontal elements were originally paper strips, but I decided that I wanted a completely stamped layout.
Background paper is from Craft Creations, and the stamping is done with a combination of Stampin' Up and Paperartsy grunge stamps in various shades of brown. I drew the circle around a template, moving it slightly twice so I got the multiple lines. The title is die-cut - I freely admit I chickened out of stamping it direct to the page I had worked so hard on!!
This is actually my second attempt at this page .... the first time, I managed to complete all the stamping, attach the photo, write the journaling - then I dropped an inkpad on it. I couldn't find a way to make the resulting ink mark look as if it was meant to be part of the grunge - so I had to start again! Second time lucky :-)
I now can't find the original sketch I used for this, the horizontal elements were originally paper strips, but I decided that I wanted a completely stamped layout.
Background paper is from Craft Creations, and the stamping is done with a combination of Stampin' Up and Paperartsy grunge stamps in various shades of brown. I drew the circle around a template, moving it slightly twice so I got the multiple lines. The title is die-cut - I freely admit I chickened out of stamping it direct to the page I had worked so hard on!!
This is actually my second attempt at this page .... the first time, I managed to complete all the stamping, attach the photo, write the journaling - then I dropped an inkpad on it. I couldn't find a way to make the resulting ink mark look as if it was meant to be part of the grunge - so I had to start again! Second time lucky :-)
Friday, 29 April 2016
Three Wise Men
I am not able to do any crafting at the moment due to an inner ear infection - I have actually been officially signed off work, for the first time in my life!! I have been given tablets to treat the constant dizziness and they seem to be working thank goodness, so that just leaves me feeling completely wiped out :-( So I am using the opportunity to slowly catch up with blogging everything I finished at the retreat ...... then going back to bed!
This is a photo of DH with DS1 & DS2, taken just before they left after Christmas. It was mostly done, just needed title and journaling, but I was really stuck for the title! A few days before the retreat, I fell asleep thinking of page kits to pack - as you do! - and it just came to me, luckily I remembered it when I woke up the next day LOL.
The background paper is quite an old one from stash, I think it may be Prima, the journaling and image panels are Marion Smith. I made the lines for the journaling using a Stampin' Up line stamp. The title was cut on the Silhouette, I used the 'weld' function to join the letters.
Pleased with this one :-)
This is a photo of DH with DS1 & DS2, taken just before they left after Christmas. It was mostly done, just needed title and journaling, but I was really stuck for the title! A few days before the retreat, I fell asleep thinking of page kits to pack - as you do! - and it just came to me, luckily I remembered it when I woke up the next day LOL.
The background paper is quite an old one from stash, I think it may be Prima, the journaling and image panels are Marion Smith. I made the lines for the journaling using a Stampin' Up line stamp. The title was cut on the Silhouette, I used the 'weld' function to join the letters.
Pleased with this one :-)
Wednesday, 27 April 2016
On the Beach
Another 'finished off' page - it only needed journaling, but for a long time I had been stuck on quite how to add it. At the retreat, I was looking through some papers and found one with a square pattern ..... so I cut out the squares and used those to write on!
The photos are of a very windy day at Eastbourne, I had managed to leave my camera in the car, so we used DS2's phone to get some pictures!
The papers are from Studio Light and the title is cut on the Silhouette.
Quite a simple page, but effective, I think :-)
The photos are of a very windy day at Eastbourne, I had managed to leave my camera in the car, so we used DS2's phone to get some pictures!
The papers are from Studio Light and the title is cut on the Silhouette.
Quite a simple page, but effective, I think :-)
Sunday, 17 April 2016
Space Oddity
Another layout started and finished at the ATDML retreat!
I am finding that I don't take so many photos nowadays, apart from holidays when we take hundreds, so I am short of material for non-holiday layouts. Krafty Karen suggested that I try scrapping older photos, or old favourites which may have been scrapped before, but deserve another look. I found this concept a bit daunting, since I scrap strictly chronologically! One year, one album. But I have embraced the step out of the comfort zone and now have an album for a Miscellany of Incidental Pages ...... LOL.
This is the first incidental layout, it's an old favourite photo of mine from 2002, DS2 dressed as an alien for the Scout carnival float. We sprayed some old clothes and a swimming hat silver, made him a sign and constructed a rocket back pack from sprayed fizzy drink bottles and duct tape!
It's quite a simple page, I have let the background paper (Maja Designs) do all the work and used another of their papers for the central panel carrying the photo and journaling. The title was cut on the Silhouette, I wanted a font which I had previously seen in passing and thought might be called Bellbottom, but wasn't sure .... happily I found it on one of the free font sites, downloaded it and was ready to go!
I really like the way it has all come together :-)
I am finding that I don't take so many photos nowadays, apart from holidays when we take hundreds, so I am short of material for non-holiday layouts. Krafty Karen suggested that I try scrapping older photos, or old favourites which may have been scrapped before, but deserve another look. I found this concept a bit daunting, since I scrap strictly chronologically! One year, one album. But I have embraced the step out of the comfort zone and now have an album for a Miscellany of Incidental Pages ...... LOL.
This is the first incidental layout, it's an old favourite photo of mine from 2002, DS2 dressed as an alien for the Scout carnival float. We sprayed some old clothes and a swimming hat silver, made him a sign and constructed a rocket back pack from sprayed fizzy drink bottles and duct tape!
It's quite a simple page, I have let the background paper (Maja Designs) do all the work and used another of their papers for the central panel carrying the photo and journaling. The title was cut on the Silhouette, I wanted a font which I had previously seen in passing and thought might be called Bellbottom, but wasn't sure .... happily I found it on one of the free font sites, downloaded it and was ready to go!
I really like the way it has all come together :-)
Sunday, 10 April 2016
The Great Outdoors
A month and a half since the last post... oops.... time to catch up a bit :-)
Last weekend, I went to the ATDML retreat in Suffolk. I got back late Sunday and we flew off to Paris very early on Monday, so this is the first chance I have had to share the pages I got done!
This one is done using the current sketch from My Creative Sketches:

and here is my take on it:
I didn't like the sketch at first look, I felt that the large block on the right was just too... well, large and blocky! But I thought about it and decided it could be a lattice to reduce the in-your-face-ness of it. So I cut a lattice on the Silhouette and packed it into the kit when I was preparing the papers etc. When I actually came to make the page, I thought I would also try flipping the sketch and I like it much better this way :-)
The papers are from Maja Design, apart from the plain blue from Craft Creations. I cut the title with an alpha die, from either Memory Box or Dienamics, not sure which. It just fit across the page!! The title comes from the fact that we never go outside at a retreat, too busy! But we were tempted out by a photo opportunity LOL.
This is my second attempt at scrapping this photo and I am much happier with it than previously :-)
Last weekend, I went to the ATDML retreat in Suffolk. I got back late Sunday and we flew off to Paris very early on Monday, so this is the first chance I have had to share the pages I got done!
This one is done using the current sketch from My Creative Sketches:

and here is my take on it:
I didn't like the sketch at first look, I felt that the large block on the right was just too... well, large and blocky! But I thought about it and decided it could be a lattice to reduce the in-your-face-ness of it. So I cut a lattice on the Silhouette and packed it into the kit when I was preparing the papers etc. When I actually came to make the page, I thought I would also try flipping the sketch and I like it much better this way :-)
The papers are from Maja Design, apart from the plain blue from Craft Creations. I cut the title with an alpha die, from either Memory Box or Dienamics, not sure which. It just fit across the page!! The title comes from the fact that we never go outside at a retreat, too busy! But we were tempted out by a photo opportunity LOL.
This is my second attempt at scrapping this photo and I am much happier with it than previously :-)
Tuesday, 1 December 2015
Let Sleeping Cats Lie
I managed to get several layouts done at the ATDML retreat, end of October / beginning of November. It was the most scrapping I have done since ...... well, since the previous retreat in April!
This one uses a sketch from the Sketchy Scrappers group, when the sketch was first posted back in August, I really didn't like it and thought it wasn't for me - but it turned out I had the perfect sequence of photos for it :-)
It tells the story of how I looked out of the kitchen window and saw next door's cat asleep on DS1's lap in the garden, so I rushed to take a picture ...... whereupon the cat leapt off his lap and came to greet me! We had several minutes of persuasion before getting the cat back on the lap for the photo :-)
The background paper is from stash, it may be My Minds Eye? The squares are punched out of Bazzill dotted swiss and a white woodgrain cardstock. The title is die-cut with a Memory Box alpha set and the journalling is written on stamped lines (Stampin Up).
It's a simple page, but I really like it :-)
This one uses a sketch from the Sketchy Scrappers group, when the sketch was first posted back in August, I really didn't like it and thought it wasn't for me - but it turned out I had the perfect sequence of photos for it :-)
It tells the story of how I looked out of the kitchen window and saw next door's cat asleep on DS1's lap in the garden, so I rushed to take a picture ...... whereupon the cat leapt off his lap and came to greet me! We had several minutes of persuasion before getting the cat back on the lap for the photo :-)
The background paper is from stash, it may be My Minds Eye? The squares are punched out of Bazzill dotted swiss and a white woodgrain cardstock. The title is die-cut with a Memory Box alpha set and the journalling is written on stamped lines (Stampin Up).
It's a simple page, but I really like it :-)
Saturday, 31 October 2015
Magnificent Seven layout
My last post for Blogtober :-) At the moment I am at the ATDML retreat, so it seems appropriate to post a layout using a photo from a previous retreat, April 2014. This is actually one of my many almost-done layouts which are languishing in my albums, in need of title and /or journaling. This one actually only needed the title!
I cut the title with Memory Box 'Alphabet Soup', using Stick It as the letters are quite small and fiddly. The papers are from Marian Smith.
So that's Blogtober over and done with ... for this year.... I have enjoyed it, though it has got a bit stressy toward the very end, but next time I can be more prepared for that. I have tried several new ideas and made good use of my Pinterest board - also I have managed to use new stash as it comes in and have pulled quite a lot of things out of the drawer. I even took part in some challenges and I must try and do more of that, going forward. Roll on next year :-)
I cut the title with Memory Box 'Alphabet Soup', using Stick It as the letters are quite small and fiddly. The papers are from Marian Smith.
So that's Blogtober over and done with ... for this year.... I have enjoyed it, though it has got a bit stressy toward the very end, but next time I can be more prepared for that. I have tried several new ideas and made good use of my Pinterest board - also I have managed to use new stash as it comes in and have pulled quite a lot of things out of the drawer. I even took part in some challenges and I must try and do more of that, going forward. Roll on next year :-)
Monday, 26 October 2015
Retreat Preparation
Yesterday I started printing out photos for next weekend's ATDML retreat. Most of them will be for pocket pages, but I covered the dining table and the top of my printer ......
...... I haven't finished yet :-)
Sunday, 12 April 2015
Back to scrapping - Hot Stuff
I worked out that last year I only blogged three new layouts. Not because I hadn't done any, but because I hadn't finished any of the pages I had started! So I went off to the ATDML retreat determined to finish off as many as I could. I ended up with a total of ten pages started from scratch and fully completed, and also finished off fourteen others, most of which just needed titles and journalling. I had pre-cut the titles on my Silhouette and taken them with me. It was a very productive weekend, and I thoroughly enjoyed it :-)
Here is the first, hopefully I will have time to schedule some others before I head off to Berlin tomorrow!
The story is that we were talking to FIL about how the small tins of mustard powder don't really last us very long. So he found us a big one ..... 1lb of mustard powder as opposed to the tiny 2oz tins LOL. That's 454g and 57g for those of you who are imperially challenged :-)
The papers are Basic Grey Little Black Dress, which is quite an old range now but there may be a few sheets lurking around somewhere. I chose to use Mini Owner's April sketch for this one and it worked out really well. The punched shapes are a small circle and Stampin' Up Mosaic Madness. The letters are Thickers.
I took the photos of my pages at the retreat rather than waiting to get home, as DS1 has temporarily moved back in with us and I have nowhere to set up my photo booth amongst the mountains of boxes!! I am going to have to find a flat surface to photograph all the pocket pages on though, as standing the finished page up in the protector just results in a photo of reflections!
Here is the first, hopefully I will have time to schedule some others before I head off to Berlin tomorrow!
The story is that we were talking to FIL about how the small tins of mustard powder don't really last us very long. So he found us a big one ..... 1lb of mustard powder as opposed to the tiny 2oz tins LOL. That's 454g and 57g for those of you who are imperially challenged :-)
The papers are Basic Grey Little Black Dress, which is quite an old range now but there may be a few sheets lurking around somewhere. I chose to use Mini Owner's April sketch for this one and it worked out really well. The punched shapes are a small circle and Stampin' Up Mosaic Madness. The letters are Thickers.
I took the photos of my pages at the retreat rather than waiting to get home, as DS1 has temporarily moved back in with us and I have nowhere to set up my photo booth amongst the mountains of boxes!! I am going to have to find a flat surface to photograph all the pocket pages on though, as standing the finished page up in the protector just results in a photo of reflections!
Sunday, 23 November 2014
Variations on a theme - resist embossing technique
I was late setting off to the ATDML retreat a couple of weeks ago, even though I had been very organised with everything packed the previous evening. But on the Friday morning, I decided I wanted to stamp/emboss some images in white to take with me and play around with distress inking them. This of course took far longer than I had thought it would and so I was late :-)
Having inked and over-stamped the images at the retreat, they have been on my desk crying out to be made up into cards. Here are three I did using an old Stampendous agapanthus stamp.
I am not quite so happy with the last card, I think it would have been better if I had found a toning background mat. But it's OK :-)
I have some more images to make up yet, so watch this space!!
Having inked and over-stamped the images at the retreat, they have been on my desk crying out to be made up into cards. Here are three I did using an old Stampendous agapanthus stamp.
I am not quite so happy with the last card, I think it would have been better if I had found a toning background mat. But it's OK :-)
I have some more images to make up yet, so watch this space!!
Subscribe to:
Posts (Atom)