This blog is no longer maintained, jump over to Craft, Cook, Repeat to see how I am getting along with the Instagram 100 day challenge!
Wednesday, 24 June 2020

Monday, 2 September 2019
Wedding layouts
In March 2018, my lovely sister got married. It was a beautiful wedding and I have lots of amazing photos to put in pocket pages in my 2018 scrapbook. But I wanted to do some special pages with single photos, so it has taken me some time to come up with an idea I was happy with. The first page is the happy couple and the second is the complete family - my sister, new brother in law and my nieces and nephew.


Both are loosely based on a couple of Pinterest sketches, here and here. The titles were die-cut, the heart circle was cut on the Silhouette in two different cardstocks, the border under the photo on layout 1 was punched, the flowers and the cogs were die-cut. Flowers.....? Me...? Well, I love my sister, she can have flowers for her wedding day .... LOL.
I am so pleased with these, I wanted the pages to really do the photos justice and I think they do :-)


Both are loosely based on a couple of Pinterest sketches, here and here. The titles were die-cut, the heart circle was cut on the Silhouette in two different cardstocks, the border under the photo on layout 1 was punched, the flowers and the cogs were die-cut. Flowers.....? Me...? Well, I love my sister, she can have flowers for her wedding day .... LOL.
I am so pleased with these, I wanted the pages to really do the photos justice and I think they do :-)
Beat the Christmas Rush - August 2019
These cards have taken a while to come to fruition ..... I actually started them in January, by making the double gate-fold card blanks and adding the paper panels using old freebie magazine papers. And there I was stuck!
I bought the sentiment stamp from Inkylicious a while later and realised it was perfectly sized for the inner panel. So I stamped / heat embossed five images in colours to match the papers, then die-cut using a stitched square. It turned out that the red didn't match one of the papers as well as I had thought it would, so that square was put aside. When I went back to it, I used gold instead, but couldn't be bothered to dig out the die again, so used a circle punch.
There seemed to be something missing, the cards needed some detail on the front panels, so I put them aside (again!) waiting for inspiration. Eventually I decided on some SU snowflake stamps, stamped /heat embossed those and used their matching punches to cut out. It's a little difficult to see in the photo, but the snowflakes run under the image on the inside panel, as well as on the front.

They have turned out rather well (eventually!) and I actually prefer the circle inside the card to the squares, so that's something to remember for next time!
I bought the sentiment stamp from Inkylicious a while later and realised it was perfectly sized for the inner panel. So I stamped / heat embossed five images in colours to match the papers, then die-cut using a stitched square. It turned out that the red didn't match one of the papers as well as I had thought it would, so that square was put aside. When I went back to it, I used gold instead, but couldn't be bothered to dig out the die again, so used a circle punch.
There seemed to be something missing, the cards needed some detail on the front panels, so I put them aside (again!) waiting for inspiration. Eventually I decided on some SU snowflake stamps, stamped /heat embossed those and used their matching punches to cut out. It's a little difficult to see in the photo, but the snowflakes run under the image on the inside panel, as well as on the front.

They have turned out rather well (eventually!) and I actually prefer the circle inside the card to the squares, so that's something to remember for next time!
Sunday, 21 July 2019
Beat the Christmas Rush July 2019
I made eight of these, but could really only fit five into the photo! The stamp is from Inkylicious, stamped and heat embossed onto some pearlescent card, then punched into a circle and popped onto a die card mat in the same card (die from Tonic). I then made a card blank from the same card, with two rounded corners. They were initially assembled as side fold cards with the rounded corners at the open side, but halfway through I decided that maybe they would look better as tent folds with the corners at the base, and I do now prefer them that way.

The gold is done on pearlescent ivory and the others on white.

The gold is done on pearlescent ivory and the others on white.
Sunday, 24 March 2019
Beat the Christmas Rush - March
UK Scrappers is running the Beat the Christmas Rush again this year here. The cards below are white heat embossed on kraft, matted onto an embossed kraft background with a very thin gold mat.

The snowflake and sentiment are from an SU set released a couple of years ago.

The snowflake and sentiment are from an SU set released a couple of years ago.
Wednesday, 13 February 2019
A couple of layouts
I recently spent the weekend at the Littlegreen retreat near Arundel. I managed 8 completed pages and 2 mostly done, so I am very pleased :-) The two below are my favourites.

Papers Kaisercraft "Wonderland". Title is cut on the Silhouette.

Papers from Bo Bunny Winter Wishes. Corners and title cut on the Silhouette, the title is cut in white and black for a shadow effect. We had a tic-tac-toe challenge, so I got rounded corners, two or more alphas and stamping on this layout!

Papers Kaisercraft "Wonderland". Title is cut on the Silhouette.

Papers from Bo Bunny Winter Wishes. Corners and title cut on the Silhouette, the title is cut in white and black for a shadow effect. We had a tic-tac-toe challenge, so I got rounded corners, two or more alphas and stamping on this layout!
Wednesday, 28 November 2018
Another Landscape Christmas card
Back to my favourite stamp, SU Lovely as a Tree!

I stamped the trees and did some shmooshing with Distress Oxides for the background, masking off a circle for the moon. Then I stamped the sleigh (Inkylicious).
A slight problem then was to work out where to put the sentiment! So I incorporated it into the black mat :-)
I made three altogether, made easy by the stamp positioner, after all if you can stamp one, you can stamp three!!

I stamped the trees and did some shmooshing with Distress Oxides for the background, masking off a circle for the moon. Then I stamped the sleigh (Inkylicious).
A slight problem then was to work out where to put the sentiment! So I incorporated it into the black mat :-)
I made three altogether, made easy by the stamp positioner, after all if you can stamp one, you can stamp three!!
Sunday, 18 November 2018
Lovely as a Tree - gilding flakes
I had what I thought was a brilliant idea ...... using the stamperatus, I stamped the main image on white and ivory card, in black and brown respectively. Leaving the stamp in position, I 'inked' up the stamp with Flitterglu and applied gilding flakes to the branches. It should have been spectacular - but - it wasn't!! Out of 16 images stamped, I got 2 decent cards. The idea needs re-thinking..... LOL.
However, I am very pleased with the two cards I did make, only one shown here as the other proved too difficult to photograph with the gilding showing up.


Front and side view shown :-) I haven't made an easel card for ages, but when I noticed that the Back to Basics current challenge is asking for one, this was the perfect thing to do with the topper.
The sentiment is from Visible Image, the trees from SU and the sleigh from Lavina stamps.
However, I am very pleased with the two cards I did make, only one shown here as the other proved too difficult to photograph with the gilding showing up.


Front and side view shown :-) I haven't made an easel card for ages, but when I noticed that the Back to Basics current challenge is asking for one, this was the perfect thing to do with the topper.
The sentiment is from Visible Image, the trees from SU and the sleigh from Lavina stamps.
Wednesday, 14 November 2018
Retreat Layouts 2
Two more layouts done at the retreat.


Here be Dragons? - G had made some giant eggs, using plaster and balloons, they looked like dragon eggs and one had cracked, giving it the appearance of something having hatched :-) I used a Kaisercraft background paper, added splatty stamping and some texture paste "eggshell" through stencils. The title is die-cut, twice, to give a shadow effect.
Look Up is a photo from a few years back, we had taken our visitor to London for the day and went to the London Aquarium. Next door was a Star Wars exhibition and the stormtroopers were posed above us as we queued, clearly ready to take over the world :-)


Here be Dragons? - G had made some giant eggs, using plaster and balloons, they looked like dragon eggs and one had cracked, giving it the appearance of something having hatched :-) I used a Kaisercraft background paper, added splatty stamping and some texture paste "eggshell" through stencils. The title is die-cut, twice, to give a shadow effect.
Look Up is a photo from a few years back, we had taken our visitor to London for the day and went to the London Aquarium. Next door was a Star Wars exhibition and the stormtroopers were posed above us as we queued, clearly ready to take over the world :-)
Monday, 12 November 2018
Lovely as a Tree Christmas cards
Lovely as a Tree is one of my favourite SU stamp sets. Although when it came out, I did read it at first glance as "lonely" as a tree ..... :-) Though not a specifically seasonal stamp, it does lend itself very well to Christmas cards.


A nice simple card, embossed in silver and gold, on aqua and red mats respectively. I assembled four each of these at the retreat, but ran out of plain white card blanks and had to use deckled edge ones for the aqua/silver cards. I think I like them better..... LOL.


A nice simple card, embossed in silver and gold, on aqua and red mats respectively. I assembled four each of these at the retreat, but ran out of plain white card blanks and had to use deckled edge ones for the aqua/silver cards. I think I like them better..... LOL.
Friday, 9 November 2018
Retreat Layouts 1
I got seven layouts completed and a few more partially done at the ADTML retreat. I hadn't actually scrapped since the previous retreat last April, but it was like meeting up with an old friend, I just took up where we left off!
Here are two:


The photos have come out a little dark! Silver Birch has a beautiful background paper which didn't really need much adding to it. I used this sketch from Pinterest, the banners and long strip are punched, the doily is die-cut, as is the title. It is also straight in real life, not as wonky as it looks, I swear!
The Mad Hatters also lets the background paper do most of the work. I punched out two different Martha Stewart snowflakes, several times, to make a flurry. The journalling and date tags at the side of the photo were supposed to be done with a label punch, halved - until I discovered I hadn't packed it! But in my die folder I had the nestabilities labels four set and it was perfect. The title is die-cut.
Here are two:


The photos have come out a little dark! Silver Birch has a beautiful background paper which didn't really need much adding to it. I used this sketch from Pinterest, the banners and long strip are punched, the doily is die-cut, as is the title. It is also straight in real life, not as wonky as it looks, I swear!
The Mad Hatters also lets the background paper do most of the work. I punched out two different Martha Stewart snowflakes, several times, to make a flurry. The journalling and date tags at the side of the photo were supposed to be done with a label punch, halved - until I discovered I hadn't packed it! But in my die folder I had the nestabilities labels four set and it was perfect. The title is die-cut.
Wednesday, 7 November 2018
Steampunk candle stand
I was browsing in a charity shop, when something caught my eye - a rather naff candle stand with some plastic 'crystals' suspended from the top plate.

I thought ... I could steampunk that to within an inch of its life! It was in the half price bric-a-brac sale at £2.50, a bargain LOL. It did come with a wax pillar candle, held by a spike in the centre of the top plate. But I knew I wanted to put an LED candle on the top, so that spike had to go.
First I found some MDF cogs and gears, two assorted sizes packs I had bought at a show a while back. There were two large ones for a base and top plate and some smaller ones for decoration and also to sit over the spike.
I sprayed with a metal primer and then with a matt black. The base and top plates, plus two smaller cogs were painted with a black acrylic and matt varnished. The wings were made by die-cutting the openwork wing, then drawing around the solid shape left in the die-cut waste and hand cutting the solid backgrounds - four of each as I wanted them to be dimensional two-sided wings. The front and back were then joined by a strip of the same heavy black card, with cuts made to each side of the strip so it would bend to the shape of the wing (thanks Sy!).
The decorative trim around the base and the clock face on the top plate were die-cut in the same bronze card as the openwork wings.
I found some metal cogs in gunmetal and copper, fixed two small copper cogs to the 'twirly' bits to frame the mask. For the small MDF cogs, I used large gunmetal and small copper cogs on top. Then it was time for assembly! It all came together quite well, though I had a bit of trouble hanging the ornaments from the edge, until I worked out I could turn it upside down rather than trying to fiddle with it from underneath ... duh. The ornaments are souvenir key-rings from our travels.
The last thing to go on were the masks, front and back - they are tiny fridge magnets from Venice, so cling to the stand without the need to stick them down.
The finished candle stand:
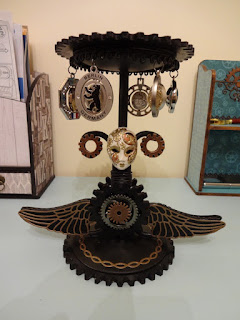

Here it is in its final position :-)

The only thing I had to buy was the spray primer, which will get used for other projects, everything else was dug out from stash. I absolutely love it :-)

I thought ... I could steampunk that to within an inch of its life! It was in the half price bric-a-brac sale at £2.50, a bargain LOL. It did come with a wax pillar candle, held by a spike in the centre of the top plate. But I knew I wanted to put an LED candle on the top, so that spike had to go.
First I found some MDF cogs and gears, two assorted sizes packs I had bought at a show a while back. There were two large ones for a base and top plate and some smaller ones for decoration and also to sit over the spike.
I sprayed with a metal primer and then with a matt black. The base and top plates, plus two smaller cogs were painted with a black acrylic and matt varnished. The wings were made by die-cutting the openwork wing, then drawing around the solid shape left in the die-cut waste and hand cutting the solid backgrounds - four of each as I wanted them to be dimensional two-sided wings. The front and back were then joined by a strip of the same heavy black card, with cuts made to each side of the strip so it would bend to the shape of the wing (thanks Sy!).
The decorative trim around the base and the clock face on the top plate were die-cut in the same bronze card as the openwork wings.
I found some metal cogs in gunmetal and copper, fixed two small copper cogs to the 'twirly' bits to frame the mask. For the small MDF cogs, I used large gunmetal and small copper cogs on top. Then it was time for assembly! It all came together quite well, though I had a bit of trouble hanging the ornaments from the edge, until I worked out I could turn it upside down rather than trying to fiddle with it from underneath ... duh. The ornaments are souvenir key-rings from our travels.
The last thing to go on were the masks, front and back - they are tiny fridge magnets from Venice, so cling to the stand without the need to stick them down.
The finished candle stand:


Here it is in its final position :-)

The only thing I had to buy was the spray primer, which will get used for other projects, everything else was dug out from stash. I absolutely love it :-)
Monday, 5 November 2018
Distress Oxides over white embossing
My PC hasn't flaked out for a while now ..... fingers crossed!
The weekend before last, I went to the ATDML retreat, had a fab time as always and got a reasonable amount done.
I made these cards:


The image is a Woodware stamp, heat embossed in white and Distress Oxides shmooshed over the top. They look very delicate :-)
The weekend before last, I went to the ATDML retreat, had a fab time as always and got a reasonable amount done.
I made these cards:


The image is a Woodware stamp, heat embossed in white and Distress Oxides shmooshed over the top. They look very delicate :-)
Sunday, 7 October 2018
So many PC problems.... it all seems to be settled at the moment, at least until the next tech support call with Microsoft, when it will doubtless all go pear-shaped again....
So, whilst I am able to blog, here are some cards made with some new Woodware stamps.


I coloured with watercolour pens, then went over with some Wink of Stella for a gleamy effect - not really showing up in the pics! Since WoS is also water based, it does cause the colouring to 'move' a little, will try it over alcohol markers next time.
A green mat to finish. Nice and simple!
So, whilst I am able to blog, here are some cards made with some new Woodware stamps.


I coloured with watercolour pens, then went over with some Wink of Stella for a gleamy effect - not really showing up in the pics! Since WoS is also water based, it does cause the colouring to 'move' a little, will try it over alcohol markers next time.
A green mat to finish. Nice and simple!
Monday, 13 August 2018
Silhouettes over pink ink
I was having a play with inks at the last crop. The first card has an inked-through-aperture background, whilst the second has a stamped background splotchy splat. Both were then overstamped with a silhouette image.

The mini stars and tree are from Lavinia, the flowers from Nellie Snellen, the splat and mini bubbles from SU, the sentiments from Stamping all Day and SU. I matted with silver mirri rather than trying to match the pink, it looks quite elegant :-)

The mini stars and tree are from Lavinia, the flowers from Nellie Snellen, the splat and mini bubbles from SU, the sentiments from Stamping all Day and SU. I matted with silver mirri rather than trying to match the pink, it looks quite elegant :-)
Saturday, 11 August 2018
New baby cards
Cast your minds back.... early last year I had to make a last minute engagement card at the request of DH. The last minute wedding card request followed some time later. And now ...... tah-dah! ...... the new baby card! I was prepared for this one and made some variations on pink and blue, at the last-but-one crop :-) Today we heard that a baby boy has arrived, so congrats to the proud new parents and DH is tasked with writing - and posting! - a blue one.


I made four of each, mixing and matching two embossed backgrounds and two sentiment stamps. Stamps are from Woodware and SU, the die is from Tonic.
So I am well prepared for any more new arrivals :-)


I made four of each, mixing and matching two embossed backgrounds and two sentiment stamps. Stamps are from Woodware and SU, the die is from Tonic.
So I am well prepared for any more new arrivals :-)
Sunday, 29 July 2018
Beat the Christmas rush - July
For the last couple of months, I had half-done several cards for this challenge, but not finished them. So in July I have had an almighty catch up, resulting in four sets of five cards!! The photo shows one from each set, with two white hexagons as they had different sentiments.

To make the hexagons, I used a 6" square blank and a Sizzix hexagon die, with the folded edge of the original blank just inside the cutting edge. I also went a bit mirri-tastic!! As always, it doesn't photograph well.....
The white hexagons have a holly wreath die from Tonic, cut in silver mirri, a hexagon frame (Card Making Magic) which is a two piece swirly bit and stitched outline. The sentiment on the left is from an old set, I have no idea which brand and the right hand one is from Stamping all Day. Both were stamped/heat embossed with Wow apple red powder. Just a few 5mm red pearls for the wreath to finish it off.
The ivory hexagons have die-cut gold mirri - the same hex frame, a gift die from Tonic and the sentiment a tiny peel off.
The Scandi hexagons have a huge die-cut snowflake (Kaisercraft) and the same round sentiment as the white, but this time I punched out the centre to make a sentiment polo LOL. I really like it and plan to make some more little polos in different colours :-)
Finally, the A6 card has a background done by inking through an aperture, over stamping with the tree and sentiment from SU.

To make the hexagons, I used a 6" square blank and a Sizzix hexagon die, with the folded edge of the original blank just inside the cutting edge. I also went a bit mirri-tastic!! As always, it doesn't photograph well.....
The white hexagons have a holly wreath die from Tonic, cut in silver mirri, a hexagon frame (Card Making Magic) which is a two piece swirly bit and stitched outline. The sentiment on the left is from an old set, I have no idea which brand and the right hand one is from Stamping all Day. Both were stamped/heat embossed with Wow apple red powder. Just a few 5mm red pearls for the wreath to finish it off.
The ivory hexagons have die-cut gold mirri - the same hex frame, a gift die from Tonic and the sentiment a tiny peel off.
The Scandi hexagons have a huge die-cut snowflake (Kaisercraft) and the same round sentiment as the white, but this time I punched out the centre to make a sentiment polo LOL. I really like it and plan to make some more little polos in different colours :-)
Finally, the A6 card has a background done by inking through an aperture, over stamping with the tree and sentiment from SU.
Monday, 4 June 2018
Variations on a Theme
I wanted to pack light for this month's crop on Saturday, so I chose one of my Pins - original pin here - and took along various stamps to make variations on the idea. I die-cut the cardstock to size in white and then some ivory when I ran out of white LOL. I didn't pack coloured cardstock for mats, but cut those on Sunday and assembled the cards.


I used silhouette stamps from Lavinia (seedheads), Nellie Snellen (stylised flower stems) and Hot off the Press (feather). The splats are from Stampin Up and the sentiments from Visible Image.
I do like silhouette stamping :-)


I used silhouette stamps from Lavinia (seedheads), Nellie Snellen (stylised flower stems) and Hot off the Press (feather). The splats are from Stampin Up and the sentiments from Visible Image.
I do like silhouette stamping :-)
Monday, 7 May 2018
Beat the Christmas Rush - April (and March catch up!)
For some reason, March just seemed to pass me by .... so for April's BtCR I have made two batches of five cards :-)
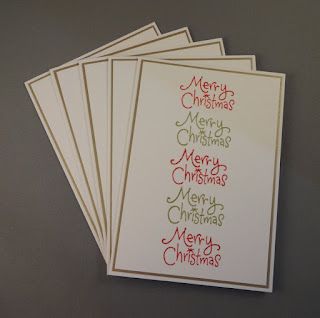
I used the stamping platform to stamp the sentiment in alternate red and green and matted with a dull gold. Very quick to make!

I originally intended to have the white die-cut on the kraft background, but since said background is embossed, it wouldn't have stuck down very well, so I made a mat. Not sure whether it now has too much red on it, but it's OK :-)


I originally intended to have the white die-cut on the kraft background, but since said background is embossed, it wouldn't have stuck down very well, so I made a mat. Not sure whether it now has too much red on it, but it's OK :-)
Friday, 9 March 2018
Stamping Platform - third card
Ok, after this week I will stop calling them first, second, third etc LOL.
I was having a look through my card box and finding that they are mostly birthdays, so I have decided to try and build up a stock of 'other' cards too. The cards I find most difficult to make are sympathy cards, so I thought I would see what I could come up with.

The lotus is a multi-step stamp set from SU, the sentiment is from my collection, possibly Woodware? I kept to purple, black and white, with a touch of silver on the first one - that whole frame was to cover up a little mark which mysteriously appeared on the card after I had assembled it!! It looks quite effective and I'm not sure which one I prefer. Purple for sympathy cards always seems appropriate to me, it was the Victorian colour of mourning.
Having set up the lotus on the stamp platform, I thought I would do a batch, but getting back to birthday cards!

It's fun playing around with colours to see what works :-) Yellow and two shades of orange for the first, then pale pink and two purples. The sentiment is from Stamping all Day.
The mats and stamping background are all die-cut, using Rare Earth dies, which fit an A6 card perfectly.
I was having a look through my card box and finding that they are mostly birthdays, so I have decided to try and build up a stock of 'other' cards too. The cards I find most difficult to make are sympathy cards, so I thought I would see what I could come up with.

The lotus is a multi-step stamp set from SU, the sentiment is from my collection, possibly Woodware? I kept to purple, black and white, with a touch of silver on the first one - that whole frame was to cover up a little mark which mysteriously appeared on the card after I had assembled it!! It looks quite effective and I'm not sure which one I prefer. Purple for sympathy cards always seems appropriate to me, it was the Victorian colour of mourning.
Having set up the lotus on the stamp platform, I thought I would do a batch, but getting back to birthday cards!

It's fun playing around with colours to see what works :-) Yellow and two shades of orange for the first, then pale pink and two purples. The sentiment is from Stamping all Day.
The mats and stamping background are all die-cut, using Rare Earth dies, which fit an A6 card perfectly.
Subscribe to:
Posts (Atom)