I thought ... I could steampunk that to within an inch of its life! It was in the half price bric-a-brac sale at £2.50, a bargain LOL. It did come with a wax pillar candle, held by a spike in the centre of the top plate. But I knew I wanted to put an LED candle on the top, so that spike had to go.
First I found some MDF cogs and gears, two assorted sizes packs I had bought at a show a while back. There were two large ones for a base and top plate and some smaller ones for decoration and also to sit over the spike.
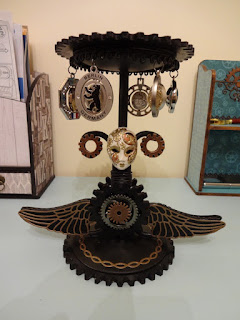
I sprayed with a metal primer and then with a matt black. The base and top plates, plus two smaller cogs were painted with a black acrylic and matt varnished. The wings were made by die-cutting the openwork wing, then drawing around the solid shape left in the die-cut waste and hand cutting the solid backgrounds - four of each as I wanted them to be dimensional two-sided wings. The front and back were then joined by a strip of the same heavy black card, with cuts made to each side of the strip so it would bend to the shape of the wing (thanks Sy!).
The decorative trim around the base and the clock face on the top plate were die-cut in the same bronze card as the openwork wings.
I found some metal cogs in gunmetal and copper, fixed two small copper cogs to the 'twirly' bits to frame the mask. For the small MDF cogs, I used large gunmetal and small copper cogs on top. Then it was time for assembly! It all came together quite well, though I had a bit of trouble hanging the ornaments from the edge, until I worked out I could turn it upside down rather than trying to fiddle with it from underneath ... duh. The ornaments are souvenir key-rings from our travels.
The last thing to go on were the masks, front and back - they are tiny fridge magnets from Venice, so cling to the stand without the need to stick them down.
The finished candle stand:
Here it is in its final position :-)
The only thing I had to buy was the spray primer, which will get used for other projects, everything else was dug out from stash. I absolutely love it :-)


Fantastic project, I do love a bit of steampunk.
ReplyDeleteWow! Amazing job.
ReplyDelete