A blog for cooking and crafts

Thursday, 10 July 2014

Deco 'celebrate' birthday card

I needed to make a card for a 50th birthday, but was in a quandary as to whether to use the number 50 on the card, or not.  DH agreed that it was a dilemma, then suggested that I could do something with a champagne glass and the word 'celebrate'.  Well, that was just an inspired idea and here it is :-)


The deco fan is a Silhouette cutting file, reduced to 30p from 59p, what a bargain.  The champagne glass is made with a Britannia die, the sentiment tag is a Nestie.  The word is spelt out with individual 5mm peel off letters, from Craft Creations.  I added a couple of crystals onto the tag, and then a few tiny ones for 'bubbles'.
It was a little fiddly, not to mention more time consuming than you would think, assembling all the pieces.  But I really like it, I think having two glasses on an anniversary card would look good too.  Incidentally, the card and fan are ivory, rather than white as they look in the photo, it looks a lot warmer in real life :-)

Monday, 23 June 2014

BtCR May

Beat the Christmas Rush for May .... I made four cards, difficult to get into one photo!


The postage stamp circle mat is a Silhouette cutting file.  I stamped /embossed the Christmas image (Just Rite) and punched into a circle with my huge 4" Woodware punch.  Then I inked it with Antique Linen and Tea Dye distress inks.  I used 1mm foam tape to attach it to the mat, so it's not completely flat, but still "post-able"!

Sunday, 15 June 2014

Mixed Media - Clock & Butterfly

This is a present for my friend's daughter, based on the mixed media piece of wall art I did a little while ago, here.


I didn't take step by step photos, as I was quite anxious to get it finished in time, but the basic procedure is as follows.....
  • Cut some greyboard to fit the chosen frame - I knew that I would be using a mount to allow room for the crystals, so I cut the board to 10 x 8", and marked out the visible area of 8 x 6".  Cover both sides with gesso - the back won't be seen, of course, but it does seem to stop the piece warping if both sides are primed.
  • Die-cut your chosen shapes in white card.
  • Gather the 'background' items together - masks and stamps.
  • Work out placement of die-cuts, then stamp/emboss where required.  I used brown embossing powder as I wasn't sure how it would take everything that was going over it - if it acted as a resist, brown would look OK (though I did end up putting Treasure Gold over it anyway!).
  • Adhere die cuts.
  • Use texture paste through the masks in required areas.  Leave to dry.
  • Cover everything with gesso, leave to dry.  I did speed this up with a heat gun!
  • Apply colours  .... I have used mists and alcohol inks, using water from a mister to help everything flow around the piece nicely.  Dry thoroughly with a heat gun between each colour so the colours don't muddy together.
  • When happy with the result, make sure everything is completely dry and apply Treasure Gold to various raised areas.  I have used Classic Gold on the clock dial, the embossed script and a little over the texture squares  in the corners, Onyxite on the die-cut corners, the clock hands and the butterfly.  The gears and clock centres have the misleadingly-named Sapphire, it is not really blue, much more of a teal!
  • Place crystals here and there :-)
  • Leave for at least a couple of hours to let the solvents from the TG evaporate off before placing behind the glass in the frame.
I took the photo without the glass, to avoid reflections.  My friend is very happy with it and will let me know if her daughter likes it ...... fingers crossed :-)

Thursday, 12 June 2014

Father's Day cards

Two Father's Day cards today :-)


They are both quite simple, the top one has patterned paper from a 6" pad matted over brown cardstock onto a kraft card blank.  Then I used a Sue Wilson die for the topper and added a peel-off sentiment.
The second card has half of the front cut away (shortfall card??), some freebie magazine paper from Making Cards and a stamped & coloured image which is from Crafty Individuals, I think.

Sunday, 8 June 2014

52CC - week 23, aqua & yellow

The prompt for week 23 is a photo, predominately aqua and yellow.  Now, yellow isn't really a colour I am fond of, and certainly I don't see it as a Christmas colour, so I did a birthday card and a get well card instead.  I decided to go with using inks, after seeing an example on UKS from one of the other participants (thank you Silver Tiger!)


The get well card was inspired by something I found on Pinterest, here.  Simple stamping and some scored lines to add interest to the white space :-)

For the birthday card, I revisited the embossing resist technique, stamping & embossing the flowers in white and smooshing distress ink over in Peacock Feathers, squeezed Lemonade and Salty Ocean.

I won't say they are my favourite cards ever, but they are acceptable :-)

Thursday, 5 June 2014

40th Birthday card

Picture the scene.  DH comes in from work with:  "It's P's 40th birthday on Monday".  Well, it's Thursday evening, so I have plenty of time.  Then the penny drops ...... DH has a semi-regular Friday evening with our friends P & S at their home and this Friday is going to be one of them.  So what he actually means is that he needs to take the card with him when he goes on Friday ....... I actually only have the remainder of Thursday evening, after dinner, to complete the card.  Eek!

But all is not lost - I have a box full of semi-prepped card bases and there must be one I can finish off as a masculine 40th birthday!


And here it is :-)  I had actually almost finished it previously, but was stuck on the final extra little topper.  Turns out that a nice 40 is just the thing it needed!  The papers are from a MME 6" paper pad and the lace edge border is a Dienamics die.  The numbers are Thickers.  I think it works as a male card even with a ribbon on :-)

And the moral of the tale ..... Be Prepared!  LOL.

Wednesday, 4 June 2014

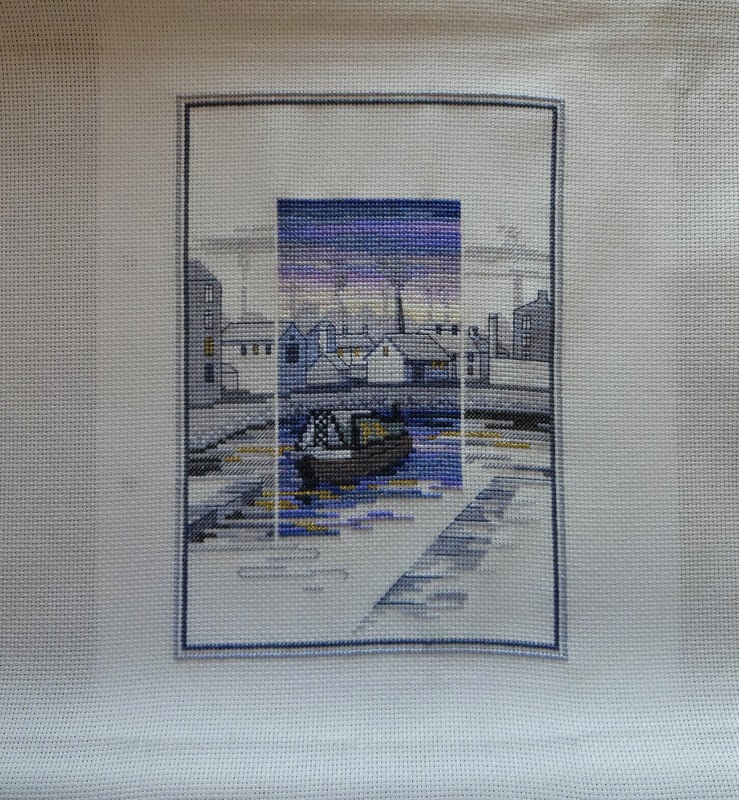
Cross stitch UFO - finished!

I bought three of these Sunset kits, by Derwentwater I believe, several years ago at a stitching show in Brighton.  They have each taken about three years to complete, not because they are large ..... or difficult ..... but because I lost enthusiasm very quickly on each of them.  I even bought three frames, framed the first two and put all three frames on the wall so the empty one would act as motivation!  Didn't work ...... :-)

But finally I have finished, here it is:


Here are all three in their long-awaited glory - difficult to photograph because they are on the stairway wall, so I can only get the width of the stairs away from them to take the picture!  But I think you can get the idea :-)


There are several more in the same series and they are all lovely.  But for me, three is enough :-)  I have many, many UFO cross stitch kits, so it's on to the next one!