A blog for cooking and crafts

Tuesday, 21 October 2014

Buy it & Use It - Birthday and Thank you text dies

Last week, I shared this card, made using the Memory Box Christmas text die.  I have now bought the Happy Birthday and Thank You dies from the same range, they arrived in the post yesterday.  There is also a Best Wishes available, but that's something I would hardly use (if at all!), so I will refrain from getting that one :-)


The papers are from two different Authentique 6" paper pads.  I ran the Thank You through the Bigshot using a spotty embossing folder to see how it would turn out, but I left the Happy Birthday plain.
I really like these dies, I can see them being very useful :-)

Monday, 20 October 2014

More quotation cards

Oooh, I am late with my Blogtoberfest post today!
These cards were semi-prepped, with an inked/stamped background mat and an ATC blank given the same treatment and used as a topper.  I can't remember what brand the quotation stamp is.


I just needed to add a sentiment, so I went for two different birthday stamps (Stamping All Day) and a thank you (Tinchies).

Sunday, 19 October 2014

Christmas preparation: Cranberry Vodka

Last year, Tesco had punnets of cranberries at a reduced price, down from £2 to 25p, so I bought six and popped them in the freezer.  Three months ago, I started this cranberry vodka off, so it would be ready for Christmas.  Although I have used other fruits in vodka before, I have never tried cranberries so only used two punnets - didn't want to waste too much vodka on an experiment!  I usually wing the amounts but this time used an actual recipe (!) from the Waitrose magazine, it doesn't appear to available on their website anymore, so I will type it out here.

Cranberry vodka - original recipe with my adaptations in italics

200g cranberries
1 orange
200g caster sugar
500ml gin - I used vodka

I doubled all quantities
  • Prick the berries to allow the juice to run - I mashed them about a bit with a fork
  • Divide between two 500ml sterilised bottles - I used two x 1 litre preserving jars
  • Peel thin strips of zest from the orange and divide between bottles - I missed the orange out completely
  • Mix vodka and caster sugar, stir until sugar is dissolved, then divide between the bottles.  Make sure to leave a 2 - 3cm gap at the top of each bottle
  • Store bottles in a dark place for at least 2 weeks but not longer than 6 months, shaking them every couple days to infuse - I left mine for 3 months, so I have time to make more for Christmas if it turns out well
  • The recipe ends with: Label before giving as a gift - I don't think it's a great idea to give people vodka with the berries still in it, so that's why I use preserving jars and this is how I continued the process. 
  • Strain jars of vodka through a sieve into a large jug, in stages.  Discard cranberries.  Transfer vodka into a smaller jug for pouring into decorative bottles (washed and sterilised), don't fill the jug too full at a time so that pouring will be more controllable!  Place a muslin strainer or a tea strainer over the top of a small funnel and pour alcohol through this into the bottle.  You will need to rinse the muslin or strainer several times to get rid of sediment from the berries.
The jars:


The finished product:

We did taste a bit ..... well you have to ..... and it is a little tart but not too much so, it is absolutely gorgeous.  Tomorrow I will be buying more vodka :-)

Saturday, 18 October 2014

Pin-spiration: colour block card

Another Pin-spired card today :-)  The original Pin is here and this is my take on it.


I had a rummage through the half-prepped cards box (now doesn't half-prepped sound better than half-done??) and there was this card with just the background done.  I found the rest of the 6" paper pad - possibly My Minds Eye? - the pad cover has become separated.  The three different yellow papers were cut into a square and two sets of two strips, then attached to a square piece of cardstock, which I then close-cut to fit the shape made by the blocks.  The sentiment stamp was free with a card making magazine recently, I believe it's Lily of the Valley and the border stamp is from an old (and mostly unused!) Inkadinkadoo set.

Friday, 17 October 2014

Chocolate birthday cards

No, not real chocolate ...... LOL

These were started off a while ago, I made an inked/stamped A4 background and cut it into mats for two A6 cards and one square one.  Then I stamped the quote(from Paperartsy) onto an ATC blank and inked/stamped around the edges.  After attaching the topper to the card, they were left in need of a sentiment, but instead have been in the semi-finished card box for a couple of months.  The sentiment on the square card is, I think, from Hobby Art, the other two are from Stamping All Day.  I also added the banners to the square card to 'balance' it more and because I had raised the topper on 1mm foam, it was easy to slide them underneath :-).


I really must have a good rummage through the semi-done cards box, to see if more inspiration strikes!  In the meantime, I am rather pleased with these :-)

Thursday, 16 October 2014

Throwback Thursday - Spots & Stripes

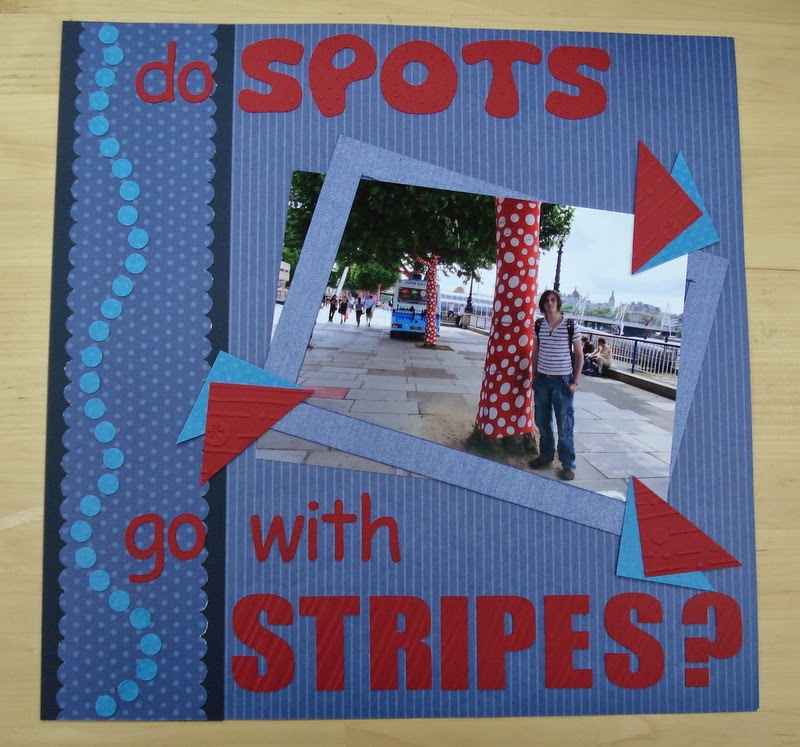
For today's Throwback Thursday I have chosen this layout from 2010.  DS1 is pictured somewhere in London where there were a lot of decorated tree trunks.  I liked the way he was leaning against the spots in a stripy t-shirt!


I used stripy and spotty papers, cut the title on the robo and then embossed the letters with stripes and spots.  As I remember, the asymmetric frame came from the need to hide an object in the photo and one of the triangle pennants was to hide a mistake, the others were to balance the design ......  I embossed those with stripes and spots as well :-)

Wednesday, 15 October 2014

Cross Stitch in Progress

I thought I would chart the progress of my current cross stitch project.  So far I have been stitching this for 10 - 15 minutes in the mornings before work, plus I was able to get a good couple of hours in at the crop.  There are nine different trees all together, with some 'snowy' ground beneath them and a lot of snowflakes swirling around them.  I have completed one tree so far and am working on the second :-)  The original chart has letters in the tree trunks spelling 'Welcome', but I didn't like that.  It is quite a long and thin design, about 18" x 6" so will fit nicely above a window.


The lighting is not very good, the trees are actually a deep green, not almost black as they appear here!  Hopefully it will be completed in time for Christmas :-)