A blog for cooking and crafts

Tuesday, 30 April 2013

Beat the Christmas Rush - April


But what happened to BtCR March, I hear you cry?  Ahem.  Actually these are the cards I made for March - but never got to photographing and subsequently uploading LOL.  So now they are all ready for BtCR April!
One of my favourite quick designs, a simple nine-patch card.  I used a scalloped square punch to echo the scalloped card blanks and some Craft Creations snowflake papers in pale blue and white.  The letters were robo-cut (font: Cairo) from Bazzill (not sure of the colour, possibly Typhoon).  The frame is done with peel-off lines, groups the squares together nicely.
The key to success with this design is to line up the squares precisely, or it just doesn't look right!
Posted by Picasa

Sunday, 28 April 2013

Decorated picture frame


You may remember this layout of my nieces from a few posts ago, which I made from the mystery kit at the Trip Down Memory Lane retreat.  It's now in a frame!

I bought a 12" wooden box frame from The Range and sprayed it with Cosmic Shimmer spray in Patina - absolutely gorgeous colour, but the frame (plus the small test piece I did) used nearly the whole bottle.  I have used Glimmer Mist on similar projects before, it seems to go further, but then again maybe that explains the price difference LOL.  Anyway, I have bought two more bottles of Patina as I love the colour so much!

I stamped a leafy flourish, a sprig of leaves and a flourish all around the frame in three shades of Stazon.  One of the corners hadn't taken the spray very well as the grain was quite dense in that spot, so I covered it and the other three corners with a mosaic tile.

Job done, or so I thought, but as I was handling it to put the picture in,  I noticed that the mica from the spray was coming off on my fingers.  I sealed the frame with a coat of Mod Podge and that has seemed to do the trick.
Posted by Picasa

Monday, 15 April 2013

UKS Spring Blog Hop - Stamper's Delight project

 
Welcome to the UKS Spring Blog Hop!  If you have come to me from Barbara, you're in the right place, and if you have dropped in on me directly, here is the full list of participants for you to follow.

My project is a 12 x 12 background, using nothing but stamps and inks.  I started with a 12 x 12 sheet of cardstock (Stampin' Up - Very Vanilla).

Stage One

Apply distress ink all over the sheet, first Antique Linen, then Tea Dye.  It doesn't need to blend perfectly, splodgy is fine.

Stage Two

Take a crackle stamp, ink up a circular patch of it in Versafine Toffee and apply randomly over the sheet, leaving gaps.  Try not to leave too many hard edges, but don't worry about the inevitable few as they will disappear by the time the background is done :-) 

Stage Three

Next comes the splatter - I used a Paper Artsy cling mounted stamp for this, holding in my hand rather than using a block.  Apply the stamp randomly all over in two colours, overlapping the crackles in some places, especially over any hard edges, and remembering to turn the stamp as you go so your splatters are not all the same :-)   First use Versamagic Gingerbread - my inkpad is new and so the first impression was quite dark, so I made a second and then third impression with it before re-inking. Then
I used Memento Peanut Brittle.


Close up of the crackled and spattered bottom right corner.

Stage Four

Take distress ink Brushed Corduroy and blend from the edges, to a little way in.  Then use a flourish stamp - I used Hero Arts Leaf Flourish - and apply around the edges in distress ink Aged Mahogany.  Stamp part on and part off the edge, turning the stamp to get different aspects of the flourish around the sheet.

Close up of flourish stamping on bottom left corner.


Stage Five (last one!)

Choose a corner motif stamp - this one is Clockworks from Stampendous - and stamp in the bottom left corner using distress ink Tea Dye.  In the top right corner, use a smaller motif on the same theme - I used a gears stamp from Katzelcraft.  I also inked up one of the gears on the stamp and added it to both corners in a few places ..... until it looked "right".
Then the final bit of stamping. Still using distress ink Tea Dye, take a couple of small flourish stamps - I used two from a Waltzing Mouse set - and go around the edges again, between the Aged Mahogany stamping, in any bits you feel need a bit more "filling up".  And there it is - done! 

Close up of the finished bottom left corner.


These are the stamps and inks I used.  The beauty of this technique is that you can do anything you like with whatever you have :-)
Edited 09:16 am - UKS prize draw details
If you want to be in with a chance to win a random draw for a £25 gift certificate to the sponsor of your choice then:
 visit each blog on the hop during the Hop Day (15th April 2013, 00:01 to 23:59)

  • comment, making sure to include your UKScrappers name
  • go to the thread in General Scrapping and reply to say you have completed the hop.
 We all know commenting can be tricky - Blogger in particular doesn't always cooperate! If you find you are unable to comment on up to a maximum of three blogs, you can note them in the forum post and still be in with a chance on the draw.

Next on the hop is Carole - hop on over!
Posted by Picasa

Wednesday, 10 April 2013

52 cards challenge - week 13


I am still catching up with the 52 card challenge ...... those three weeks of being ill and recovering have really put me behind!  I still have 14 and 15 to do before next Monday - eek!
The prompt was to take inpsiraiton from something online or something around you.  I have files full of ideas clipped from magazines so decided to flick through those.  The last photo is what I chose - a design by Glenda Waterworth for Craft Stamper, using their freebie stamp.  I did mean to do a straight copy, especially for the Christmas one, but things evolved during the making, as they so often do :-)
As you can see I am still on the aqua/white/silver theme!  The birthday card has two embossed aqua panels, with the join hidden by ribbon, matted onto silver.  The butterflies are punched, as are the squares and the ovals on the sentiment tag.  The tag itself is die-cut and matted onto white. I added a pearl to each butterfly.
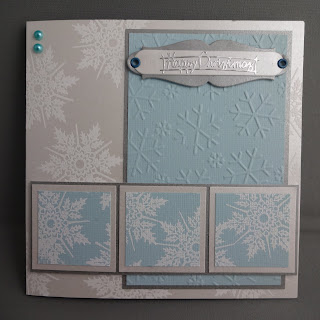
The christmas card has the snowflake stamp heat-embossed in white all over the base card, and I also heat-embossed it onto the punched aqua squares, which were then each matted onto white and all three went onto one silver mat.  The aqua panel is embossed using a snowflake embossing folder and again matted onto silver.  The sentiment tag is done with two dies and a peel-off - and two eyelets!  I have so many of those to use up ...... :-)  Two pearls went into the left corner for balance.
I think these are my favourites so far :-)
Posted by Picasa

Tuesday, 9 April 2013

ATDML retreat - mystery kit page


I have just spent a fabulous weekend at the A Trip Down Memory Lane retreat in Suffolk.  This layout is from the mystery kit provided - the challenge is to use only what is in the kit, plus one extra sheet of cardstock in the colour of your choice, plus inks and stamps.  The photo is a bit wonky as I just could not get the thing to stand up straight!
I don't know what the papers were, the kit had three patterned papers plus one sheet of cream cardstock.  I chose brown as my additional cardstock, though really all I used it for were some of the punched fronds around the flowers!  Yes that's right .... I said  *flowers*.  Since the picture is of my nieces and I am going to give it to my in-laws, I can use flowers with no qualms :-)
I used a MS punch around the page set to create the panel behind the photo and cut around the swirly bit of the base paper to slot the photo into.  Then I started on the flowers..... They are stamped with a craft stamper freebie stamp, and then all cut out and their edges inked.  Some are stamped on the third sheet of patterned paper, which was turquise with brown spots, some are on the cream cardstock and the pink ones.... well those are also from the cream, but I smooshed pink ink over it first :-)  Then I punched out fronds in brown, but then decided that some of them looked better in cream, so just stuck the cream punch-outs over some of the brown ones, giving a slightly shadowed effect to them.
The base paper originally just had the aqua border around the cream scalloped central square, but I added swirly stamps in brown, pink and turquoise all around the edges.
My in-laws will hopefully love it ..... now all I have to do is to paint the frame for it to go in ..... LOL.
Posted by Picasa

Tuesday, 2 April 2013

52 Cards challenge - catching up with week 12


Since the prompt for week 14 has gone up today, I am a little behind......

The prompt for week 12 was to use a small card blank, so I dug out a pack of 4" x 4" blanks that I had bought at a craft show and never used - they are so badly cut and scored that they aren't square when folded!!!  So I trimmed them down a little to square them off, which resulted in a 3.75" card (approx).

They are essentially the same card - a square of embossed aqua cardstock framed in silver, the birthday card is matted onto silver pearlescent and the Christmas card has a frame of peel-off lines.

I stamped/embossed and punched out the Happy Birthday (Tinchies) and die-cut the doily circle (Dienamics).  The mat was embossed with a retro circles embossing folder.  Then I wrapped the ribbon around the mat before attaching to the card and was going to tie a bow, but the ribbon refused to co-operate!!  So I stuck it as a straight strip and added a separate bow on top.  I had torn the base card slightly when first attaching the assembled topper, so there are a few crystals down the side to hide that LOL.

The Christmas card has a snowflake embossed mat, I die-cut the white snowflake (Marianne die) and punched out the scalloped and plain ovals with two Stampin' Up punches.  The sentiment is an oval peel-off.  I added aqua pearls at each corner ..... if you are thinking that's to hide the not-so-perfect corners .... you're right :-)  Then I added a few tiny crystals to the snowflake.

I do like this combination of aqua and white amd will definitely be doing some more.
Posted by Picasa